


I will not get tired of saying it, vinyl is a very grateful material because it is quite simple to install (you can see how to do it correctly here) and it is also cheap and durable. I have already done quite a few things with this material but I had not yet dared to cover furniture with vinylso it was time to try it, don’t you think?
Some time ago I decided to clean up the family home and from time to time I bring a piece of furniture home to see what I can do with it (for example this chair). In general, they are not pieces of furniture that have a great economic value, but they do have a lot of sentimental value since I have grown up with them.
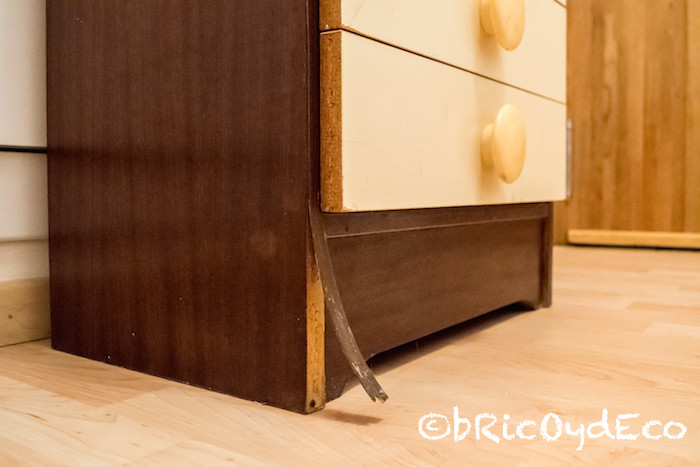
On my last visit I took this bedside table from the early 70’s, it’s melamine but shiny, like glass. In general, it was in fairly good condition, all the flaws it had were aesthetic since the edging on one side had been raised and two drawers were missing. Also the front of the drawers had yellowish stains.
At first I thought about painting the bedside table but I was hesitant with the “glazed” melamine, I wasn’t quite sure how it would look even with primer. I was also clear that I wanted it to be white but I also had doubts about whether I was going to get the same shade of white both in the dark part and in the front of the drawers without having to apply layers and layers of paint. In short, I remembered my closet and its doors lined with vinyl and I said to myself, why not cover it with vinyl? After all, this table was the perfect candidate since it has straight lines and lacks reliefs and decorations.
To cover the bedside table I used the following materials:
– 1 meter of 1.23m wide matte white vinyl. The vinyl I used is from Vinilosametros and it costs only 6 euros per meter (plus VAT).
– A spatula for vinyl application, although a cloth is also suitable.
– a sprinkler spray with water and a drop of detergent.
– Nail scissors and/or a cutter.
The steps i followed to cover a piece of furniture with vinyl were the following:
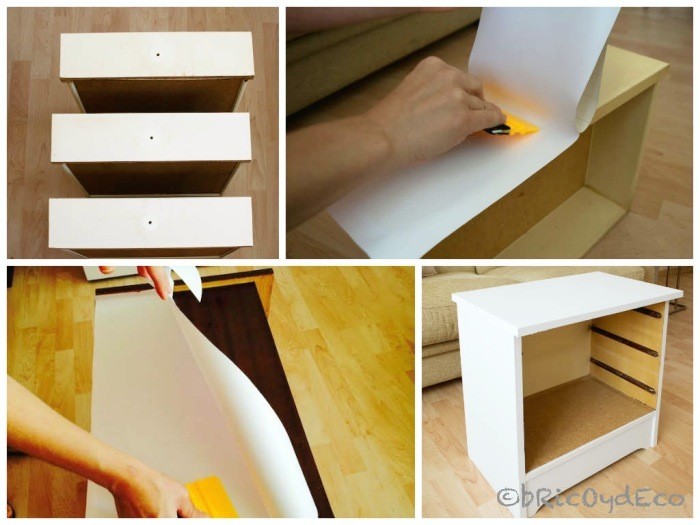
1st.- I repaired the deteriorated edging of the tablefor this I used edging tape that I had at home (any color will work because it is hidden with the vinyl). It is very important to repair all the imperfections that the furniture has before covering it with self-adhesive vinylsince you have to keep in mind that vinyl is like a second skin, if the furniture has a bulge or a chip, when you cover it with vinyl it will be noticeable (for chips you can apply putty and sand until the surface is even).
2nd.- I cleaned the table with rubbing alcohol. It is important for the good adhesion of the vinyl that the furniture is free of dirt, dust, grease…
[magicactionbox id=»5642″]
3rd.- I removed the drawer pulls. I will explain the step by step of the shooters later.
4th.- With the sprinkler I sprayed a little water on the furniturein this way we can stick and take off the vinyl to rectify its placement and avoid bubbles.
5th.- I cut the vinyl pieces to size plus a 1 cm margin on each side. For example, the front of the drawer is 45 cm long, plus almost 2 cm for the edges, so the piece to be cut would be 51 cm long (45 cm + 2 cm right edge + 2 cm left edge + 1 cm lateral right + 1 cm lateral left).
In this way I started lining the front of the drawers and continued with the sides of the table, leaving the upper part and the front plinth for last. In a couple of hours I already had the table fully covered.
The part with the handles was more laborious (it almost took me as long to make as the whole table), but I think the end result was worth it.

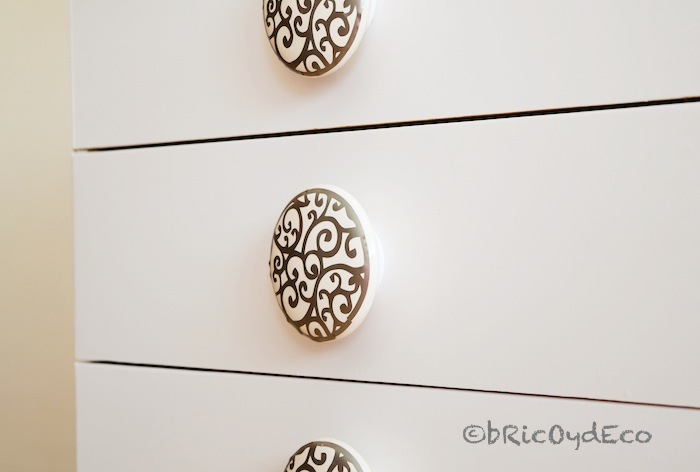
The table handles were made of plastic and were yellowish, I could have changed them for others, period, but they seemed very original both for the size and for the mushroom shape They had. I really think they added a lot of personality to the bedside table, it gave it that “different” touch.
The first thing I did was paint the handlesfor this I took advantage of a special varnish-enamel for metals that I had at home (the one that is usually used for balcony railings), since in the instructions for use it indicated that it was suitable for any surface.
I then searched a design to cut out with vinyl and stick it on top of the handles. For this I used stainless steel effect vinyl.
I have to warn you that it was quite laborious to place a vinyl with a design with such flourishes on a handle that was also not flat, but convex. After sticking and peeling several times because the vinyl did not adapt well to the shape of the handle, I decided to make a small cut and “splice”. In spite of everything, I think that the final result has been quite good, nobody would say that it is the same shooter, right?
In the following image you can see the fully vinyl lined nightstand and with the drawers placed. Achieving this look cost less than 10 euros (vinyl + proportional cost of other materials that I already had at home), with paint I would have obtained a similar result but at a higher price (several coats of primer, plus several coats of paint) and of course it would have needed much more time (drying between coats).
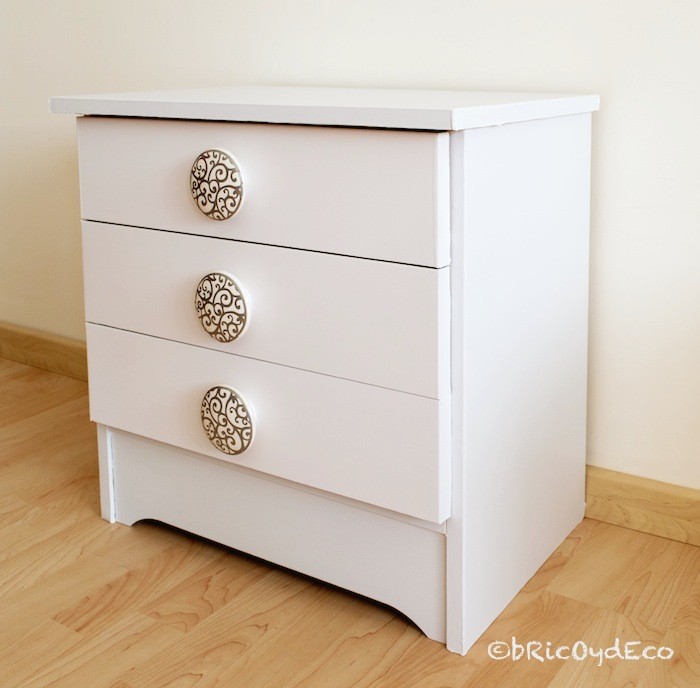
As I always tell you, for this type of work you have to use a quality vinyl. The vinyl that I have used has not only managed to fully cover the dark color of the bedside table, but I have also obtained the same tone for the drawers (which were light). In addition, it must be a vinyl that resists daily use and can be cleaned (I cleaned the table with furniture cleaner as soon as I finished covering it).
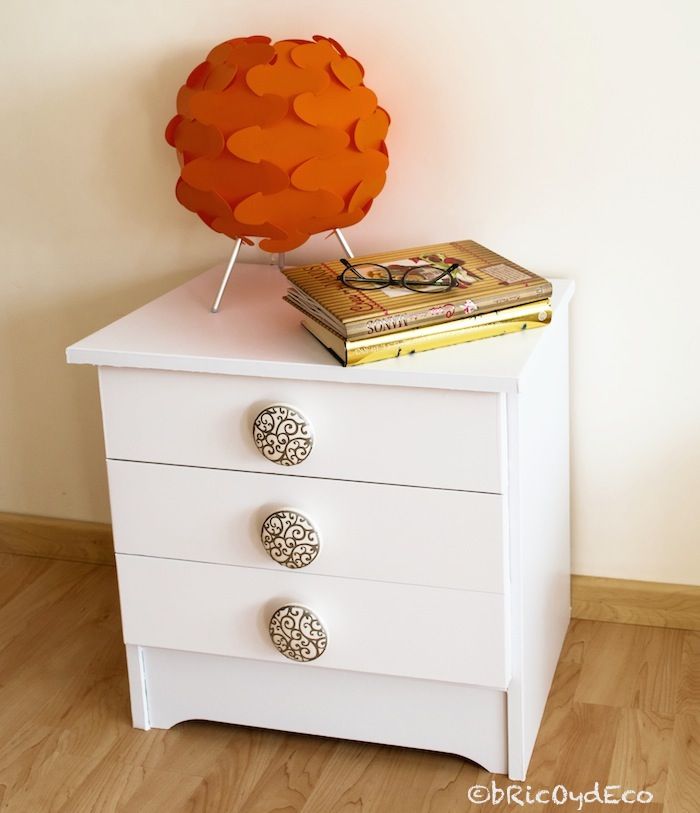
It seems unbelievable that it only took just one morning for this transformation, looking at her now, nobody would say that she is over 40 years old.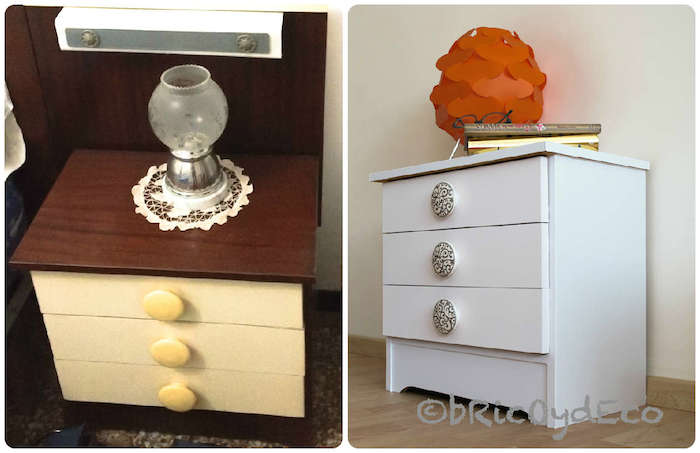
What did you think of this “before and after”? are you going to encourage cover furniture with vinyl? It is a quick and cheap way to give your old furniture a second chance, I am certainly not going to stay here, at least I will cover the pair of this nightstand and the matching chest of drawers.


