

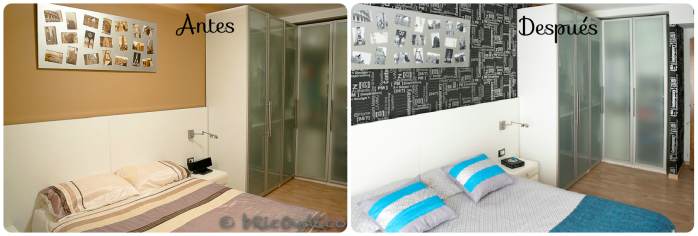
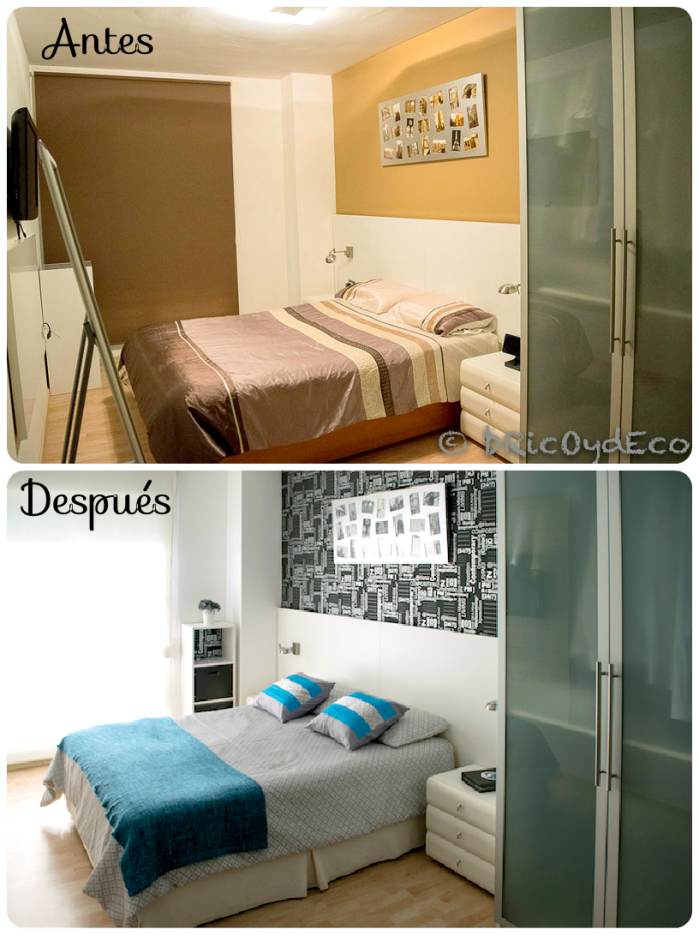
Last August we started update the bedroom. Little by little we have been renovating some details to give another air to the decoration and we have also solved different functional problems, all with a very tight budget. I hope this before and after bedroom I give you ideas for low-cost updating of your decoration.
reuse the space
Our bedroom has a rectangular floor plan of 2.70 meters wide by 5.35 meters long and since the bed is 2 meters long, the passage that remains is not very wide. Before, we had a mirror next to the door with shelves at the back and a chest of drawers next to the window. Both pieces of furniture further shortened the width of the room since the mirror forced you to go around it if you wanted to go to the window and the chest of drawers left little free space with the corner of the bed.
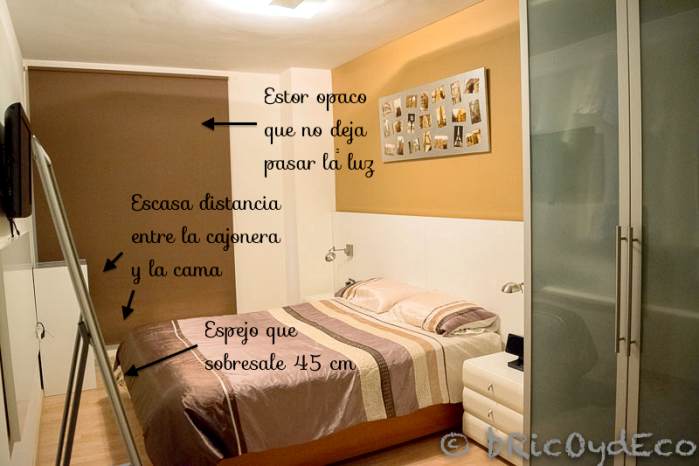
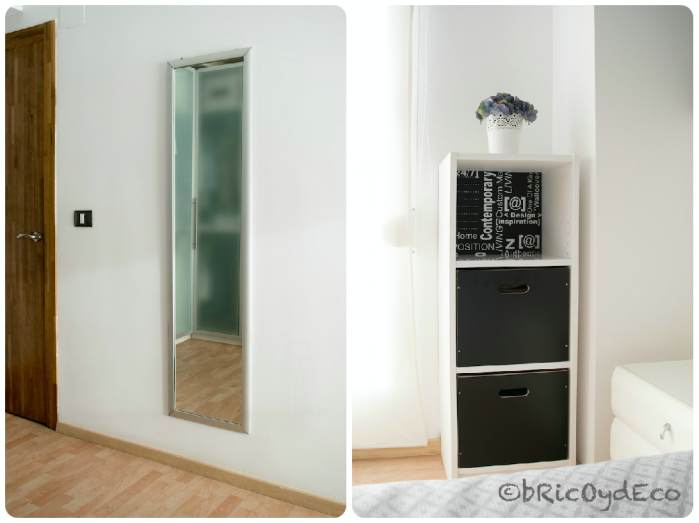
The solution was remove mirror backing and hang it directly on the wall, in this way it continued to have its function but did not take up any space (before it protruded 45 cm). I also eliminated the chest of drawers and placed it between the blind and the pillar a bookstore with less depth that I tuned myself (you can see the before and after here). In this way, I did not lose storage space but completely cleared the wall in front of the bed, leaving that corridor free.
gain luminosity
I had changed the blind not long ago but when I bought it I didn’t realize it was opaque (I discovered it when it was already installed). The fact is that a lot of light enters the bedroom, I need a blind that filters it out, not completely removes it. If I lowered the blind, the room would be dark and I had to turn on the light, but if I left it up, all the sun came in and I also lost privacy.
Since I didn’t want to go through the expense of buying a new blind, what I did was replace the material of the blind, in this way it took advantage of the mechanism that it already had. To do this I cut out the opaque fabric, sewed a rectangle of canvas fabric, put self-adhesive velcro on the upper part and on the blind bar and glued it. The canvas is a fabric with a good quality/price ratio, it is quite resistant and also filters the light perfectly. It didn’t cost me anything since the canvas I used was from an unused curtain that had been stored at my parents’ house for some time.
Only with this change, the room already seemed different, much larger, also I could finally take advantage of all the natural light from the window and preserve our privacy.
Wallpaper for the head of the bed
The header wall it was painted a shade of brown that I had grown tired of, so I wallpapered it with black wallpaper with silver lettering. I was afraid to use such a dark paper and that it would “eat” the room, but the truth is that I think it has given a high decorative value to the bedroom and also creates a nice contrast with the white headboard and furniture. I also used this same paper to wallpaper the wall next to the wardrobe and the back of the bookcase that I showed you before.
The cost of the wallpaper I used was approximately 25 euros.
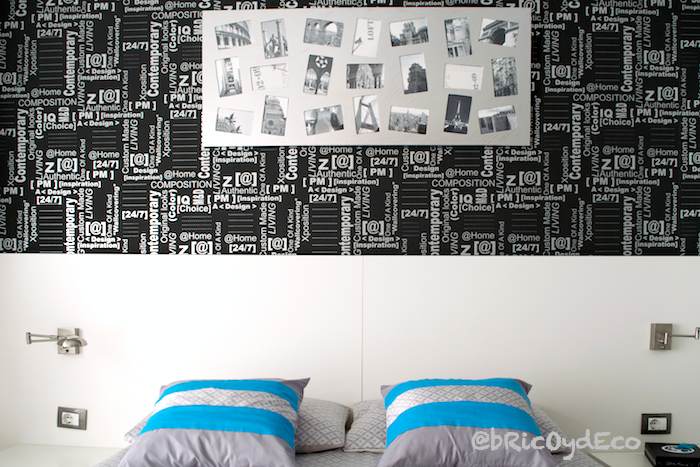
On the other hand, the head frame de la cama is a compilation of photos that my boy and I have taken on our travels. The only thing I did to update it was change the sepia-toned photos to the same black and white ones to make it more in line with the tones of the wallpaper. I don’t remember exactly the cost of the digital copies but I think it was less than 5 euros.
Restoring bedding
By changing the predominant tones of the bedroom from whites and browns to black and grey, I also had to update duvet cover. Since I had no intention of spending a fortune on bedding, what I did was buy the fabric and use the back of the cover that I already had (you can see the step by step here). The fabric of the new duvet cover cost me 6 euros per meter (double width) as it was a rest of the series.
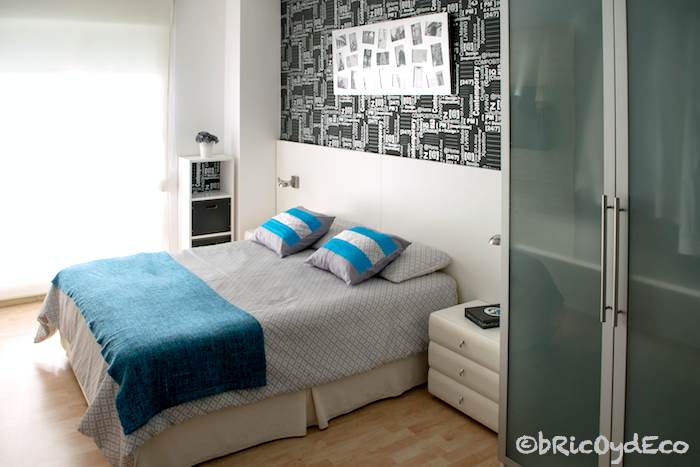
I also added some details Turquoise Color to break the monotony of the predominant neutral colors and create a bit of contrast. The advantage is that they are such specific details that if I get tired of them I just have to change them for others: orange, green, purple… any of them would go well with the white, black and gray palette.
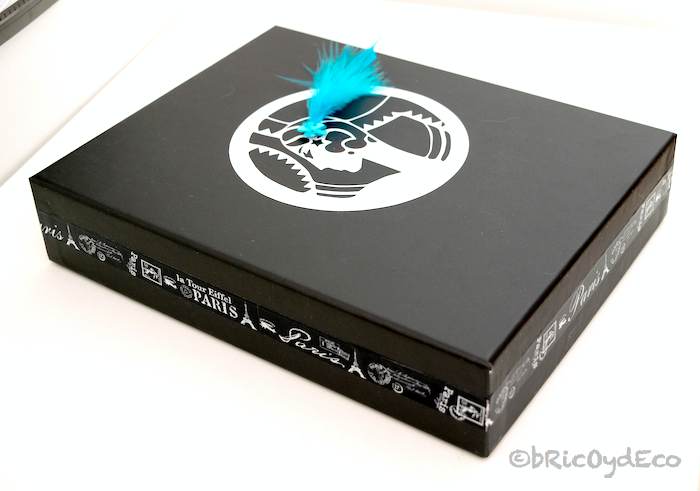
For example, this box on top of the table I tune up in a moment by adding a ribbon to the edge, a white vinyl on the lid and a turquoise feather that I can change for another tone in the case of changing the contrast color.
changing the lighting
Before, the ceiling had a chrome plafond with acid-etched glass panels. Although it was in perfect condition, it was cold so we decided to change it for a ceiling lamp with ivory fabric shade (in the same tone as the blind) and bordered with a gray organza ribbon.
We put the ceiling light we had up for sale and with what we got we paid for the new ceiling lamp, so the cost of this change was zero.

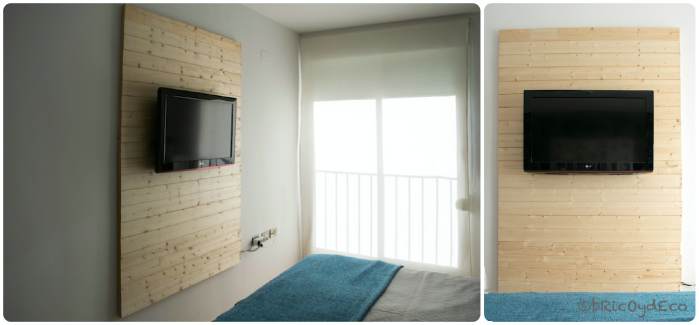
Hiding the wires
A few weeks ago I published the step by step of the wooden panel we made to hide the TV cables (they ran diagonally to the plug). An economical solution (the wood cost about 15 euros) that did not take up space in the small passageway between the bed and the wall. In addition, natural wood has added that touch of warmth that cannot be missing in a bedroom.
What did you think of the before and after bedroom? As you can see, a large budget or large changes are not necessary to renovate and give a different touch to a room. Taking advantage of fabrics I have renewed the blind and the duvet cover, moving some furniture to another place I have gained space, with the wallpaper I have achieved a great decorative effect… With a low cost budget (about 60 euros, what does a duvet cover cost?) and a little bit of skill can give the bedroom another air, do you dare?
If you liked this post, please share it on your social networks.


