Is your bathroom like a matchbox and you don’t know how to store everything so that it fits? If so, don’t miss these small bathroom organization ideas. These practical tips will help you make it functional despite its small size. You will see that with a few square meters you can also have a complete and pleasant bathroom.
When we do not have much space in the bathroom, it is essential to have a good organization. For this, there is furniture in which we can store towels, toilet paper rolls, etc., as well as hangers for the walls and organizers to keep accessories close at hand.
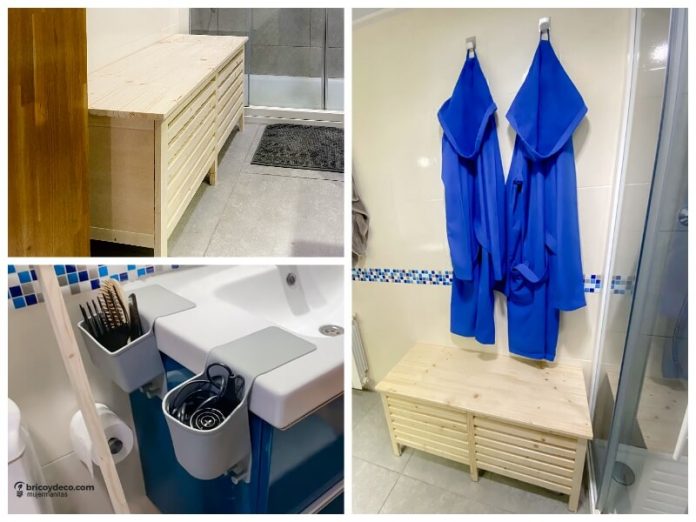
In my case, years ago I recycled a bookcase to transform it into a cabinet for the bathroom. Although it had a lot of storage capacity, its size was disproportionate for a bathroom of just 4 square meters and created a feeling of being overwhelmed.

For this reason, I decided to exchange it for a bench with storage made to measure and reorganize the rest of the accessories using hangers and silicone organizers. In this way I still had storage space, but now it is much more visually clear. In the following video tutorial you can check it:
How to make a bench with storage
A bench with storage It is very practical in the bathroom since, in addition to sitting down while you dry yourself, you can store towels inside, leave dirty clothes, etc. In addition, the space under the legs can be used to store the scale or the shoes.
The materials that I have used to make this custom bench are:
- 12 fir slats 200 x 3.4 x 2.1 cm and 1 200 x 6 x 1 cm
- 99 x 40 x 1.8 cm fir board, 2 pieces of 34 x 29 x 1 cm plywood for the sides and one 99 x 40 x 0.5 cm for the bottom
- SOUDAL T-Rex Turbo Sticker
- wood putty
- angle brackets
- wood screws
- 2 rim hinges
- Matt transparent varnish
- leg studs
For its construction, the steps indicated below have been followed.
1º.- Cut the strips and pieces of wood
First, the slats will be cut to obtain the following pieces:
- 28 of 43 x 3.4 x 2.1 cm for the front and back of the bench
- 4 of 34 x 3.4 x 2.1 cm for the sides
- 6 of 47 x 3.4 x 2.1 cm for the legs
- 2 of 35 x 6 x 1 cm for the central inner reinforcement
- 4 of 35 x 3 x 1 cm for the internal reinforcement of the sides
I used the miter saw for this, but you can also cut them with a handsaw and a miter box.
On the other hand, with the table saw I cut the 99 x 40 x 1.8 cm fir board, 2 pieces of 34 x 29 x 1 cm plywood for the sides and one 99 x 40 x 0, 5 cm for the bottom. An alternative option to the table saw is to use a jigsaw.

2º.- Fix the slats with adhesive
Next, 7 43 cm long slats will be fixed to the 47 cm long central leg and to the two lateral ones. The slats will be placed horizontally leaving a distance of 2.1 cm between them (several guide slats can be used). On the back, the 1 cm thick strips will be fixed to reinforce the union.
To ensure that they are perfectly adhered, the adhesive will be used. Soudal T-Rex Turbo which has the following advantages:
- It can be used indoors and outdoors on porous materials such as wood, but also non-porous.
- It dries in 20 minutes and complete hardening is achieved in just 3 hours.
- It is highly resistant to water and humidity, making it ideal for a bathroom cabinet.
Once the adhesive has hardened, putty will be applied over the joints.

3º.- Screw the sides and fix the rest of the pieces
The next step will be to screw the sides of the bench to the front and back, fix the bottom with adhesive and screw on the overlapping hinges.

4º.- Protect with varnish
Finally, the wood will be protected with a transparent varnish for a more natural finish. In this way, it will be preserved from the humidity that usually exists in the bathroom. In addition, some plugs will be nailed to the legs to prevent the wood from being in contact with the ground and from getting wet.

After all the indicated steps, some baskets will be placed to better organize the interior of the bench and we will be able to place it in the bathroom.

Put adhesive hangers on the bathroom walls
Hooks or hangers are ideal for hanging all kinds of clothes and accessories in the bathroom. To avoid drilling the tiles, the most appropriate thing is for them to be adhesive. In particular, I have used the Inofix adhesive hanger that has a stainless steel base and is perfect for placing on bathroom walls or behind a door. To fix it you just have to peel off the paper and press.

In my case I have placed a pair on the bench with storage to hang the bathrobes and another pair on the radiator behind the door. This way I can hang up the wet towels and take advantage of the heat from the heater to dry them.

Silicone organizers to always have accessories at hand
Wenko’s flexible silicone organizers will help you keep all your accessories close at hand. They have different models and supports:
- Cosmetic organizer with a large compartment to store brushes, cosmetics and other bathroom utensils.
- Support for the dryer that allows you to always have it at hand and hang the plug from one of its hooks.
- The hedgehog is ideal for placing toothbrushes, but also eye pencils or makeup brushes, for example.
- Organizer with mirror to store cosmetics and other bathroom utensils. The built-in mirror allows for touch-ups while you put on makeup or shave.
![]()
Its installation is very easy since it is only necessary to press and they can be removed, cleaned and relocated without leaving any type of residue. In addition, they can be placed on any smooth surface such as the porcelain of the sink or the tile of the wall.

In addition to the ideas above, the following extra tips will help make your bathroom much tidier:
- Every 3 or 4 months review all your potingues and throw away the ones you no longer use or are expired. You’ll be surprised how much space you can free up.
- Use dividers for the drawers, so you will prevent the objects you keep inside from getting mixed up when opening and closing.
- With a piece of furniture with little depth and a mirror you will have storage space, at the same time that the effect of the mirror enlarges the room and gives it light.
- Put shelves near the ceiling and place what you use the least on them.
I hope all of these ideas and tips for organizing a small bathroom get more out of yours. Do not forget that you will find many more guides and tricks on DIY and decoration at
Project carried out in collaboration with Mi Hogar Mejor


