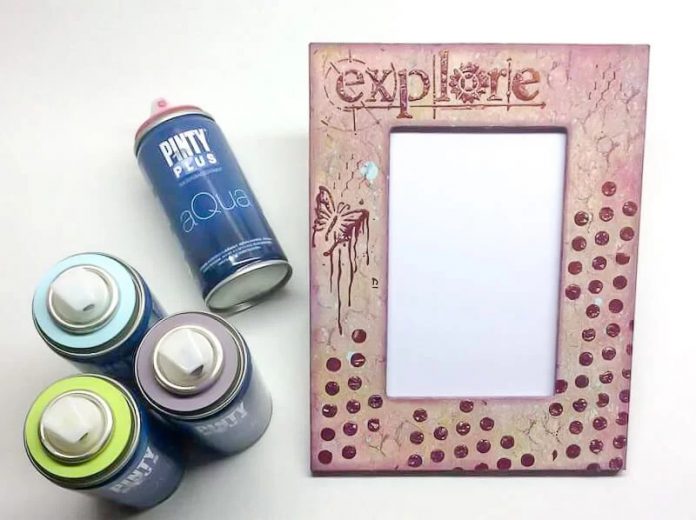
Do you know the scrapbooking technique? Would you like to make a decorative DIY photo frame using this technique? With this tutorial you will learn how to do it step by step from the hand of an expert in scrapbooking: Esther from Scrap, Sí Quiero.
Today we have on the blog a guest post by Esther Molina, co-founder of Scrap, Sí Quiero. Her website was born with the intention of helping people who love Scrapbooking and crafts, to the point of turning her hobby into her profession. This girl, with southern blood, fell madly in love with the Scrapbook and today she is going to take us into this fascinating craft in which the protagonists are paper and photographs.
DIY Photo Frame by Scrap, Yes I Do
Thank you very much Mari Luz for opening the doors of your website and making this collaboration possible.
Photos are part of our lives. With them we immortalize happy moments and we can relive again and again the emotions that made us feel. But, how can photos be incorporated into the decoration?
In this step by step tutorial I am going to show you how you can create original photo frames using scrapbooking techniques and the new Pinty Plus Aqua water-based sprays. Ready to start?
Materials, measurements and tools for the photo frame
The following measures are intended to frame a photo of size 10 x 15 cm vertical. I leave you all the details along with the materials and tools that I have used for the project:
- Gray cardboard (also known as papier mache): 2 pieces of 17.5 x 22.5 cm, 2 pieces of 3.4 x 22.5 cm and 1 piece of 3.3 x 10.6 cm
- Cardstock (brown or to personal preference for the back of the frame): 1 piece of 17.5 x 24.7 cm
- Cardstock (white or to personal preference for the front of the frame): 1 piece of 17.5 x 22.5 cm
- Acid-free watercolor or mixed media paper (approximately 200 gr): 1 piece of 30.5 x 25.5 cm
- Pinty Plus Aqua colors Crimson Red, Ice Blue, Gray Fig and Green Kiwi.
- Seedless Preserves color distress ink and applicator
- Stamp to add texture
- Texture paste and spatula to apply it
- Folder.
- cutter
- Rule
- Scissors
- Masks or Stencils
- double sided tape
- plastic sleeve
- dispenser with water
- White glue
- 1 picture hanger
- cutting mat
- hot glue gun
- hot air gun

Step by Step
Did you know that the Mixed Media is a term widely used in Scrapbooking to define those works that combine multiple techniques? To learn how to apply these techniques and create your own photo frames, you just have to follow the following video tutorial:
On the other hand, these are some advice and recommendations What you should keep in mind when making your DIY photo frame:
- Have all the pieces needed to make the frame cut to the indicated measurements before beginning the tutorial.
- The Pintyplus Aqua water-based sprays are very easy to use. You should apply them about 15 cm away from the material on which you want to paint. Due to their size they are ideal for scrapbooking.
- Distress inks are very versatile. They are widely used in Scrap to create an aged or vintage effect.
After following the steps and tips above, the end result will be what you see below.

Advantages of using Pintyplus Aqua sprays
In this tutorial you have been able to see one of the ways in which you can use PintyPlus Aqua spray paint, but these offer many more possibilities since they can be used in different ways to:
- Paint directly on the paper or cardboard because they do not wet it as much as other paints.
- Apply on stencils or texture paste.
- Mix different colors on water to transfer them to a surface.
- On wood it allows you to speed up the work because they dry very quickly.

Are you one of those who have a lot of photos filed in your computer folder and rarely look at them? Which photos bring back the best memories? I hope this DIY photo frame It will help you to give life to your photos and memories, as well as to enjoy the positive emotions that they will make you feel.
If you want to learn more about Scrapbooking and the wide range of possibilities that this craft offers you, don’t miss the article “What is Scrapbooking and how to make money with it”. In addition, you will find more DIY projects both at , and in the crafts section. Thanks to Esther Molina for this magnificent tutorial and to you for commenting and sharing!


