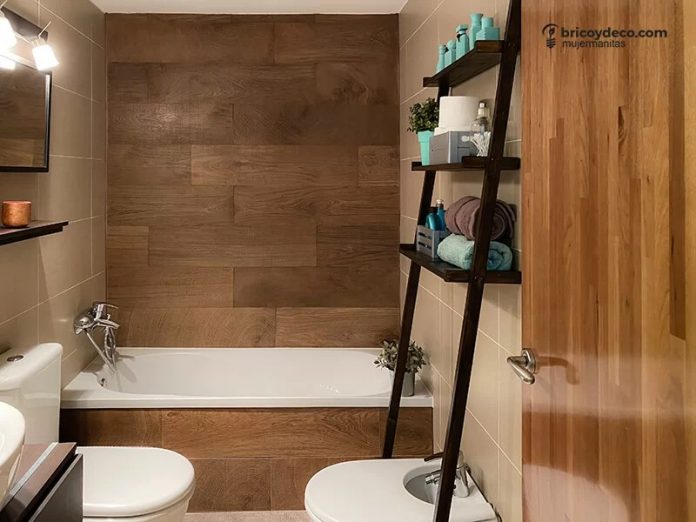
Ladder-shaped shelves are ideal if you need storage space, but you hardly have room in the bathroom. For this reason, they are a perfect solution to take advantage of the upper part of the toilet or bidet. The following video tutorial will show you how to build your own ladder shelf and protect it with lasur so that, in addition to being practical, it is decorative.
A ladder shelf fits aesthetically into most bathrooms. Placed over the toilet or bidet, it adds storage space without disturbing or taking up hardly any space. You just have to support it on the wall and it stays without having to drill the tile.
In addition, it must be taken into account that the bathroom is a humid area, so it will be necessary to treat and protect wood with which the shelf has been built to prevent its deterioration. In the following video tutorial you will see step by step how to build and protect it:
Materials and tools
- 2 slats of fir wood 240 x 3.4 x 2.2 cm
- 1 fir wood board 40 x 60 x 1.8 cm
- Cedria Background
- Cedria Fontin
- Cedria Sol Lasur
- lag screws
- mounting adhesive
- saw
- screwdriver
- Sergeants
- Level
- Brush
- protective paper

How to make a ladder shelf
To make this ladder shelf, fir wood has been used, which is a coniferous wood and is commonly used to build furniture. The steps that have been followed have been detailed below.
1º.- Cut the pieces
First, three shelves 53 cm long and 17, 13 and 9 cm wide, respectively, will be cut. For this you can use a table saw, a circular saw or a jigsaw.
Next, with a miter saw or with a saw and miter box, the two sides of 190 x 3.4 x 2.2 cm will be cut. Both ends must be cut at an angle of 8º so that the shelf rests at an angle on the floor and the wall.
On the other hand, the strips will be cut to be placed on the sides and back of the shelves and will have the following measurements:
- 3 of 53 x 3.4 x 2.2 cm
- 2 of 19 x 3.4 x 2.2 cm
- 2 of 15 x 3.4 x 2.2 cm
- 2 of 11 x 3.4 x 2.2 cm

2º.- Fix the slats to the shelves
The next step will be to fix the slats to the shelves of the bookcase so that they act as a back and side plinth. To do this, mounting adhesive will be applied to the sides and back of the shelves so that:
- The 53 cm long slats will be attached to the back of each of the three shelves.
- The 19 cm long ones on the sides of the 17 cm wide shelf, the 15 cm ones on the sides of the 13 cm wide shelf and the 11 cm ones on the sides of the 9 cm wide shelf.

3º.- Assemble the shelf
The last step will be to assemble the ladder shelf. To do this and with the help of some clamps, the first shelf will be placed 12 cm from the upper edge of the side slats. The second shelf will go 28 cm from the first and the third 28 cm from the second.
It will be checked that the shelves are level with the help of a level and they will be screwed with wood screws.

Protect and decorate wood with lasur
To protect the wood from the humidity of the bathroom, lasur will be used, which is a «open pore» wood protector that penetrates through its pores and protects it from the inside, allowing it to breathe. This characteristic allows the humidity of the wood to be regulated, allowing it to adapt to the contractions and expansions typical of this material.
To do this, first apply Cedria Background which is an impregnating base specially indicated to protect new wood. In addition, it prevents sinkholes and is water-repellent (repels water). In this way, apart from forming an invisible and protective film on the wood, a more uniform finish will be achieved by regulating the absorption of the lasur.
However, the most important feature of Cedria Fondo is the preventive protection against fungi and insects thanks to the insecticide and fungicide component.

Then apply Cedria Fon Tin Coffee color combined with Cedria Sol Lasur. The reason for combining both products is to lower the chosen tone, since a minimum of two layers of lasur must be applied to properly protect the wood. If the lasur has a dark tone as it is in this case, its intensity can be reduced by mixing it with a colorless lasur. In this way, it is lightened without losing its properties or original tone.
It is essential to highlight that, although the lasur is water-based, should never be thinned with water to lighten your tone since its function is not only finishing, but also protective. By lowering it with water, the only thing we achieve is to reduce its properties and impoverish the quality of the product.

On the other hand, it is recommended to apply the lasur with a brush since in this way it is possible to better impregnate the wood and enhance its protective function. In this case, a total of three layers have been applied to obtain the desired tone, which combines perfectly with the rest of the bathroom furniture.

Finally, the ladder shelf will be placed in the bathroom. Being so light, it can be easily transported and placed where it best suits us.

Although its lasur finish is very versatile and combines with practically any style, in this case it has been chosen to place it on the bidet. In this way, the space in the upper part is used without disturbing its use.

In addition, aesthetically it combines perfectly with the rest of the bathroom furniture and accessories.

I hope that this project on how to make a ladder shelf for the bathroom and protect it with lasur inspire you to get the most out of yours. Do not forget that you will find many more guides and projects on DIY and decoration at


