

What things are, it can be said that until four days ago I did not know that the tiles could be painted and look so good. It really is a way simple, economical and without works to radically change its appearance.
When we thought about renovating our bathroom, I began to investigate possible options to renew the appearance of the tiles without having to do too much work or a large financial outlay. Searching the Internet I could see how the appearance of a bathroom or kitchen could be radically changed with just a few coats of paint (and a little bit of skill).
types of paint
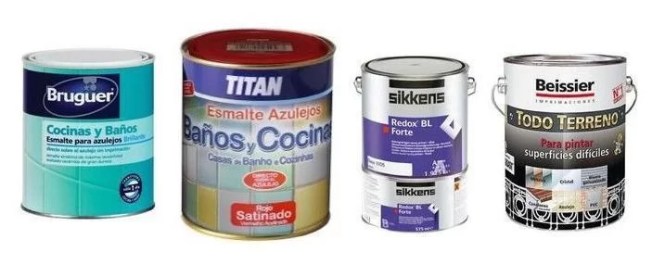
Once we decided that we were going to paint, the next step was to investigate what type of paint to use since there are several options:
- Special enamel for painting tiles. At first it seems the most obvious solution since it is applied directly on the tile (it does not need a primer). Depending on the brand, you can find different finishes (with more or less shine) and colors, although there is not much variety. It is the best option if you don’t want complications, but it is also the most expensive (between €25/30 for a 750 ml bottle).
- epoxy paint. Epoxy paint consists of two components, a highly durable and resistant epoxy resin and a high-performance epoxy enamel. Its use is especially indicated for metal structures (it is the one used in balcony railings), floors (garages for example), concrete walls, swimming pool interiors, industrial installations and, in general, any place that requires painting. resistant and highly durable. It is cheaper than the special enamel for tiles and has a greater variety of colors. On the other hand, it is more laborious to apply since the two components have to be mixed well and the exact amount that we are going to use must be prepared, since its useful life is 8 to 10 hours.
- primer + paint. Another option is to give a coat of primer and paint. Without a doubt, this is the most economical option and the one that can be more decorative since you can apply a wide range of colors and finishes, although in humid areas it would be advisable to apply a water-resistant paint.
before painting
Once we have chosen the paint that we are going to use, it is very important that we take into account the following:
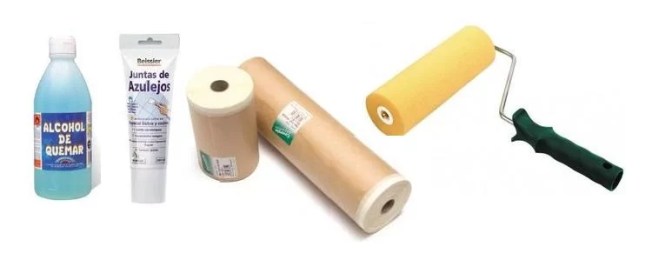
- Cleans tiles very well to remove traces of grease, silicone, lime, etc. For this you can use solvent, burning alcohol or acetone.
- Putty and repair joints since if there is any defect after painting, it will be more noticeable, it will be more difficult to repair them and, even, a joint may skip when the roller is passed.
- Must protect well the area that we do not want to paint or we will need a scraper and solvent to be able to remove the remains of paint (and even then it will not be easy). In the same way, we must also protect ourselves wearing gloves and old clothes that we do not care if it gets dirty. It also doesn’t hurt that we smear with moisturizing creamit will prevent the paint from adhering to our skin and it will be easier to remove.
- To prevent brush strokes or lint marks from remaining, we will buy a zero pore roller medium size and a small one (for ceiling/floor joints and corners), as well as several spare parts. It is also convenient to have a very fine sandpaper to review flaws after the first coat.
- Read the manufacturer’s instructions carefully. It is essential for a good finish. In addition, in this way you will be able to know how much paint you will need as well as the drying times between the different layers and the final drying time.
- Keep the room ventilated since this type of paint is usually toxic and gives off a fairly strong smell. It would also be interesting to use a mask.
paint and color
We painted with special paint for tiles and these were the steps we followed:
- Impregnate the medium paint roller well in the tray and paint from top to bottom as evenly as possible. You have to look at the wall so much in case the paint drips and spread it.
- With the small roller you have to paint the joint of the ceiling and the floor. Also go over the joints between tiles and difficult areas (behind the radiator, next to the door frame, wall lights, etc.).
- I recommend always giving at least two coats of paint. The first coat usually requires more paint than the second since it serves as a primer, in our case we use a bottle and a half for the first coat (1200 ml for about 11 square meters of surface) and one for the second (750 ml).
- It must be taken into account that if any defect when painting (brush strokes, bubbles…) this will not disappear with the second coat, it must be corrected while painting.
- If he roller deteriorates and begins to release fluff or bits of sponge, replace it immediately.
- After applying the first coat of paint, strictly wait the time recommended by the manufacturer before giving a second hand.
- Before giving the second hand go over all imperfections with very fine sandpaper. Then gently clean the wall with a cloth to remove any dust that may have remained from sanding.
- After the second coat, do not remove the bodybuilder’s tape and material that we have used to cover the floor until the drying time indicated by the manufacturer has elapsed, we run the risk of lifting the paint or staining the wall.
- It is recommended do not wet the wall in a few days and do not use abrasive products for cleaning. In addition, it must be taken into account that the drying of this type of paint is from the outside in, this means that although it is dry to the touch and feels compact, the layer that is in direct contact with the tile may need more time to adhere correctly.
I hope that all these tips will encourage and help you if you decide to paint the tiles in your bathroom or kitchen. For us it has been a totally satisfactory experience that I would not hesitate to repeat.


