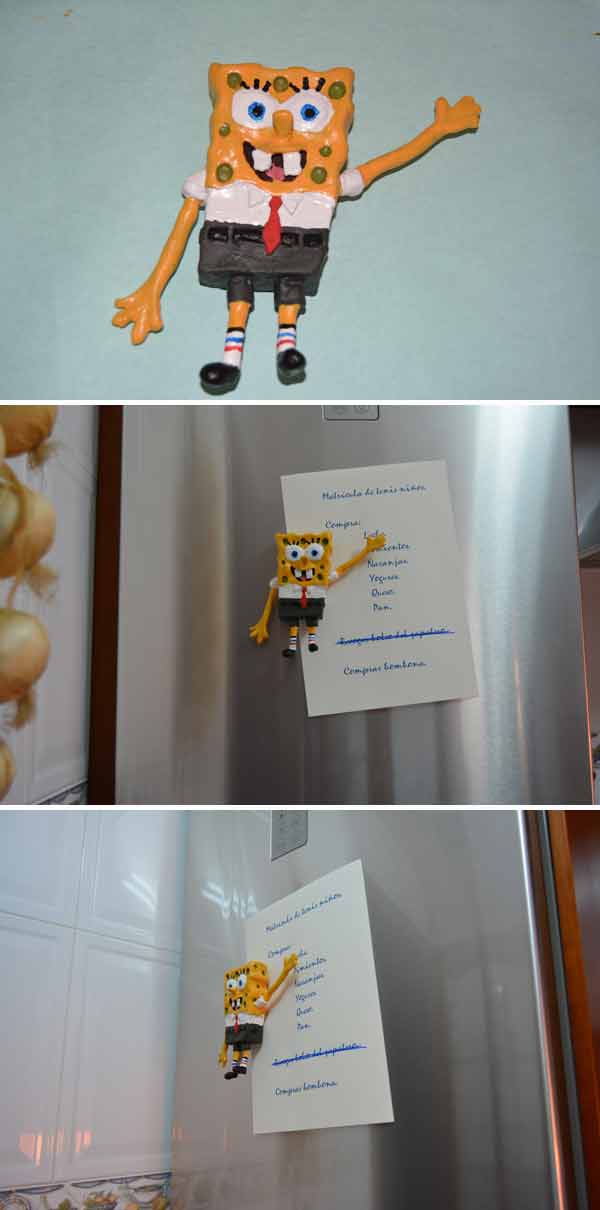
Today we bring a special craft for the little ones in the house. It is a magnetic note holder of the universal children’s character SpongeBob, modeled in 3D with clay.
This craft is very attractive for children. If you have a chance, do it for him, you’ll see how he likes it. To do this, we leave you here the tutorial in which we show everything step by step the process. For greater clarity, we also include, as usual, the corresponding video-tutorial.

Okay. With that said, let’s get started.
Preparing the necessary materials
The first step, as always, is to prepare all the materials and tools. To make our Sponge Bob we will need the following:
- Clay.
- Modeling tools.
- Wire.
- Cutter.
- Pliers.
- Two magnets.
- Brushes and brush.
- Vinilic glue.
- Colorful acrylic paint.

Video-tutorial
The written explanation of a step can be long or even somewhat confusing. For this reason and as “a picture is worth a thousand words”, we include this video so that, when you have finished watching it, you will not have any questions to resolve.
We start with our SpongeBob
Step 1: The first thing we need to do, of course, is unpack the clay.
Once the wrapper is removed, use the cutter to cut a piece of approximately the same proportions as SpongeBob. And, since SpongeBob is not completely square, we give him the same shape.
Step 2: As our SpongeBob is going to be magnetic, in order to stick it and attach the notes, for example, to the refrigerator, it will be necessary to embed a magnet. As the SpongeBob that we are going to make is of a considerable size and clay is a heavy material, we will need to put at least two magnets on it.
Therefore, with the help of pliers, we extract the magnets from their plastic casings.
 We embed them in the back of the clay, and press down to hold them in place.
These types of magnets are the ones used in domestic furniture, and you can find them in any carpentry store, and in hardware and DIY stores.
Step 3: Now we have to lower the whole part of the shirt and pants a little. We will do it with the help of the cutter.
And we smooth this whole area well, with the spatula.
Step 4: With the help of a cylindrical object, such as a thick marker or, as is the case, a wax, we give the entire contour of the upper part a sponge shape.
Step 5: As the arms and legs are very thin, to prevent them from breaking at the first blow, we have to strengthen them. For this we will use wire.
We have to take a piece of wire and fold it in half. Once folded, it should be about three times the width of the clay.
We will turn the wire on itself, joining the two parts. This way the clay will adhere better to the wire.
Now we have to go through the clay, from side to side, with the wire.
We fold it with the shape that the arms will have, and cut the excess.
Step 6: With the legs we are going to do exactly the same but, this time, we are going to give it a T shape at one of its ends. In this way we will be able to join both elements in a solid way, preventing the legs, once dry, from falling off.
We introduce the wire and, once in its position, we turn it ¼ of a turn.
We cut the excess and bend the end to later make the foot.
Step 7: The eyes are very easy to make. We only have to make two little balls, we crush them and join them to the body.
An important thing: The clay, when in contact with the air, begins the setting process, so that after handling it for a while it will begin to dry out.
In order for it to continue maintaining its properties, we must moisten it from time to time, especially when making the joints.
Step 8: We are going to give the mouth great realism and three-dimensionality in the following way. We will draw it with the cutter, we will empty it, we will raise the upper lip a little, and we will smooth its interior.
Then with a piece of clay, we make the tongue and put it in its place.
The teeth, we make them, put them in place and join them with the spatula.
Do not forget to add a little water, so that the joints are made properly.
We will also make a nice chubby cheek for our SpongeBob.
Step 9: Now it is the turn of the pores of the sponge. To make them we will use a pencil and the handle of a brush. Or any other cylindrical object that is an appropriate size.
Of course, we couldn’t forget SpongeBob’s characteristic nose.
Step 10: Now we make the collars of the shirt with two triangles. And we put them in their place.
As you can see in the video, this step is very easy.
With a ball and a rhombus, we will make the tie.
Don’t forget to add a little water from time to time.
Step 11: Now we go with the belt. We make a spaghetti, flatten it, strain it in place, and remove the part of the loops.
Step 12: We will make the sleeves with two cones, which we will nail to the wires, and we will take them to the trunk, where we will join them with a little water.
We will make the arms with two round strips.
For the hands, we will fold the strip on itself, we will flatten it, we will cut the fingers with the spatula, and we will finish shaping it.
Once the arms and hands are made, we will nail them to their respective wires, and we will unite them with a little water. So that they remain in their position, while the clay sets, we will fit them with something.
Step 13: For the pants, we will simply have to make two small cylinders.
To put them in place, we will open them lengthwise with the cutter, insert the wire inside, close and join with the spatula and a little water.
We are already reaching the end of the molding of our spectacular Sponge Bob.
Step 14: The legs and shoes will be made in one piece. We will make them with two cylindrical strips, but one of its ends will be wider than the other. In this way we can mold the shoes.
Once the shape is given, we will proceed the same as with the pants, that is, we will open the back with the cutter, insert the wire inside, and close the clay by wrapping it.
Step 15: Okay, we’re done molding now. Now we will have to leave about 48 hours for the clay to set completely.
Once the clay dries, we have to prepare it to receive the paint. To do this, we will give you a generous coat of pore cover.
For this I will use vinyl glue, diluted with water to approximately 40%.
We apply it with a brush, and let it dry for 24 hours.
Step 16: It only remains to paint our SpongeBob. This step has no mystery, only two notes.
On the one hand, to indicate that it is very possible that some areas do not look good with a single coat of paint, and you have to insist more. For example, to the areas that I have painted in white, I have had to apply two coats.
And on the other, in order to give greater realism, we will apply a darker yellow to the bottom of all the pores.
As well !! We have already finished our SpongeBob magnetic note holder, modeled in 3D in clay.
How about?