

fluid art or pouring It is a fascinating technique that uses acrylic paint and medium to create surprising effects that give rise to striking abstract paintings. Although no previous experience in drawing or painting is necessary, it does require some practice to obtain a beautiful result. Is guide on how to make fluid art It will help you make your first paintings a success.
Fluid art was born in the United States and quickly became popular because it allows the creation of an infinite range of color patterns, cellular structures and unique and unrepeatable designs. For those of us who do not have much skill when it comes to drawing, as is my case, the acrylic pouring It is quite a discovery. Thanks to this technique we can create our own abstract paintings quickly and quite easily.
In the following video tutorial you will find the detailed step by step, as well as tips and tricks so that your first fluid art paintings are a complete success:
How to make your first fluid art paintings
The acrylic pouring technique It basically consists of pouring diluted acrylic paints on a canvas and tilting it until it is completely covered. However, it is essential to follow a series of steps and select the appropriate materials to guarantee a good result.
1º.- Prepare the work area and prime the canvas
The first step will be to prepare the work area, for this the table or surface on which we are going to work will be protected. I particularly prefer to place a plastic and compacted cardboard on top, since it can be cleaned and reused several times.
It is also convenient to protect the lower part of the canvas and raise it so that it does not stick to the protective paper. To do this, you can place bodybuilder tape and fix some corks.
Next, I recommend print the canvas since in this way we will make it easier for the acrylics to slide over the surface and we will improve adhesion once it has dried.
For this I have used CX36 Concrete Latexplast which is a plastic latex Ideal for varnishing, sealing, reinforcing and protecting porous surfaces indoors. Two layers will be applied, leaving half an hour between layers.

2º.- Dilute the paint with medium
All the colors in our painting must be diluted so that they can flow more easily on the canvas. To do this, we will use a medium or medium that is an additive that is added to the paint to make it more fluid and prolong the drying time, but without altering the intensity of the pigment.
As a medium I have used Floetrol that allows the colors not to mix, but rather fuses them. In addition, it creates cell formations or the cell effect and reduces cracking once dry.
The amount to add will depend on the density of the paint, so I recommend starting with one part acrylic and one part medium, and add little by little until you get a syrup-like texture. Then it will be necessary to stir with a rod or stick for a couple of minutes to obtain a homogeneous mixture.
On the other hand, it is not recommended to add water to fluidize the paint as it lowers its quality, decreases the intensity and brightness of the color, worsens its adherence and can cause cracking.

3º.- Obtain large cells
To obtain cells or large cells, add about 3 drops of pure silicone per 100 ml of paint and remove only a couple of turns with a stick or rod. In this way, the colors will be better separated and different effects are created.
A silicone lubricant can also be used, but creates smaller cells.
On the other hand, applying heat with a kitchen torch stimulates cell formation and destroys bubbles. The blowtorch should be used very carefully and not brought too close as it can damage the paint.

4º.- Combine the colors
When combining colors, three factors must be taken into account:
- Quality: the higher the pigmentation and quality of the paint, the greater the brightness of the color.
- Density: the composition of pigments, binders and solvents is different for each color. For example, white is a very dense color and black has a lower density so if they overlap the dense color (white) goes down and the lower density color (black) rises to the surface.
- Opacity: Opaque colors are heavier and cause translucent colors to rise to the surface and form cells.
In short, it is convenient to start by combining 3 or 4 colors of different density and opacity in our first creations and add more colors with practice.

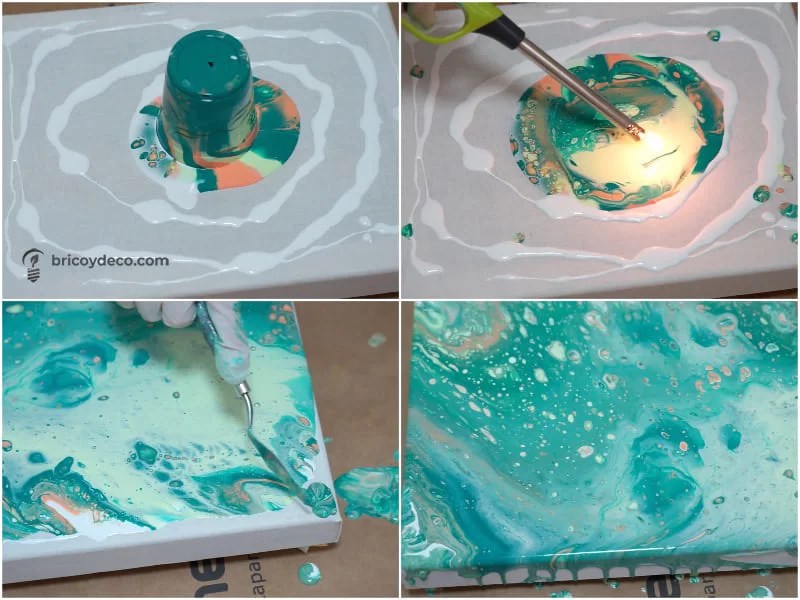
5º.- Pour the colors with the flip cup technique
To pour the colors on the canvas, the technique has been started flip cup or inverted glass. The steps to be followed are the following:
- Alternate colors in a tall glass
- Place the canvas centered on the glass
- Rotate the canvas so that the glass is upside down
- Wait a few seconds to allow the colors to flow into the glass
- Pierce the glass and let the colors flow on the canvas
- Fill the corners and sides with the remains of paint that have dripped
- Pass a kitchen torch to undo the bubbles
6º.- Seal the canvas
In the drying phase, the canvas must be laid horizontally and level. Normally, it will take about 48 hours to dry at room temperature. The surface will then be sealed to protect the paint from dirt and preserve the intensity of the colours. To do this, a layer of latex will be applied.
Other options would be to apply varnish or epoxy resin if we want to give it an ultra-gloss finish.

7º.- Frame
A simple way to frame our picture It will consist of cutting four strips at a 45º miter with a handsaw.
Next, they will be joined with white Ceys wood glue that is used for assembly and assembly work on all types of wood. In this way, we will obtain a firm and lasting adhesion.
Keep in mind that the maximum hardness of the glue will be reached after 24 hours. Next, we will screw the canvas to the frame.
Finally, to place it on the wall without drilling, double-sided tape will be used. Montack Immediate Full Grip that fixes all kinds of porous and non-porous materials on smooth and slightly rough surfaces, easily, cleanly and immediately.

The most popular fluid art techniques
The technique of flip cup it is just one of many that can be used when creating our fluid art frames. Among them, the most popular are:
- Dirty Pour: Colors are poured one after the other into a large container, gently stirred, and poured onto the canvas.
- Puddle Pour – Colors are poured directly onto the canvas. The first of them forms the base of the rest that are poured on top.
- Swipe: It is carried out after pouring the colors on the canvas and consists of dragging the paint with a sheet of plastic or paper. Normally, it is used in combination with other techniques.
- Swirl – Colors are poured in a ring and the canvas is tilted to spread the paint.
- String: several threads are cut and soaked in paint to draw with them. With this technique striking color gradients and effects are obtained.
using these pouring techniques we will be able to create original abstract paintings of fluid art.

I hope this guide on how to make fluid art help you create your first paintings and provide a much more personalized and unique decoration to your home. You can find more guides and tricks on DIY and decoration at
Project carried out in collaboration with Mi Hogar Mejor


