

A shelf above the toilet hardly takes up any space and is a perfect storage solution for small bathrooms. In addition, recycling pallets to make furniture is a trend that continues to grow season after season. For this reason, in this video tutorial both ideas are merged to show you step by step how to make a shelf over toilet with a pallet.
What to do before recycling pallets as furniture
Although the wood with which the pallets are built receives a heat treatment to eradicate possible insect pests, it must be taken into account that the use of pallets to transport goods in trucks, ships, trains, etc., means that they are permanently in contact with dirt and germs. In addition, they usually spend a lot of time outdoors, both in the sawmills and in the factories and warehouses of destination.
Detecting with the naked eye if a pallet contains parasites inside is usually complicated. For this reason, it is essential to treat them so as not to take risks and infect other furniture in our home, and even door frames or wooden floors.
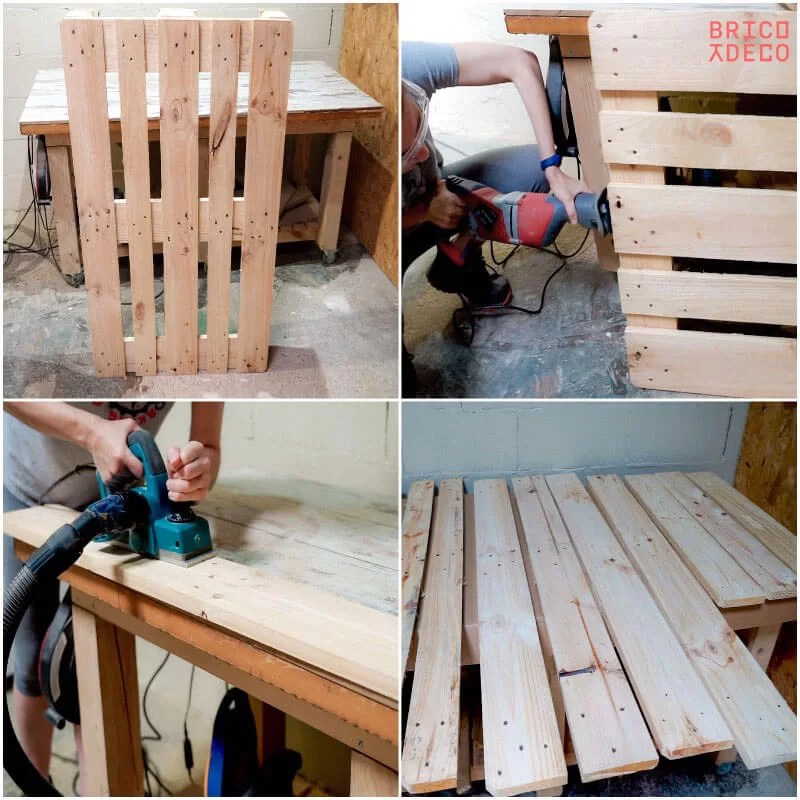
For this reason, when building this shelf for the bathroom, the first thing I did was disassemble the pallet, brush the slats and sand them to favor the penetration of the product that I used for its treatment.
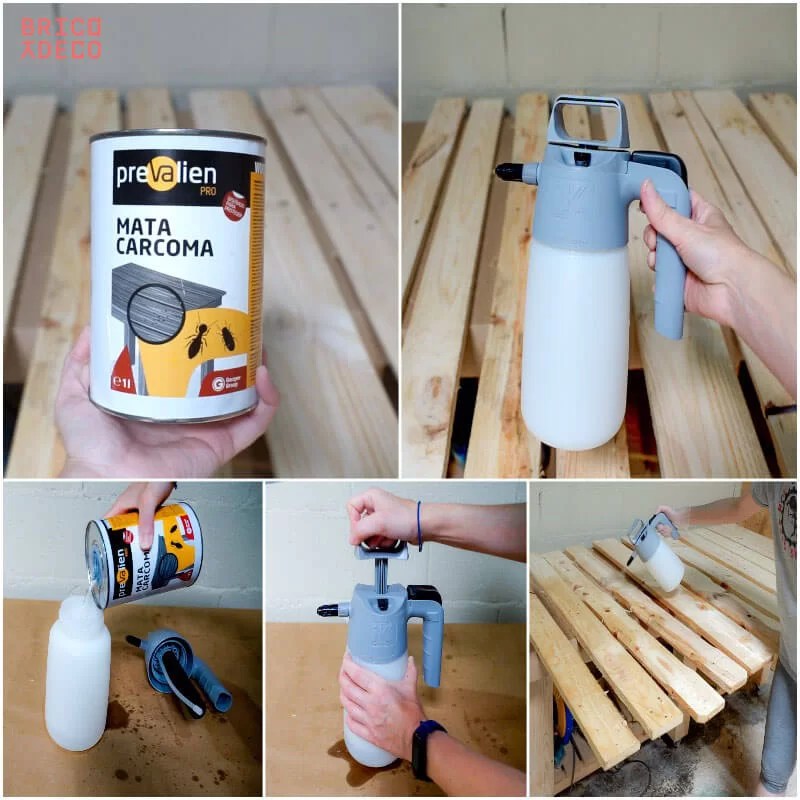
Next, I applied Matacarcoma Prevalien Pro, which is a preventive and curative treatment for wood against xylophagous insects such as woodworm and termites. In other words, as it is curative, it eliminates existing insects and if there are none, it prevents them from attacking the wood in the future.
This woodworm remover is solvent based with low odor and does not alter the original color of the wood. It can be applied with a brush or with the IK HC 1.5 professional sprayer, which is much faster. In addition, this spray can be used with oils, solvents and lubricants for cleaning brakes, degreasing or waterproofing. To do this, all you have to do is unscrew the lid to fill the tank with the product you want to spray, in this case the woodworm, and then pressurize by giving strokes until the safety valve pops out.
On the other hand, it must be taken into account that the pallet slats must be soaked on both sides with the woodworm killer and the product must be allowed to act for a minimum of 12 hours. After this time, we will have the peace of mind that we are not introducing any pest into our home.
Parts needed to build the bookcase
In a European pallet we will find:
- 4 boards of 120 x 14.5 cm
- 3 boards of 80 x 14.5 cm
- 4 boards of 120 x 10 cm
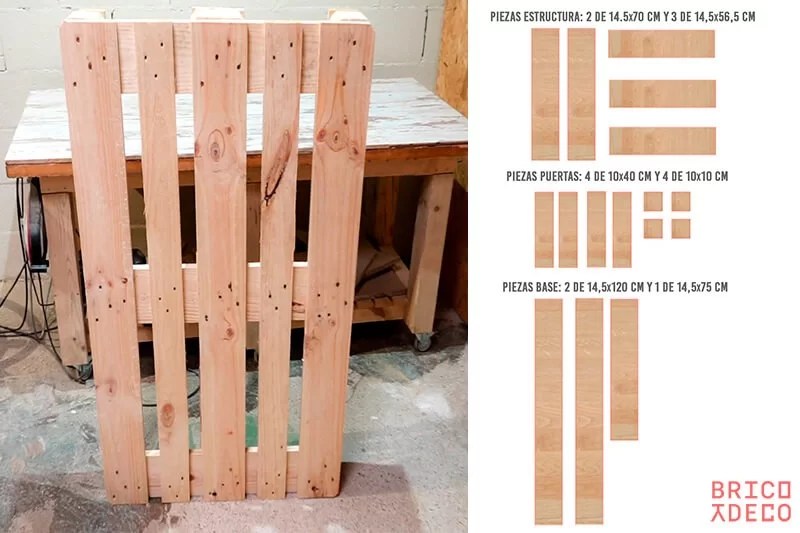
To make this shelf over the toilet, the following pieces have been cut and used:
- 2 of 70 x 14.5 cm and 3 of 56.5 x 14.5 cm for the structure
- 4 of 40 x 10 cm and 4 of 10 x 10 cm for the doors
- 2. 120 x 14.5 cm and 1 75 cm x 14.5 cm for the base
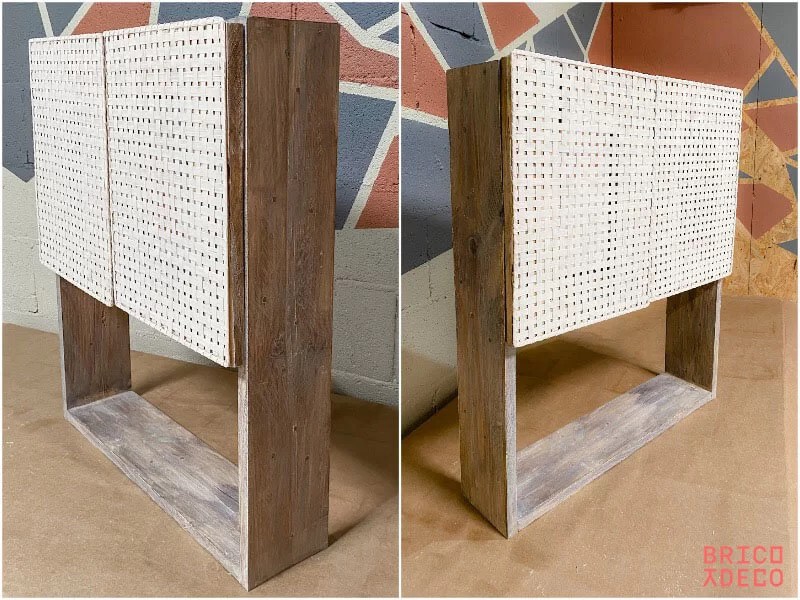
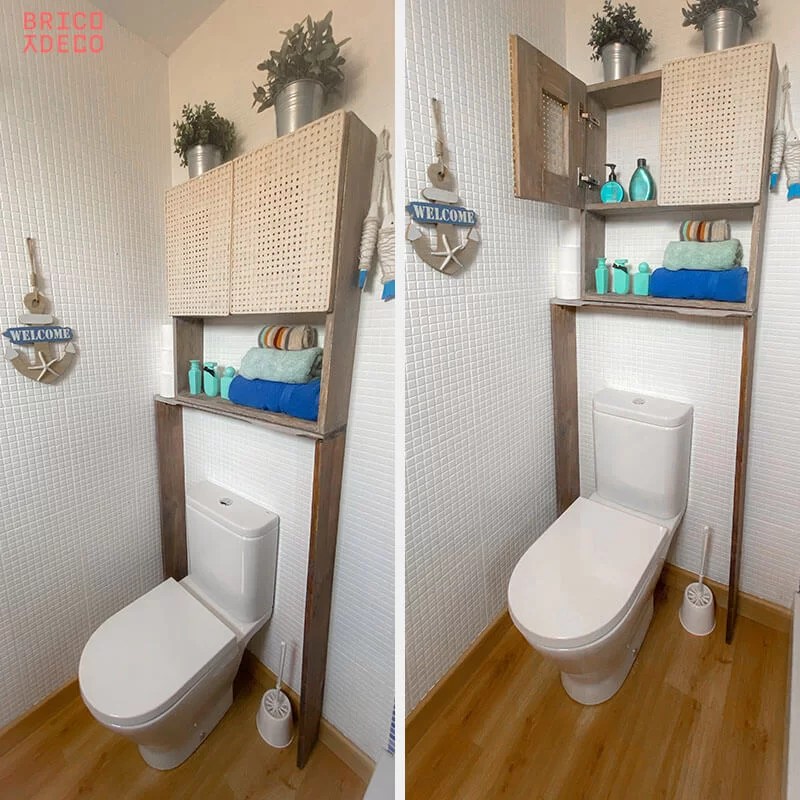
Once all the pieces have been assembled, the shelf will have a total height of 1.90 meters and a width of 75 cm at the base and 60 cm at the top, which will have two doors of 40 x 30 cm each.
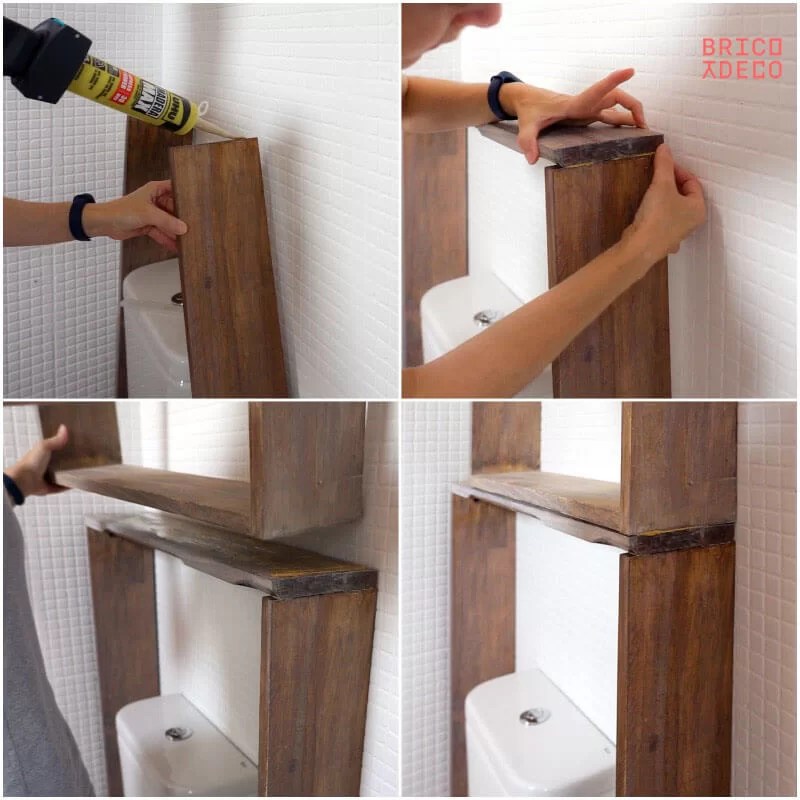
How to mount a shelf above the toilet without screws or nails
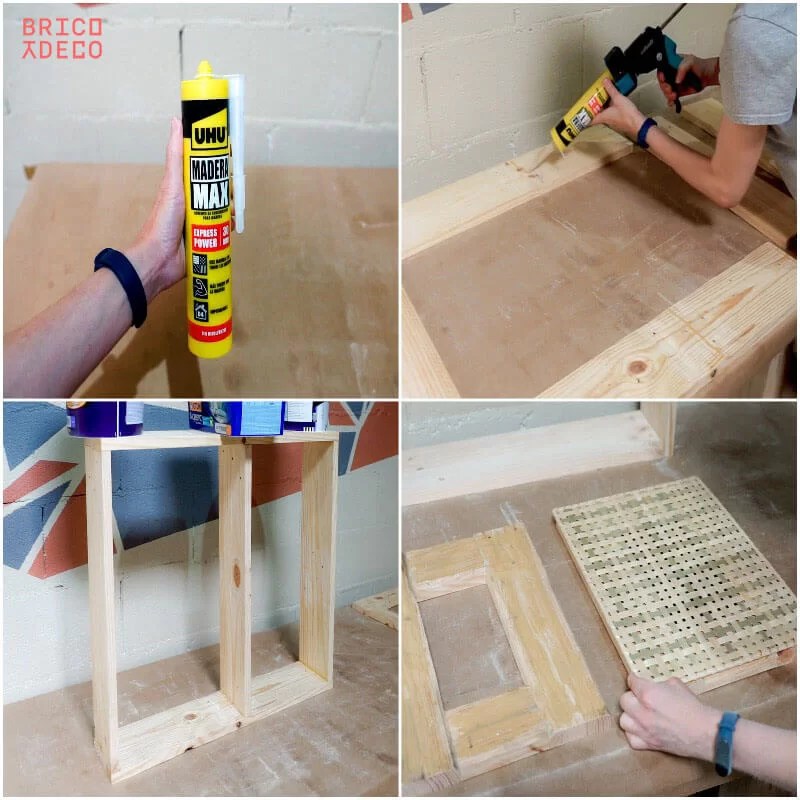
To assemble the pieces I have used Max Express Wood from UHU, which is an adhesive that combines strength, speed and ease of use, since you only have to apply it on the two sides that you want to join, spread it out and press it for a few minutes. In fact, 5 minutes after its application it already reaches a resistance of 10kg/cm2 and its final strength after 8 hours.
In addition, it can be painted and sanded and, as it is 100% waterproof, it is ideal for interior and exterior projects such as fences, pergolas, sheds, furniture or the installation of skirting boards and platforms.
It is also used to join wood to other materials such as metal, stone, concrete or the rattan that has been used to decorate the doors of this bathroom shelf.
Types and uses of hinges
I have placed Amig hinges on the doors, which are made of steel and come with the necessary screws for installation. When choosing hinges for our doors, we must take into account the different types that exist:
- Straight. They allow the door to be at a right angle to the frame of the structure. They are the ones I used in this project.
- Layered. The door is a few millimeters from the frame and they are used when several doors are going to be placed together, so that when they open they do not rub against each other.
- Super layered. They are used when you want to place the doors inside the frame.
In addition, these three types of hinges can be purchased with a pre-assembled screw and plug for pre-machined doors or those that already have the hole to insert the hinge.
In this case, I had to make the holes to insert the hinges with the help of a 37-millimeter hinge template and a Fortsner bit. The grounds that I have followed have been the following:
- Mark the center of the hole 10 cm from the top and bottom of the door.
- Insert the hinge and screw with the screws that come in the package. Keep in mind that the hinge must be straight when screwing it.
- Screw the internal part of the hinge to the interior of the furniture structure.
Once the hinges are placed, they can be adjusted in depth or in displacement in case the doors are a little out of square. In addition, the doors can be easily removed and replaced using the push button and without the need for tools.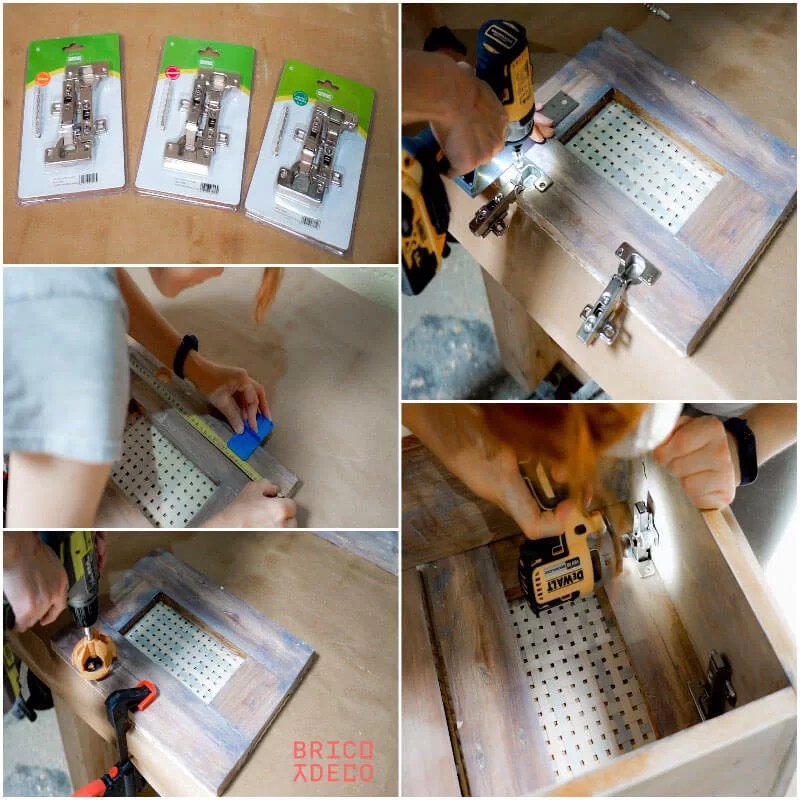
vintage finish
To give the shelf a vintage finish, what I have done is apply a layer of teak tint varnish and wait for it to dry. Next, I have given a coat of paint to the very watery chalk and, immediately, I have removed it with a rag. In this way, the wood acquires an aged appearance.
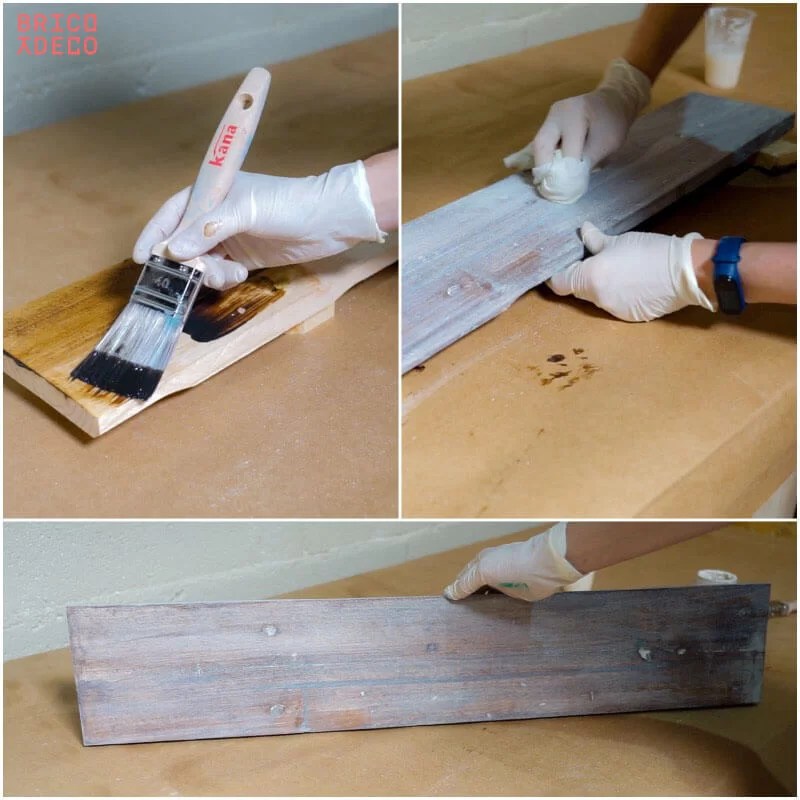
In the case of the rattan of the doors, what I have done has been to paint it with chalk paint diluted with a little water.
After all these steps to transform a pallet into a practical shelf, all that remains is to organize our belongings inside it to get the most out of it.
I hope that this project has inspired you when it comes to making furniture with pallets. organize a small bathroom with a shelf above the toilet. Do not forget that you will find many more guides and tricks on DIY and decoration at
Project carried out in collaboration with Mi Hogar Mejor


