


Painting seems easy but the first time you use a roller you realize that it is not that simple. At first it is difficult to get the point and it is quite frequent that some areas are lighter than others or that the marks of the roller are noticed. Do not give up! To obtain a good final result, you need practice and know some roller painting tricks.
I always say that painting is the easiest, fastest and cheapest way to change the look of a room. However, when we face our first wall, several hours and layers of paint later we are left with a silly face (or silly in my case), looking at the roller marks and stripes of different color intensity… At that moment comes THE SLOWDOWN (in capital letters). But how could I have done so poorly? The answer is simple…. Because it is not so easy to paint a wall!!! It takes practice and also some technique when using the roller.
Assemble a good team
The technique is useless if the roller is of poor quality. Normally, a cheap roller does not usually load the paint well, it requires a longer painting time and it is easy for marks to remain in the end.
There are wool and polyester mix rollers that usually give good results. If they are properly cleaned after each job, they can last a long time in perfect condition, so the investment is worth it.
However, wool rollers have the drawback that they shed hair when used for the first time. To prevent this from happening, you should wrap adhesive tape around it, repeating the operation several times until it stops shedding hair.
An alternative option is to use a Teflon coated roller. This type of coating prevents the fiber strands from caking. It also improves the load of the roller, reducing the painting time.
On the other hand, keep in mind that you will also need a telescopic handle and a mesh bucket to complete your painting kit.
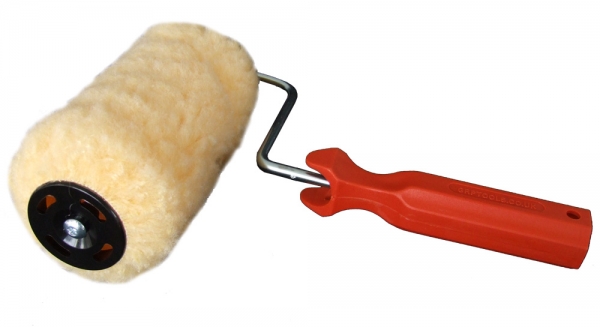
Image: polyfibre.co.uk
How to load the roller
To load the paint roller never fully immerse it in the bucket but we must follow the following steps:
- Dip the roller into the paint but only halfway.
- Then turn it over the tray rack and insert the other half.
- Remove excess paint by gently rolling it against the grid.
How to paint with a roller
There are different ways to paint a wall with a roller, although the “W” technique usually guarantees an optimal finish in a short time:
- First of all, you should pass a brush through the areas near the ceiling, baseboard, over doors and windows, as well as in the corners.
- After loading the roller, place it on the lower corner of the wall, a few centimeters from the skirting board, and exerting a little pressure it goes up towards the ceiling but not in a straight line, but following a slight incline.
- Lower the roller towards the ground but this time in a straight line. Follow this pattern from the bottom up as long as you have enough paint in the roller, but don’t wait until it’s out of paint to reload it. In this step you may notice some marks but don’t worry because they are resolved in the next step.
- Once the wall has been painted and the paint is still fresh, you will have to pass the roller again following the same pattern but this time without paint. Remember that you must press lightly on the wall, since otherwise the only thing you will achieve is dragging the paint (from experience).
- Finally, smooth the paint both in the area near the ceiling, and on the baseboard, above doors and windows, with the roller without loading it and following a long line horizontally.
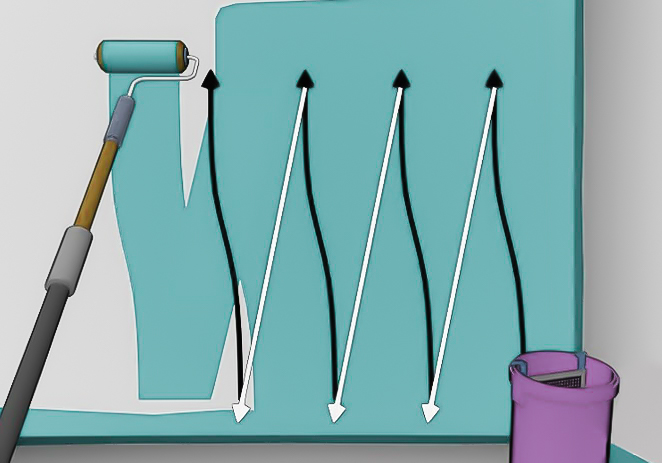
Image: wikihow.com
paint on wet
When painting, you have to be quick because if wet strips of paint overlap with others that are already dry, it will inevitably leave marks.
Never leave a wall half painted, calculate the time it takes to paint a surface and plan your breaks accordingly.

Make the corners as tight as possible
When we are going to paint a room, we already know that the previous step to using the roller consists of painting with a brush the edges of the ceiling, above the plinth, doors, windows and corners. However, the texture of the brush is different from that of the roller, so it is convenient that the horizontal stroke that we make with the roller is as close as possible to the ceiling, plinth or corner so that the mark of the brush is as little noticeable as possible.
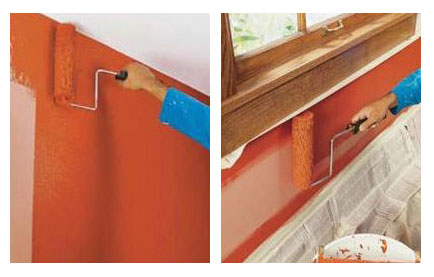
Image: familyhandyman.com
No lumps
When a paint job takes several hours, it’s easy for the paint to clump up and get passed through the roller and onto the wall. To avoid this, you can strain it or also cover the bucket with a damp cloth to delay drying. Also remember to clean the roller if lumps have formed because residue may remain on it.
The roller like the jets of gold
Before storing the roller we must remove any remaining paint, to do this first remove the excess with a blotting paper for example, to later rinse the roller until the water comes out completely clean.

Finally, I wanted to tell you that all these tricks to paint with a roller are not only useful when we paint walls, but can also be applied in the event that we paint doors (see example in this link) or furniture (see example in this link). You may also like…

How to paint the ceiling like a professional

How to renovate with paint
Paint with a brush without leaving marks
How was your first experience painting a wall? If it was as dire as mine, do not be discouraged, surely with a little practice and applying these roller painting tricks you get a good finish.
If you liked this post, you have many more DIY ideas and tricks at .
[elfsight_youtube_gallery id=»1″]


