This new chapter on “how to soundproof a commercial premises” will be devoted entirely to the manufacture of anchor plates, which covers the following aspects:
- The welding of the different pieces, which will make up the anchor plates.
- The protection of the plates. Once done, we will see how to apply the anti-corrosion treatment.
Manufacture of anchor plates
Next we will see the necessary procedures for the manufacture of the anchor plates.
Finished anchor plates.
welding of parts
For arc welding, we will use a Solter 175 Amp welder.
It has inverter technology, as well as a built-in fan. In this way, long welding processes can be carried out without interruptions.
It is small in size, and quite light (it does not reach 4 Kg), but with great features.
Selecting the proper Amperage on the welding equipment.
Ok, with that said, let’s get started…
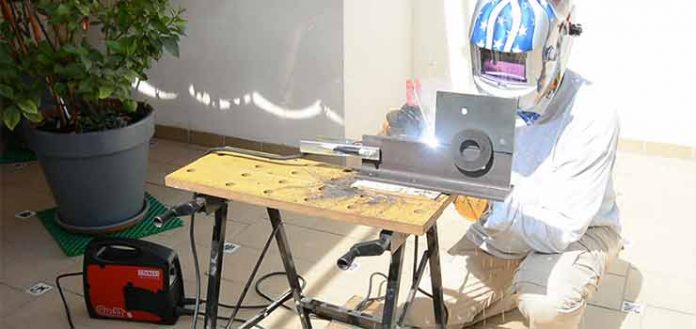
1st step – Place the parts to be welded
We must immobilize one of the two pieces, holding it to the workbench.
To position and secure the other piece, we will use a powerful magnet, which guarantees a stable temporary fixation.
Panoramic view of the arc welding process.
Zoom of welding with electrodes.
2nd step – Prepare the equipment
Now we must prepare the welding equipment, for which we will take the terminals. And we connect the equipment.
Next we must select the amperage, for which we must be clear about which electrodes we are going to use. In our case we will use 3.25 mm electrodes. Therefore, we must select an amperage of 115 Amp, which is the approximate power at which electrodes of this diameter melt under normal environmental conditions.
We put on the relevant protections, and begin to weld.
If you want to see in detail how to weld by voltaic arc, you can see our article How to weld with electrodes, Basic course.
Eliminating the slag, typical of the welding process.
3rd step – Welding the anchor plates
We could carry out the process by spot welding. However, we will do it in cord, also called continuous welding.
This type of welding requires a greater number of electrodes, but it is more robust.
Once the welding is finished, we remove the slag that has been generated in the process, hitting with the pickaxe and scraping with the wire brush.
We proceed in the same way with all the plates.
Going over the invisible weld with the radial.
Great care must be taken when handling the newly welded pieces, since they are practically red hot.
all these Anchorage plaquesThey will be welded on both sides. On one of the sides it will have the hidden or invisible welding. To achieve this, with the radial, we are going to eliminate the excess.
Finished welds. On the left, normal seam welding. On the right, invisible or hidden welding.
Anchor plate protection
Well, the last step before fixing the plates, is to protect the Anchorage plaques against corrosion. For this, we will use OXITEan antioxidant enamel that we have been advised by Pyma, specialists in this type of product.
What advantage does this product provide us? It is applied directly on the metal, thus avoiding giving the typical primer coat, simplifying the work and, therefore, saving time.
Applying the anti-corrosion protection treatment to the anchor plates.
Although we have chosen the silver gray color, you can find the Oxite in various colors.
Application can be done with a brush, roller or spray gun. In our case, as there are not too many pieces, we will do it with a brush.
We apply the product as it is, and let it dry for the time recommended by the manufacturer.
Video Tutorial – Making the anchor plates
Then we leave you the video tutorial that collects all the indications, and some more, that we have seen in this article. It only lasts 6 minutes. Don’t stop watching it.
Well, we have finished the plates that will serve as an anchor for the structure that will support the false acoustic ceiling.
In the next chapter we will see how to install the Anchorage plaques that we have made in this chapter.
Then I leave you the directory of the entire project, so you can navigate through it in the order you prefer.
Programming the soundproofing of a room
1st Part – Preparation of the structure.
2nd Part – Soundproofing of the ceiling.
- 12th Chapter – Acoustic materials and installation procedure.
- 13th Chapter – Step prior to soundproofing.
- 14th Chapter – Cutting and preparation of acoustic plates.
- 15th Chapter – Preparation of acoustic plates.
- 16th Chapter – Installation of soundproofing on the ceiling.
3rd Part – Vertical soundproofing.
- 17th Chapter – Soundproofing of the walls.
- 18th Chapter – Soundproofing of shutter drums.
- 19th Chapter – Door soundproofing.
- 20th Chapter – New measurement of the final soundproofing and review of the work.
If you don’t want to miss any of our publications, SUBSCRIBE…
to the Blog => I WANT TO SUBSCRIBE
to our YouTube channel => I WANT TO SUBSCRIBE
Once you have subscribed to our YouTube channel, don’t forget to do click on Tinker Bell. This way you will receive a notice every time we upload content.
How to subscribe to our YouTube channel.
.
.


