


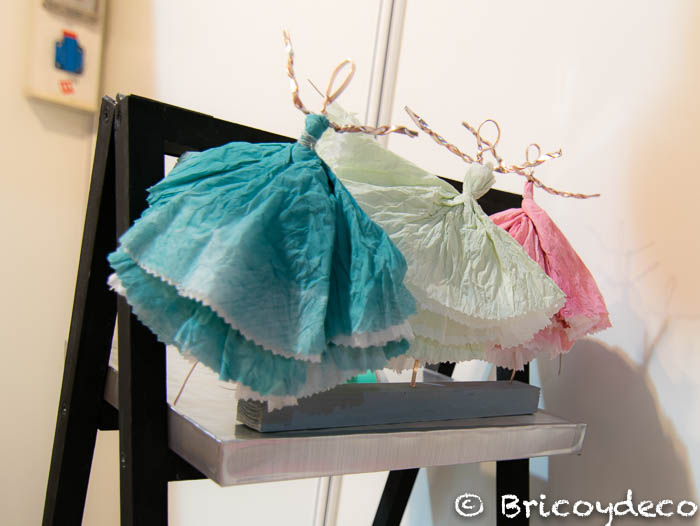
I always say that you don’t need great skills or endless materials to make a beautiful craft that attracts attention. Proof of this is this ballerina made with paper napkins, With this video tutorial you will see how easy it is to do and how decorative it is in any corner.
Surely after a family meal or event you have left on the table paper napkins that have not been used, but that are not presentable because they are wrinkled or have stained a little. It may also happen that you have bought decorated napkins and that you do not have enough left for all the guests to have the same one. For these cases I suggest that recycle paper napkins making decorative dancers with them, I assure you that they will not go unnoticed.
The materials you will need are the following:
– A couple of paper napkins. To give them color, they can be painted with paints that are not very liquid, such as spray paint or scrab inks. They can also be colored with eye shadows or crayons, and even use colored or decorated napkins.
– Wire that is easy to bend and handle, such as the wire used in jewelry.
– Pliers.
– ScissorsI have used zigzag ones but you can also use normal ones.
– Tape or tape.
– String or fine string.
The steps to take to make a ballerina with paper napkins are as follows:
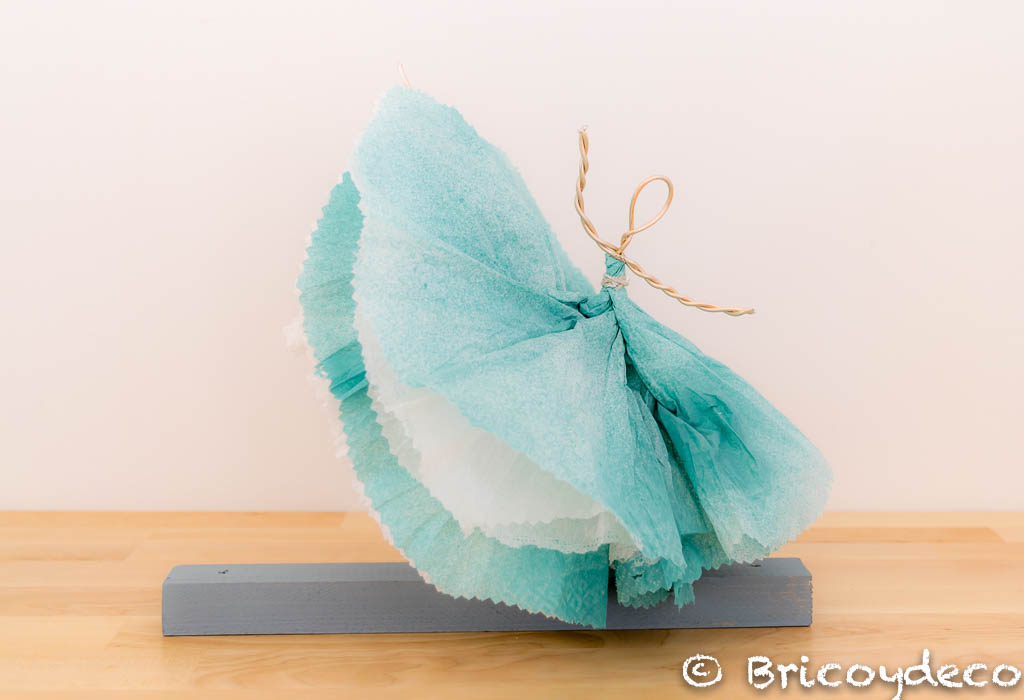
1º.- To make the dancer’s body cut a piece of wire approximately two palms long and fold it in half, leaving a small hole that will shape the head, then roll up the body part. With another piece of wire, make the arms by wrapping the wire around itself as seen in the video tutorial.
2º.- For dress the ballerina Two napkins will be used. We will completely open the first napkin, we will take it by the center and we will roll it up on itself. Next, the upper tip is cut and the wire body is inserted until reaching the arms. Finally, the napkin is tied at the waist with a fine thread or cord.
With the second napkin we will do the same but it will be attached to the body with tape or adhesive tape below the first napkin.
3º.- The next step will consist of give it a round shape to the two napkins, for this we will cut the excess part with scissors.
4º.- Finally all layers will be separated of the napkin (a total of six). This is the most delicate moment and we must do it very carefully so that the layers do not break.
Now all we have to do is find a base on which to place our ballerina made with paper napkins, I have used a wooden strip but a cork stopper, the lid of a jar, etc. can also be used.
Then I leave you the video tutorial so you can better see the step by step:
What did you think of this ballerina made with paper napkins? In addition to being a decorative and original way to recycle this type of napkin, it is a fairly simple craft that can be done with children. Do you dare?
If you liked this post, you can find more DIY crafts and ideas at . Thank you very much for commenting and sharing!


