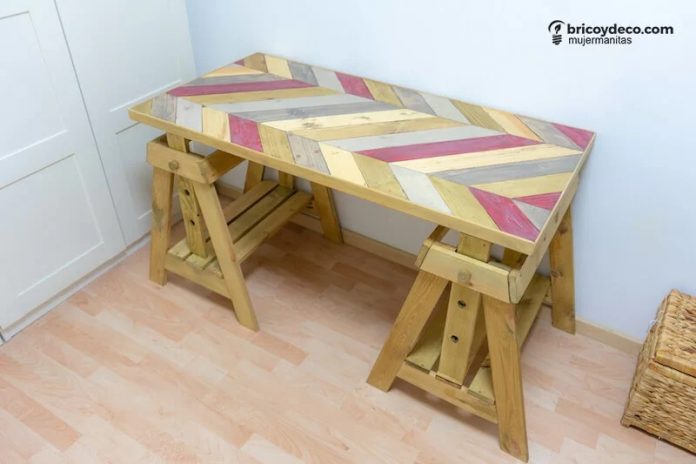
If you like pallet furniture and need a table, look no further. This tutorial will show you step by step how to make a practical desk with pallets. In addition to being decorative thanks to its geometric-style top, it will be very practical since the legs are made up of two trestles that can be adjusted in height.
Furniture made with pallets has the advantage that it is cheap. If you also treat the pallet wood with some care, incredible results can be obtained. Proof of this is this post with the best ideas with pallets or the desk made with pallet slats that you can see below.
Table top with geometric style pallets
Materials employed
- Cedria Lasur Pacífico colors Sales Green, Silver Grey, Pacific Gray and Navy Red
- Cedria Sol Lasur
- DM or MDF board of 120x60x1 cm
- 3.5 cm wide wooden strip or biscuit
- Saw saber or foot of goat
- miter saw
- orbital sander and brush
- nailer
- carpenter’s glue
- Masking tape
- Brush

Step by Step
This table top stands out because the slats have been placed diagonally. In this way, a beautiful geometric effect is obtained that is highlighted by combining different shades.
1º.- Disassemble the pallet
First, the pallet is disassembled. I have used a saber saw, as it is much faster and uses less force than with a foot or kickstand. If the slats are also in poor condition or have many imperfections, I recommend brushing and sanding them.
2º.- Cut the boards
Once the pallet has been disassembled, the boards will be cut at a 45º angle with the miter saw. The number and length of boards to be cut will depend on the size of the table top. In this case they have been cut:
- 22 slats for the sides 19 cm long
- 11 slats for the central part of 37 cm long
- 4 slats that have been sized to fill the four corners of the board
3º.- Protect and decorate with lasur
Next, different colors of Cedria Lasur Pacific to highlight the arrangement of the pallet slats. Keep in mind that lasur is an open pore wood protector that allows to regulate the internal temperature and does not crack like the varnishes with the movements of the wood. In this way, the desk will serve us to use it indoors and also outdoors as it is protected with lasur.
Also, Cedria Lasur Pacific has the advantage that it is only necessary to apply a layer to decorate and protect the wood. This saves product and time.
On the other hand, as some slats have been left uncolored, a layer of Cedria Sol Lasur. This lasur is completely colorless and provides sun filters that will provide extra protection to the wood and the colors used.
4º.- Edge the board
Finally, a strip of wood or biscuit will be placed to edge and embellish the edges. For this, carpenter’s glue and the nailer will be used. Once placed, a layer of Cedria Lasur Pacífico in the color Verde Sales will be applied.

Trestles with height adjustable pallets
Materials employed
- Cedria Lasur Pacífico color Green Salts
- miter saw
- Orbital sander and brush
- Driver drill
- Drill template
- 18mm Spade Drill
- Squad
- japanese saw
- Round wooden rod 16 mm in diameter and 22 cm in diameter
- Brush

Step by Step
The main advantage of these trestles made with pallets is that they can be adjusted in height to be able to place different types of seats, either a chair or a high stool.
1º.- Cut the pieces
Once the pallet has been disassembled, the slats will be cut so that we obtain the following pieces for an easel:
- 4 slats of 63×7 cm cut at a 15º miter, 2 for the front legs and another 2 for the rear ones
- 2 58×7 cm slats that will join the front and rear legs laterally at the top
- 3 slats of 56.5×7 cm that will form the lower shelf
- 1 slat of 54×7 cm and another two of 47×7 cm to make the support on which the tabletop will be placed and that can be adjusted in height
- 2 slats cut at a 15º miter of 22×7 cm that will join the 2 slats that form the legs at the top
- 2 slats cut at a 15º miter of 30×7 cm that will join the legs at the bottom and that will serve as a support for the shelf

2º.- Protect and decorate with lasur
At this point you can choose to protect the pieces with lasur before assembling the easel or after. Particularly I have tried it in both ways and it has been more comfortable for me to apply the lasur on the pallet slats before assembling it.
The color that I have used has been the Green Cedria Lasur Pacific Salts, which he had also used on the table top. It is a color that gives the easels a beautiful appearance of wood naturally cured by the passage of time.
3º.- Assemble the easels
To assemble the trestles, follow these steps:
- Screw the 22 cm piece onto two of the 63 cm boards. Then screw the 30 cm piece to the bottom. In this way, one of the legs is obtained, so the same process will be repeated for the other.
- Join the front and rear legs at the top with the 58 cm slats. At the bottom screw the three 56.5 cm slats at the bottom to provide stability to the easel. In addition, it will provide the trestles with a practical shelf that will serve as a storage area to place boxes, for example.
- Assemble the top piece on which the board will rest. To do this, the two 47 cm boards that have previously been drilled with the spade bit will be screwed to the 54 cm board.
3º.- Make the wooden pin
Finally, the pin will be made with a wooden rod with a diameter of 16 mm and another with a diameter of 22 mm. Cut 4 pieces of 7 cm and 4 of 2 cm, respectively. Next, the piece with the largest diameter will be screwed to the thinnest rod so that it acts as a stop when the pins are inserted into the holes.
After following all the steps indicated above, this is how this desk with pallets will finally be.

You have been able to verify that by dedicating a little time you can obtain very creative works by recycling pallet wood. In addition, if the wood is protected with lasur we will highlight its natural beauty since it does not cover the grain.
If you liked this tutorial to make a desk with palletsDon’t miss out on more DIY projects and inspiration that you can find at .


