

Friday finally arrived and with it also comes a new post from the special series of DIY gifts for Christmas. If last week’s idea was a fabric whale, for this one I wanted to make some Easter flowers made of felt. Surely in your closest environment you will find someone who would be delighted to receive this Christmas gift.
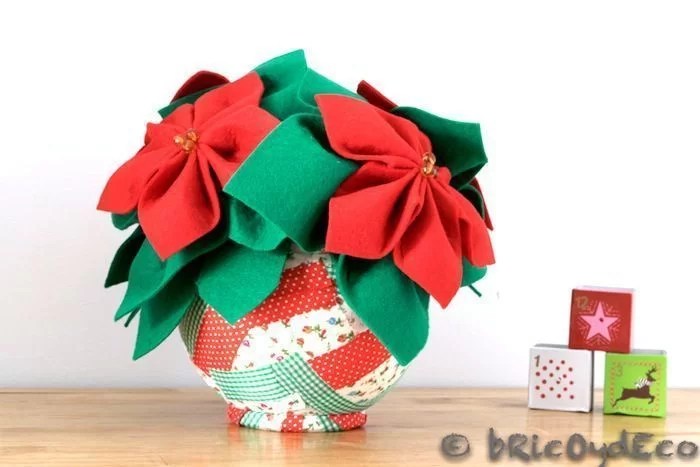
As soon as December arrives, shops, homes and even parks are flooded with poinsettias or poinsettias as I usually call them. Some of these early December poinsettias won’t even make it to Christmas day because they will have spoiled first. For all this I thought it would be a good idea to make a composition with poinsettias made of felt to give this Christmas as, in addition to being a very showy and decorative gift, it will remain unchanged over time.
The materials that we will need are the following:
– Felt red and green (one large leaf of each color).
– accounts amber color (3 or 4 for each flower).
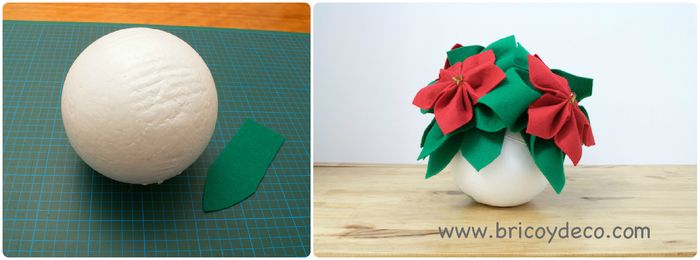
– Styrofoam ball or polystyrene 20 centimeters in diameter.
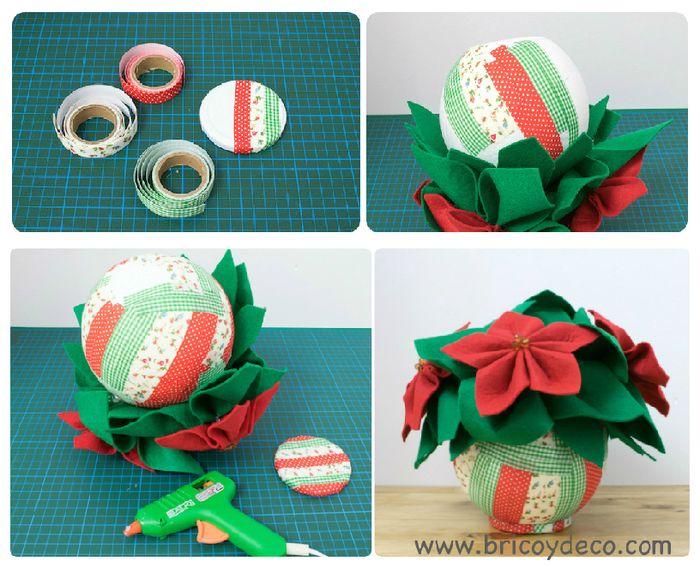
– fabric tape to cover the polystyrene ball (it’s like washi tape but made of cloth instead of paper).
– The jar lid (for the base).
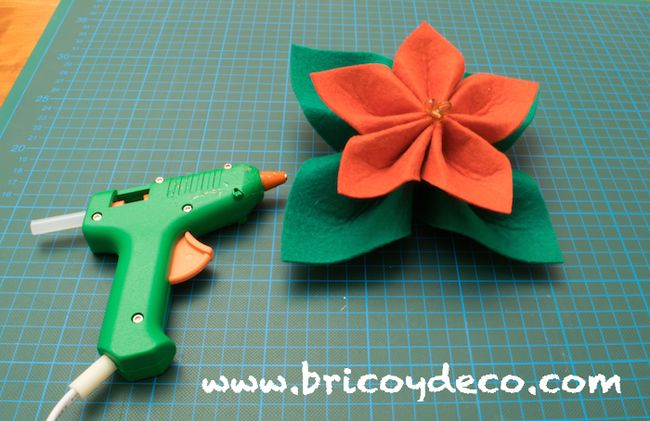
– Gun of hot melt glue.
– Red and green thread, needle and scissors.
I bought the felt, the beads and the polystyrene ball at a Chinese store. The fabric tape is ideal for lining the polystyrene ball because it adapts perfectly to its spherical shape.
Once we have all the materials, we will follow the following steps to make this composition with poinsettias.
1º.- Cut the felt
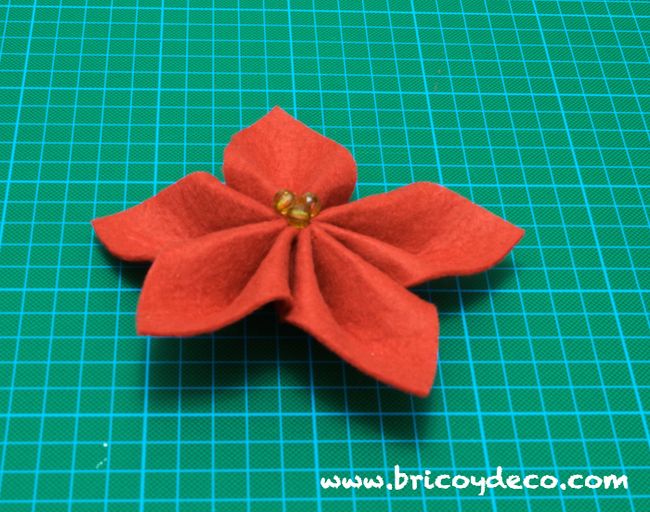
For a poinsettia we need to cut 3 squares of 10 x 10 centimeters from the red felt and 2 squares of 15 x 15 centimeters from the green felt. I have made a total of four poinsettias so I have needed to cut ten squares of red felt and eight of green felt.
Once we have cut the squares, we divide them in half so that we obtain two triangles from each square.
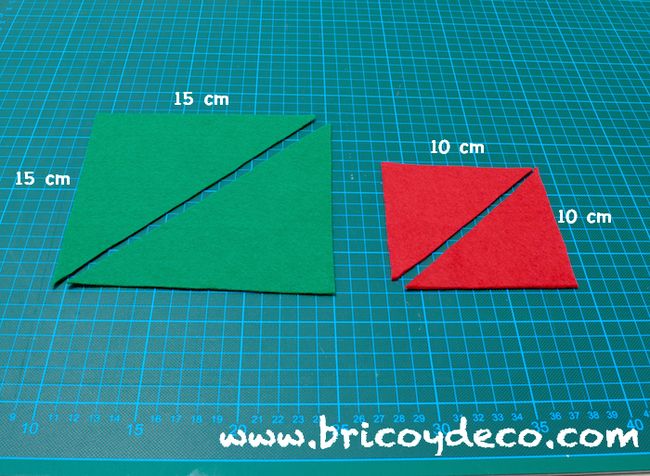
Each triangle of red felt will be a petal, with five triangles-petals we will form a flower and with four triangles-petals of green felt we will form the leaves of that flower.
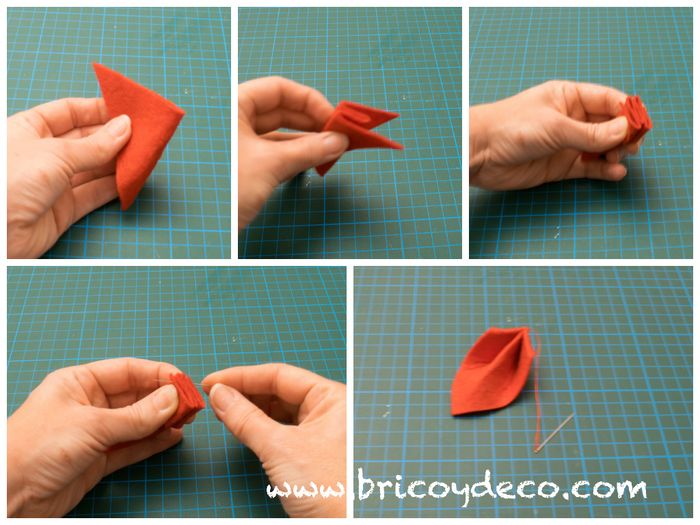
2º.- Make the petals and leaves
To make the petals we will fold the felt triangle in half, we will fold it a second time and a third time. Then we will make some stitches with red thread so that the folds are united.
With the green felt triangles we will do exactly the same.
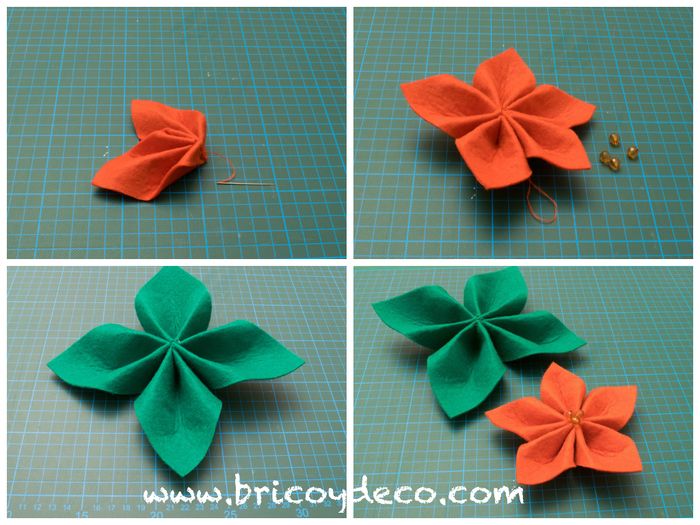
Once we have the five red felt petals, we sew them through the center with each other (the first to the second, the second to the third, the third to the fourth and the fourth to the fifth and the fifth to the first).
In the case of the green felt, instead of joining five petals we will join four since the triangle-petals are larger.
3º.- Sew the beads
Before attaching the flower to the leaves, we will sew three or four amber beads in the center, so we will hide the union of the petals.
If we do not find amber beads, wooden or pearl-shaped beads can also be used, even a button.
4º.- Stick the flower to the leaves
With a hot glue gun we will join the flower (the five red felt petals) to the leaves (the four green felt petals), pressing the two parts until the glue has cooled.
5º.- Paste the Easter flowers on the polystyrene ball
The next step will be to glue the poinsettias with their leaves to the polystyrene ball, for this we will use the hot glue gun, placing the flowers one next to the other until they cover the upper part of the polystyrene ball.
In the lower part we can add some leaf with green felt to give more body to the composition.
6º.- Decorate the polystyrene ball and make the base
With fabric tape we will cover the rest of the polystyrene ball and the lid of the glass jar that will make us a base so that the ball is stable when placed on a surface.
I have used three different models of fabric tapes: a red one with small white polka dots, a green vichy checkered one and an ecru one with small flowers, with which we can create a beautiful composition that is very appropriate for these dates.
To finish we will join the lid of the jar based on the polystyrene ball with hot melt glue.
7º.- Gift wrapping
Now that we have our composition of poinsettias made of felt finished, we are going to wrap it for a gift (You can see the essential materials for creative gift wrapping here). The materials that I have used on this occasion have been kraft paper, some strips of decorated cardboard and a green wool cord.
Wrapping this type of rounded gifts is not easy, if you also add that you do not have much skill for these things, the result can be disastrous, but with a little effort and desire you can try to make it look as good as possible.
To begin with, what I have done has been to cut a rectangle of kraft paper large enough and fold it in half so that it has more consistency. Then I have folded the corners so that when wrapping the gift I can better adapt it to its rounded shape. Finally, I have placed some tape and a green wool cord and I have finished off the top with an ornament made with the cardboard strips.
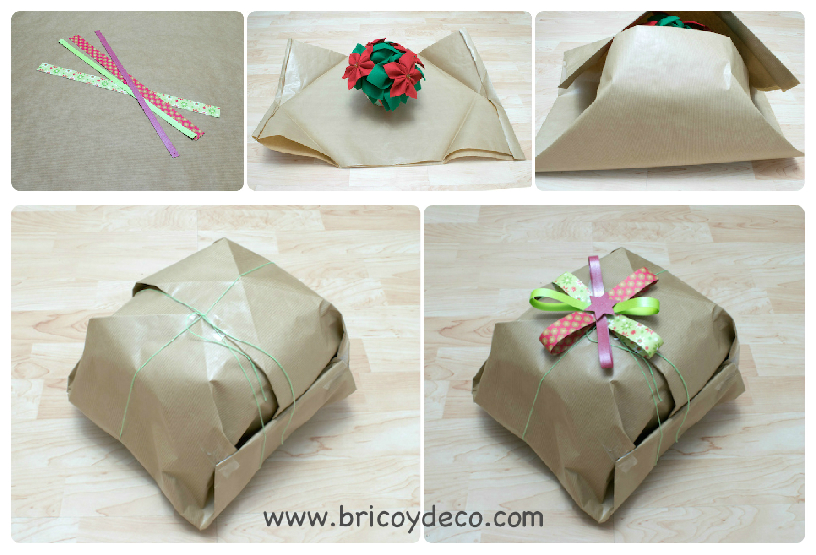
The final result can be improved but I’ll put it the same so that you can see that nobody is born taught, that in this type of thing experience is a point in favor and that you have to keep practicing to improve your technique.
I hope that you liked this composition of Easter flowers made of felt and that it inspires you when it comes to make your DIY gifts for Christmas. Also, if you don’t like Easter flowers, you can do it with other types of flowers: roses, daisies, etc.
If you liked this post, please share it on your social networks.


