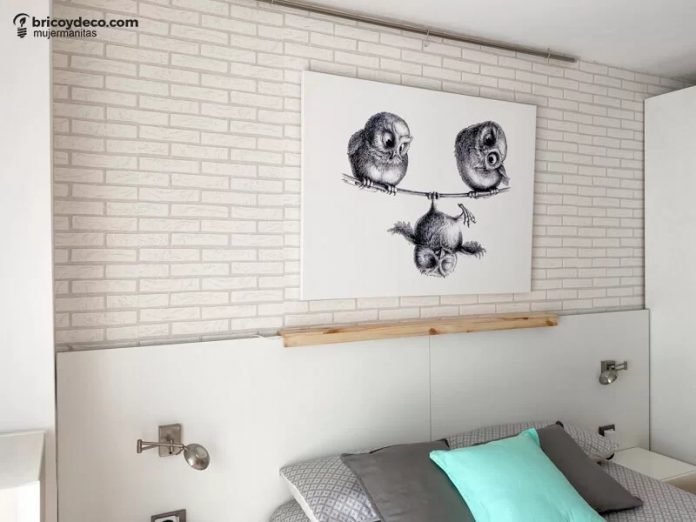
Would you like it hang a picture on wallpaper but you don’t want to damage it? With this tutorial you will learn how to place one or several frames without having to perforate the paper or attach adhesive strips that can damage it when removed. Keep reading to see the step by step.
There is no doubt that the pictures are a perfect complement to decorate any wall. There are different compositions with which to hit sure:
- Larger box and several around in different sizes for a fun composition
- Diptych or triptych with pictures of the same size if you are looking for balance
- XL frame that is the protagonist or focus of attention
Personally, I opted for the latter option and therefore chose a canvas from Posterlounge, a painting shop, to decorate the headboard wall in my bedroom. What I like most about this store is:
- They have an extensive catalog of paintings, illustrations and photographs by renowned and emerging artists.
- They have paintings that are out of the ordinary and that are not usually found on other pages.
- There are many sizes and finishes to choose from: canvas, wood, methacrylate…
- They confirm the delivery date at the time you place the order.
- In a few days you have it at home and the postage is from €2.95.
Although the decision was not easy due to the great variety to choose from, I finally decided on the work Three Owls on a High Rope by Stefan Kahlhammer for its originality, warmth and sympathy. Regarding the finish and size, I chose a 120 x 90 cm canvas, consisting of a print on a cotton blend fabric (360 g/m²) and mounted on a 2 cm thick frame.

How to hang pictures on wallpaper without damaging it
A few weeks ago I renewed the wallpaper on the headboard in the bedroom and the last thing I wanted to do was do anything that might mess it up. However, it is also true that, being a paper with a very neutral pattern, it required a decorative touch that would bring it to life.

Drilling holes in the wall was completely out of the question and placing adhesive strips to hang pictures was not a viable solution either, as they could damage the paper when removed. For this reason, I decided to place a rail from which I can hang the canvas. The materials and tools I used were:
- Drill
- Tacos
- open sockets
- Bar
- open hook
- Fishing line
The steps I followed were the following.
1º.- Place the supports
First, the supports will be placed. To do this, the holes in the ceiling will be marked with a pencil so that the bar protrudes from both sides. In addition, sufficient distance from the wall must be left for the socket to rotate.
Next, the holes will be made. Keep in mind that if the ceiling is made of concrete, as in my case, it will be necessary to use a hammer drill and a bit with a tungsten carbide tip. Afterwards, the plug will be inserted and the socket will be screwed on.
An alternative option to drilling the ceiling would be to attach adhesive mounts or mounting tape.

2º.- Introduce the bar
The next step will be enter the bar. You can use a curtain or wardrobe rod, as they are suitable for supporting weight and you will find different sizes and finishes (wood, metal, PVC). Personally, I have chosen a steel bar 180 cm long and 2 cm in diameter, which is a size that allows me to hang several paintings if I later decide to change the composition.
To place it, you only have to support it on the sockets that have been used as supports.

3º.- Hang the picture
The last step will be hang the picture. To do this, a hook will be placed on the bar and fishing line will be passed through the rear hooks that we will find on the back of the canvas.
The advantage of using fishing line is that it is made of a very resistant material suitable for bearing weight. In addition, being transparent, it is invisible and gives the feeling that the painting is suspended.

After following these steps the canvas will be placed and the wallpaper intact.

In addition, the painting does not rest directly on the wall, but is a few millimeters away. In this way, we ensure that it will not be damaged due to friction.

Get the most out of this idea by also using it for walls with gotelé, since it is a finish in which it is more complicated to repair the holes or place adhesive strips for pictures.
Tips for decorating the walls with XL paintings
An XL painting prints personality to any room in your home. The following tips will help you get it right when choosing it to decorate your walls:
- Allow the painting to breathe. An XL painting requires a wall that is wide enough so that it does not look stuffed in.
- So that it does not clash with the rest of the decoration, look for a painting whose dominant color is within the color palette that you have used in the room.
- The theme must also be consistent. Landscapes, portraits or still lifes fit better in a classic decoration, while abstract compositions, illustrations and typography are ideal for a contemporary environment.
- An unframed canvas will give the impression that it extends on the wall, while a framed one will make it stand out. In any case, remember that less is more and do not choose an overly ornate frame that could detract from the painting.
- Take into account the weight of the frame when choosing the support or placement system. Also if it will be necessary to place one or more supports to avoid having to continually reposition them.
- If you make a composition of an XL frame and several smaller ones around it, always leave a distance of about 10 cm between them.
Do you dare to decorate with XL paintings? I have loved the final result since I have achieved hang the painting on wallpaper without damaging it and also breaking with the neutrality and seriousness of the bedroom’s headboard wall.
Do not forget that you will find many more guides and tricks on DIY and decoration at


