

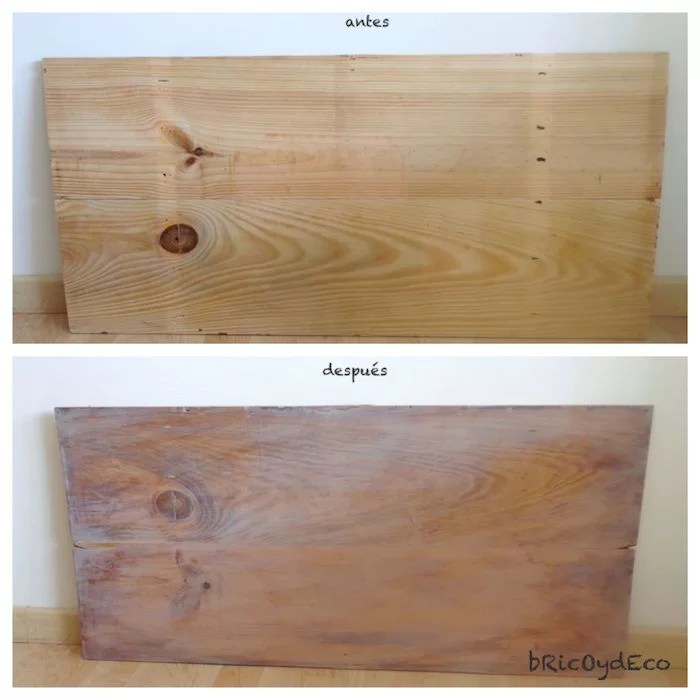
Surely more than once you have been stunned looking at those rustic tables stripped with vintage air that fit practically with any decorative style. When I made a bookcase and planter for the kitchen with a wooden box, I kept the lid even though it was quite damaged since you never know the benefit that we can get from it. I have now decided to recycle the lid as rustic boardread on to find out how I did it.
Materials
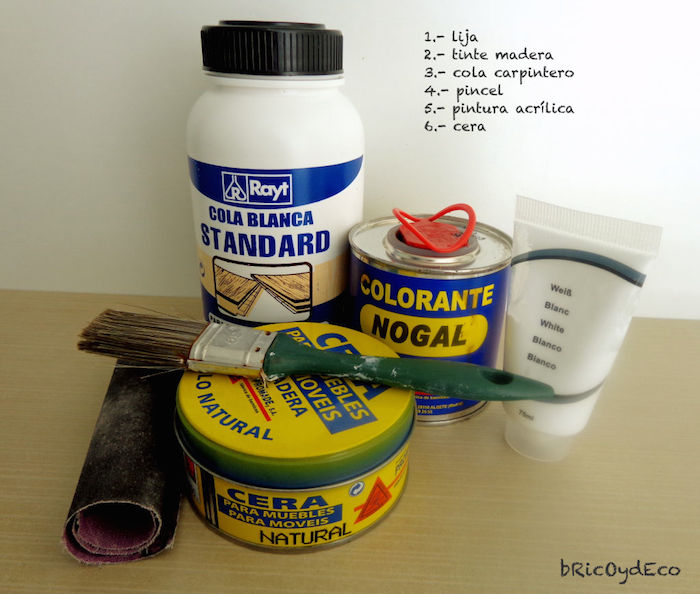
The materials that we will need are:
1.- One sandpaper. Both sandpaper and a block or a sander work.
two.- Wood Stain Dye. I have used walnut stain, which is the one I had at home, but you can use any one you like.
3.- carpenter’s glue. At this point I think I would not know how to live without her.
4.- A wood brush.
5.- Acrylic paint. I have used white to give the wood a whitish appearance but you can use any color you like.
6.- colorless wax. You can also use matte varnish, although I personally prefer that satin touch that wax gives it.
And of course a board whether it is bought, found, a pallet or even some tongue-and-groove wooden slats that we have previously joined, the important thing is that this wood flavorthat the veins and the knots are seen.
Step by step: pickled rustic board
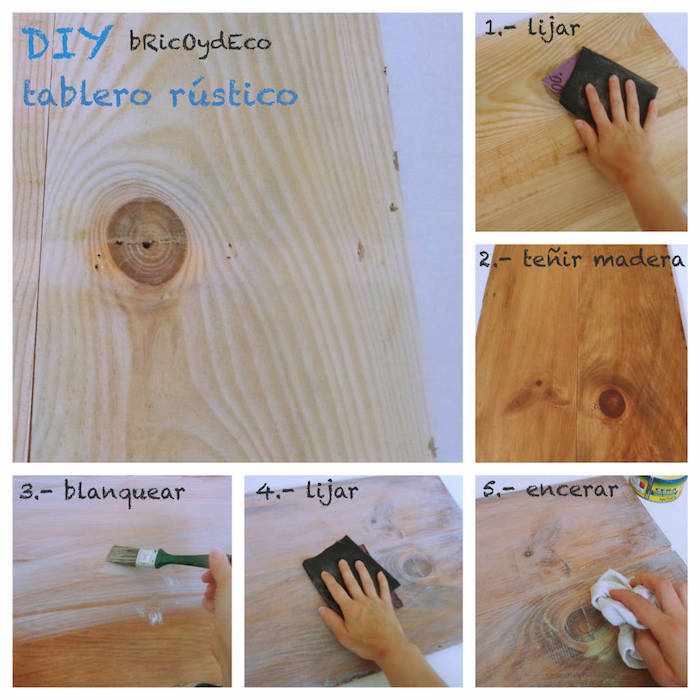
The first thing we will do is sand the board until it is completely soft to the touch, both to open the pore and to avoid problems with splinters. The board I used was a bit faded, moldy and had some cracks but I didn’t want to repair them to keep that very lived-in board look.
We will then apply the water-reduced tint and to which we will have also added carpenter’s Glue, In this way, in addition to staining the wood, we are sealing it. The measures that we will use will be 1 part of water and 1 part of glue, the better to add the dye little by little so as not to go overboard with the color, it is better to give it two layers of dye because it has been very light for us to make it darker than usual. what we want It must also be taken into account that the mixture will always be lighter than the final result.
Once the stain has dried, we will sand again and apply the acrylic paint previously diluted in water to give the board that stripped look. As with the stain, it is better to err by default than by excess when painting because, if it is not diluted enough, it will cover the grain of the wood and it is not what we are looking for, we want a rustic board with vintage flavor.
When the diluted acrylic paint has dried, we will sand and give another coat of paint. We will repeat this step as many times as we want until we get the stripped look What are we looking for. Once we have achieved it, we will apply 2 or 3 layers of colorless wax (or matte varnish), to protect the wood.
In the next post I will show you some ideas of what can be done with a rustic board like this one and what I used mine for.


