


Last weekend I took my first swim at the beach and I took advantage of it while I dried off to collect some shells by the shore. Once at home I soaked them to remove the remains of sand and I was thinking about what I could do with them. Several ideas occurred to me, but since I didn’t have much, I finally decided to make a original shell necklace..
MATERIALS
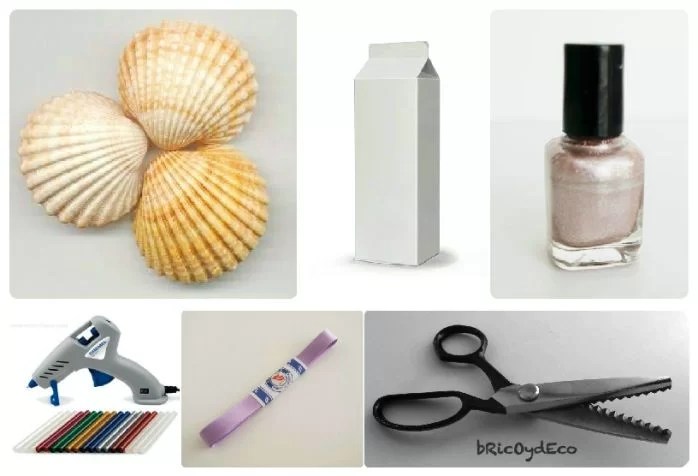
For this I used the following materials:
– Nail shells. Better if they are whole and of different sizes. If you can’t get them because you don’t have the sea nearby, you can look in bazaars or even take advantage of the ones you can usually buy at the fish market (clams, small mussels…).
– A tetrabrick. It doesn’t matter if it’s milk, juice… whatever we have on hand. The silver part of the tetrabrick cardboard will serve as the base for our necklace since it is resistant and easy to cut.
– pearly nail polish. I don’t like pearly nail polish at all, but I do keep them to paint on other surfaces. In this case I used one that came with a promotion and that had a nice mauve tone.
– A glue gun or silicone gun. If you like crafts and you don’t have any, it is interesting to acquire them since they are not expensive and you can give them a lot of use.
– white woodpecker glue. If we do not have at home we can use any other adhesive that is transparent once dry.
– A piece of felt. Although any piece of fabric can also be used, the interesting thing is that it matches the chosen tone of the nail polish.
– A headband. You can also use the chain of an old necklace that we no longer use and want to recycle.
– Nail zig zag scissors. This last utensil is not essential but if you have them the necklace will be more attractive. If you do not have zig zag scissors, normal scissors can be used perfectly.
As you can see most of the materials used for our shell necklace They are recycled materials that we normally have at home.
STEP BY STEP
To perform this shell necklace we will follow the Next steps:
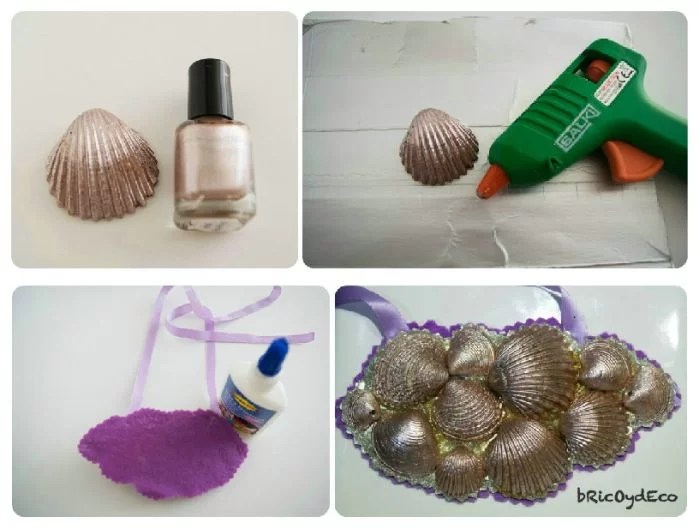
1st.- Paint the shells with nail polish and let them dry.
2nd.- Cut a piece of the tetrabrick and stick the shells on the silver part with silicone. To do this, we will spread the silicone with the gun on the cardboard of the tetrabrick and we will place the shells so that they fit together, as if it were a puzzle. I used glitter silicone silver that is more showy.
3rd.- Cut the excess of the tetrabrick flush with the composition of shells. The zig zag scissors will create a nice effect around the shells.
4th.- Stick the tape with carpenter’s glue on the back of the tetrabrick cardboard (the one that is printed) and where we want the necklace to be attached. If instead of tape we have chosen one or several chains, instead of gluing it what we will do is make a small hole to hook it to the cardboard of the tetrabrick.
5th.- Stick the felt on the back of the tetrabrick with carpenter’s glue. This is the part of the necklace that will be in contact with the skin or with the clothes we are wearing.
6th.- Trim off excess felt or fabric. We will try to leave a small border around the cardboard of the tetrabrick so that a little of the color of the felt or fabric that we have chosen can be seen.
After following all these steps, the final score has been the following:
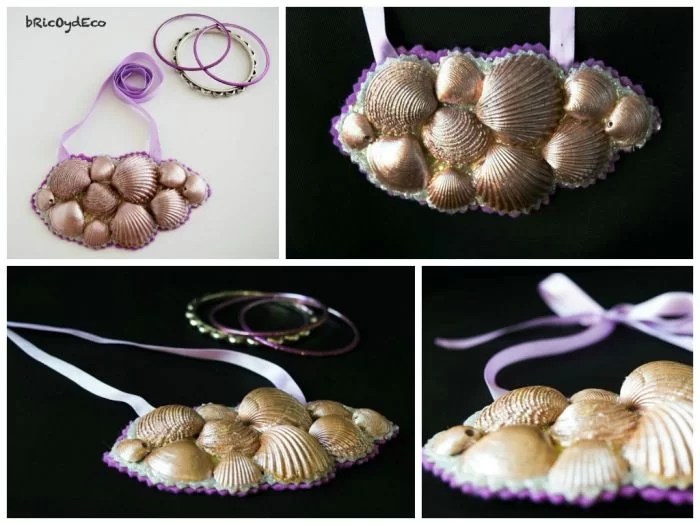
What do you think? I hope you liked this idea to make a shell necklacealthough you can always adapt it and take advantage of other materials you have at home to make it (buttons, beads from other necklaces, etc.).


