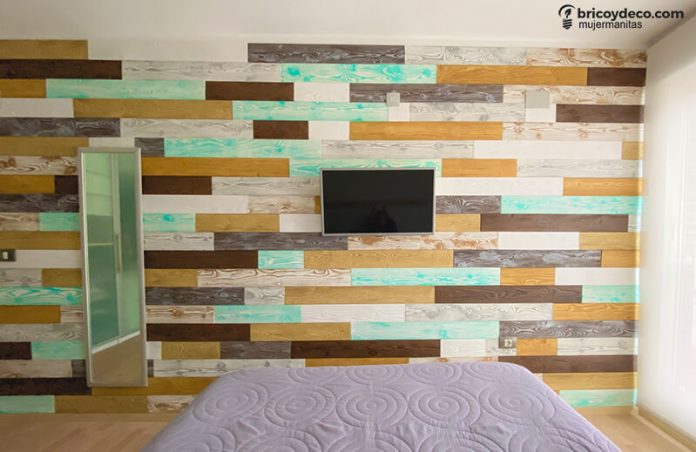
High-density polyurethane panels for interior wall cladding not only have a decorative function. They are also resistant and act as thermal and acoustic insulation. If you want to renovate any of the walls in your home, don’t miss this step-by-step video tutorial on how to install polyurethane panels.
Polyurethane is characterized by its elasticity and high resistance to wear. In interior decoration, its most common application is in the form of a panel to insulate false ceilings and interior walls. Their properties as acoustic and thermal insulation make it perfect for achieving greater energy savings by maintaining the temperature and a more comfortable environment.
In addition, polyurethane panels are very decorative, since they reproduce textures such as wood, bricks, geometric shapes, etc., in a very realistic way.
For all these reasons, I decided to cover one of the walls of my bedroom with polyurethane sheets. In the following video tutorial you can see the whole step by step:
polyurethane coating for walls
The polyurethane plates They are ideal for covering the walls of our home, since their lightness and flexibility allow them to be installed on smooth, embossed or wallpapered walls, as long as they are in good condition.
Personally, I wanted to give a more decorative and warm look to one of my bedroom walls. For this, I chose the Decoflair polyurethane slats from NMC since, in addition to being a coating that insulates thermally and acoustically, it has the following characteristics:
- Its wood finish is very realistic as it has veins, knots and 10 different drawings that can be combined with each other.
- The slats are 1.5 cm thick which makes it particularly shock resistant.
- Resists humidity and temperature changes, although it is not recommended for bathrooms
- Easily cleans with a damp cloth

How to install polyurethane panels step by step
The installation of a polyurethane coating is clean and very simple thanks to the flexibility and lightness of the material. All you need is a ruler or square to guide us, a utility knife to cut the panels and NMC mounting adhesive putty to fix them to the wall.
The mounting adhesive will be applied using the Wolfcraft caulking gun. This gun is ideal for applying silicones, acrylics and adhesives. Its compact design saves space and even fits in a toolbox. The quick change allows the cartridge to be held in a single click and is easily changed by pressing the sides. In addition, the casing is rotatable to be able to adjust the working angle.
On the other hand, the ergonomic handle is super comfortable to work with for several hours and its anti-drip system prevents the adhesive from coming out when you stop pressing.

The steps to follow when install polyurethane panels on an interior wall are the following:
- Locate, mark and cut the pieces. To do this, a square will be used as a guide and the cutter will be passed 2 or 3 times to create a cut approximately a couple of millimeters deep. Then the piece will be folded to separate both sides.
- Apply mounting adhesive, spreading a bead or several points along the length and width of the board.
- Fix to the wall pressed along the entire length of the slat. In just a few seconds the correct adherence will be achieved.

Mounting of polyurethane panels on walls with sockets
In case you have to install the panel over a switch or socket, what we will do is remove the frame and unscrew the mechanism. Next, the interior gap is measured and marked with a pencil on the polyurethane slat.
The next step will be to cut with the cutter and remove the excess part by folding it. Finally, it will be fixed on the wall and the mechanism will be screwed on again, although using longer screws than the original ones since the slats are 1.5 cm thick.

Once all the slats have been placed, the final result will have a great decorative effect in the room, as can be seen by looking at the before and after placing the cladding.

Complete the bedroom decoration
To complete the decoration of the bedroom and intensify the warmth provided by the polyurethane slats, a Stor Planet rug has been placed on the sides of the bed. Its spongy texture provides comfort underfoot. In addition, it has a heat-sealed finish that gives it confidence, a non-slip backing and it is very easy to clean.

On the other hand, its hydraulic pattern contrasts with the imitation wood slat cladding, but at the same time it is harmonious due to its neutral colors that match the bedroom textiles.

What did you think of this tutorial on how to install polyurethane wall panels? Without a doubt, it is not only a decorative solution, but also a functional one due to its acoustic and thermal insulation characteristics. You can find more ideas in this article on how to update the bedroom without renovating the furniture, as well as many more guides and tricks on DIY and decoration at
Project carried out in collaboration with Mi Hogar Mejor


