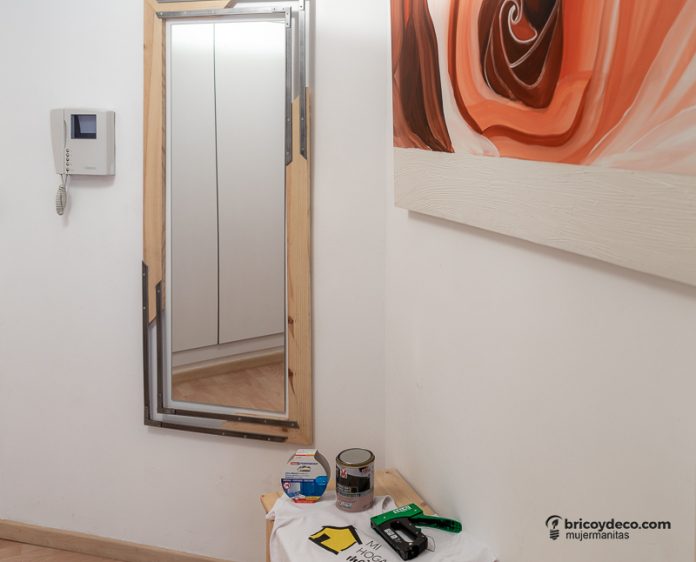
When drilling a wall, we always have the same doubts: am I drilling in the right place? What type of plug and screw should I use? What if I want to remove the holes I have made? In this tutorial you will see how to place a mirror without drilling with its corresponding frame using double-sided tape. Do not miss the step by step to know what type of tape is appropriate and learn all the tricks.
Mirrors are an essential furnishing accessory in any home. Either in the bathroom or in the bedroom to be able to see each other while we get ready or get dressed, or in any other room as a resource to visually enlarge the space. When it comes to hanging them on the wall, doubts usually arise about the type of screw and plug to use, if it will be the most appropriate according to the type of partition and if it will withstand the weight of the mirror. To avoid having to drill through the partition, the best solution is to use double-sided tape, but not just any. In the following video tutorial you will see how to install a mirror without drilling the wall, as well as the custom-made frame.
Materials and tools
To carry out this project, we have had the collaboration of Mi Hogar Mejor, which is a website where you can count on a multitude of DIY tutorials to do yourself. Below, you can see the list of materials and tools used:

How to install a mirror without drilling step by step
First of all, keep in mind that to place a mirror on the wall, not just any double-sided tape will do. It will be necessary that you respect the chemical compound of the back of the mirror, as well as that it be 100% resistant to humidity to be able to place it in a bathroom.
In this sense, the Tesa double-sided tape meets these requirements and also has the following characteristics:
- Supports mirrors 4 mm thick and up to 70×70 cm, which is equivalent to a surface of half a square meter, which is the surface of my new mirror
- It resists humidity, so it is ideal for placing the bathroom mirror without having to drill the tile
Its installation is as simple as following these steps:
- Place several strips of masking tape along the back of the mirror
- Press with the help of a spatula to make sure that the tape is well adhered
- Remove the protective paper
- Mark the place where the mirror will be placed on the wall. Help yourself with a level to make sure it will be straight
- Place the mirror on the wall and press with a cloth on the entire surface to make sure that the tape adheres to the wall

How to make a custom wood and steel frame
To provide a more decorative appearance to the mirror, a custom wood and steel frame. This frame has also been placed with double-sided adhesive tape, but this time a special mounting tape has been used. The steps that have been followed have been the following.
1º.- Cut the pieces of wood and steel
First, the wooden slats will be cut at a 45º angle with the miter saw. Alternatively a handsaw and miter box can be used. In the case of steel, 8 pieces have been cut at an angle of 45º with the jigsaw and a special blade for metals.
The dimensions of the pieces will depend on the size of the frame, but they must be able to surround it, leaving a gap of a couple of centimeters around it.

2º.- Join the pieces
Two different systems have been used to join the pieces depending on the material. In the case of wood, what has been done has been to apply carpenter’s glue and reinforce the joint by placing some staples with the Salki Manual Stapler. This stapler has the following features:
- Stapling force can be adjusted
- It has an ergonomic handle
- Loads from the bottom with different sizes of staples and nails
- Can be easily unblocked
Once the glue has hardened (24 hours), the staples will be removed, the holes will be putty and the joint will be sanded to make it perfect.

Double-sided mounting tape will be used to join the steel pieces. In the first place, several holes will be made on the steel plates and, later, they will be sanded. Next, the adhesive tape will be placed on the metal brackets and two of the pieces will be joined. Finally, they will be screwed to the wood.

3º.- Varnish and protect the wood
The next step will be to varnish and protect the wood. For this, it will be used V33 ultra resistant matt varnishwhich has the following characteristics:
- Suitable for all wood species, both European and exotic
- Guarantees excellent resistance to shocks, scratches, stains and water
- Does not drip, good brushability, fast drying and absence of unpleasant odors
- Complies with the EN 71.3 toy standard making it ideal for toys and children’s furniture
A couple of layers will be given, both on the front and on the back of the frame.

4º.- Place the frame on the wall
Finally, the frame will be placed on the wall. For this, mounting tape will be adhered to the back and pressed on the wall until it is well fixed.

After following all these indicated steps, we will have both the mirror and the custom-made frame placed on the wall and without having to drill the wall.

What did you think of this project? place a mirror without drilling with a custom-made frame? I hope it has been useful for you to know what type of double-sided adhesive tape to use according to the material you want to adhere.
If you liked this post, you can find many more DIY and decoration projects and tips at .


