Have you ever accounted for the time you spend looking for your tools? Organize the workshop to have everything at hand It is the first step when carrying out your DIY projects. With this guide you will learn the keys to have everything organized, save time and work more comfortably.
There is no doubt that time is one of the determining factors of productivity. Having a good organization of our workspace will make us much more productive, since you will not waste time looking for your tools.
In fact, if I have learned anything after having done numerous DIY projects, it is that there are always unforeseen events that make their execution take longer. If you also add the time it takes to find the tools you are going to need, the project can become a nightmare that never ends.
For this reason, I can assure you that it is worth spending a day or two organizing your workshop, but… how to do it? Where to start? Follow these tips to work efficiently and feel comfortable in your DIY corner.
Organize your tools
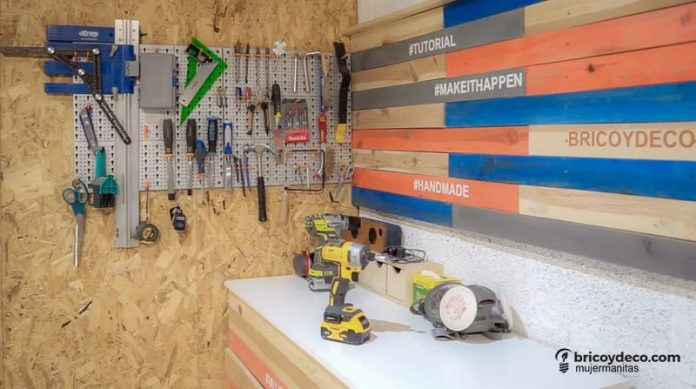
have your manual tools at a glance will help you find them quickly. For this, it is ideal to have a wall-mounted panel on which to hang them. at the online hardware store ferrOkey You will find panels or racks of different sizes that you can adapt to the space you have. In addition, you have the advantage that you can select the “click & collect” option to pick it up at the nearest store.
When arranging the tools on the panel, I recommend organizing them by categories. For example, group the ones for metalworking in one row, the ones for woodworking in another, etc.

In the case of electric tools such as drills, screwdrivers, sanders, saws, silicone guns, etc., we can choose between two solutions:
- Place each tool individually inside a suitcase or briefcase. In this way, its accessories such as chargers, sandpaper or screw bits can also be stored inside.
- Have them all arranged on the different shelves of a closet or shelf.
Both options have their advantages and disadvantages. For example, the first is ideal for small workshops at home, since everything is hidden from view. However, each suitcase must be labeled to know the type of tool we have stored inside and it also takes more time to take it out and store it. In this sense, the second option is much faster, but it has the disadvantage that your power tools will be more exposed to dust.

Keep only what you use frequently on hand
There are tools and accessories that are only used from time to time. Ideally, you should keep them in less accessible places, such as the highest or lowest part of a shelf or closet. For example, it is of little use to have three screwdrivers of the same size at hand. It is more efficient to exclude duplicate or spare tools from the cabinet or panel and place them in storage boxes. Of course, I recommend that you write down on the outside of the box what is inside so that when you have to look for that part, you do not despair opening boxes.
Also do not accumulate tools or accessories that are broken or do not work. If you think you can take advantage of any of its parts as a replacement for other tools, disassemble it and keep only that part.
On the other hand, metal shelves are a good storage option for your workshop. Always choose a larger size than you need, since you must anticipate that it will not take long to occupy those shelves that are now empty.

There is no order without cleanliness
If your workshop is tidy but you don’t keep it clean, you will cause the opposite feeling. Also, cleaning your tools will lengthen their useful life. It is not necessary for everything to shine like a mirror, with 10 or 15 minutes a day and applying these tips, you will have a clean workshop:
- Sweep the floor daily when you finish and remove any stains that may have fallen on it, don’t wait for them to dry.
- Frequently clean the dust and dirt from your bench or work table, in this way you will avoid dirtying the material or project that you are doing on it.
- Always have bins on hand, as well as a container dedicated to waste that needs special disposal.
- Concentrate the work area in a single point to avoid dirtying other areas such as passage and storage.
- Keep your workshop ventilated to facilitate air renewal and that the environment is not overloaded. Use air purifiers if necessary.

After following these tips you will have achieved organize the workshop in a few hours, as well as keeping it clean and tidy. In a short time you will begin to notice the benefits of the time invested in its organization and you will enjoy much more when carrying out your DIY projects.
If you liked this post, you can find many more DIY guides at .


