

Part II: Assembling the decorative lamp
In this 2nd tutorial we continue with our decorative lamp of recycled materials.
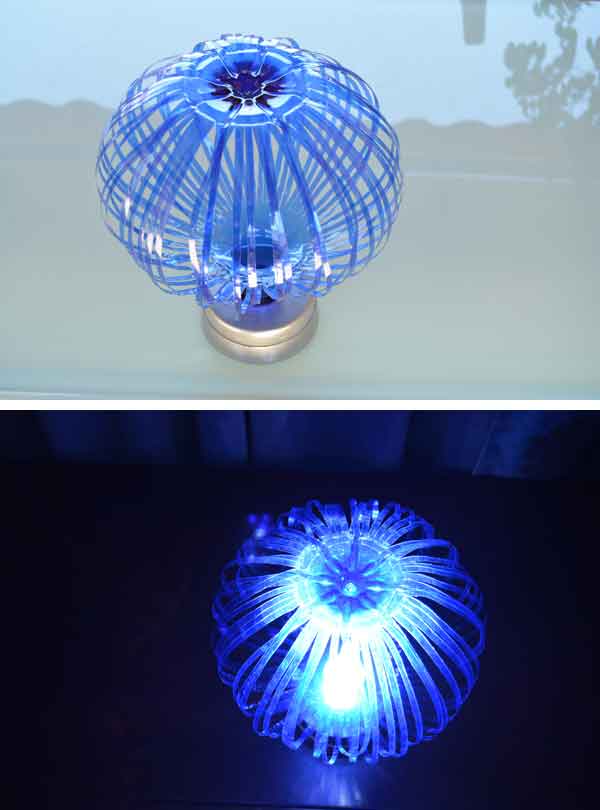
We are going to mount the original lampshade, which we did in our previous video, on its base.
To make push operation possible, the base will be made up of two parts.
One fixed and one mobile. The latter will be attached to the lampshade forming a single piece, which will go up and down when the ignition mechanism is activated.
It is nothing complicated. Do not miss it.
If you haven’t seen the 1st part of this tutorial yet, you can see it by clicking on the following link globe lamp.
VIDEO
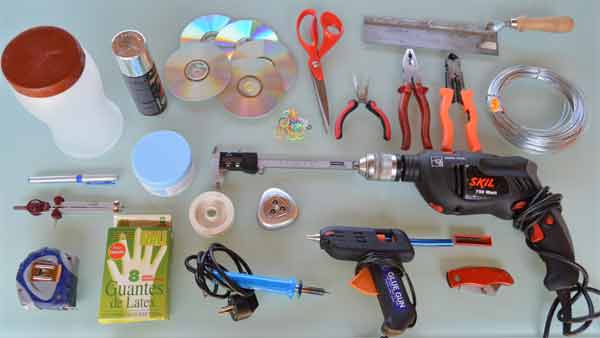
Well to start, we will need the following tools and materials:
In my case I am going to recycle a bottle of cola-cao and a jar of cream.
In my case, in principle, I calculate that I will need 4 or 5.
- Cutter.
- Marquetry hacksaw, tin soldering iron or pyro-engraver.
I am going to use the latter.
- Permanent marker.
- Meter (flexometer).
- Caliber is optional.
If you don’t have, nothing happens.
- Hot melt adhesive gun.
- Nylon thread.
- Wire.
- Pliers.
- Scissors.
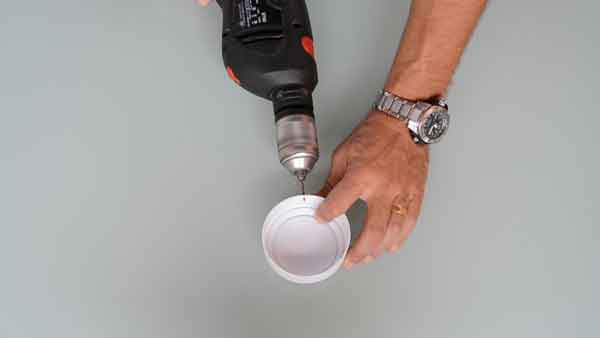
- Small diameter drill and bit.
- Compass.
- Rib saw.
- Latex gloves.
- Spray paint.
- Small elastic bands.
- LED push button.
Pay attention to the procedure:
A clarification before we start…
I am going to use a bottle of cola-cao and another of cream, because they are the ones I had on hand and they serve me for what I want to do. But you, you can use totally different ones. They only have to meet two requirements:
- On the one hand, they must be wide enough to give stability to the decorative lamp.
- And on the other hand, that one enters the other, but without much slack.
We are going to use a new bottle, to preserve the lampshade that we have already made.
Ok, with that said, let’s get to it.
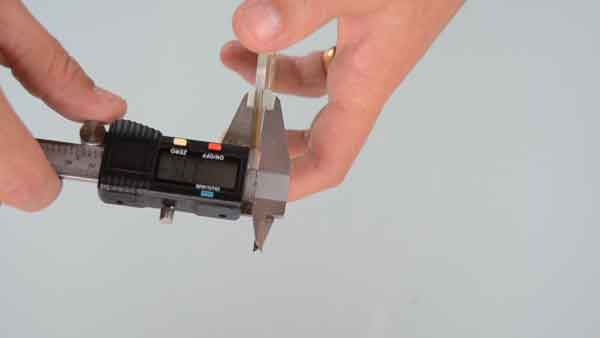
Step 1: The first thing is to measure the diameter of the mouth of the bottle. The most comfortable thing is to use a caliber, also called “calendar”. But you can also do it with a ruler or even a ruler.
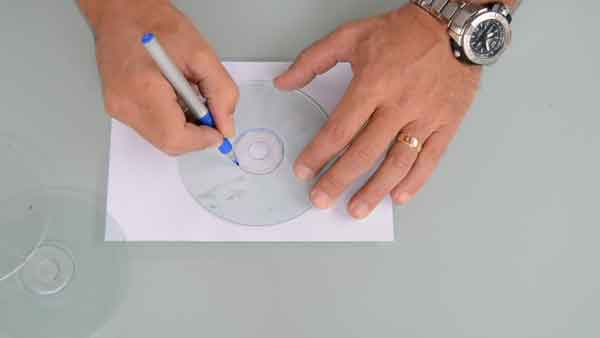
With the compass we draw a circle of the same diameter, which in this case is 38.5mm, on the lid of the wider can. In the very center of the lid.
We highlight the pencil stroke with a permanent marker, to see it better. And we cut it.
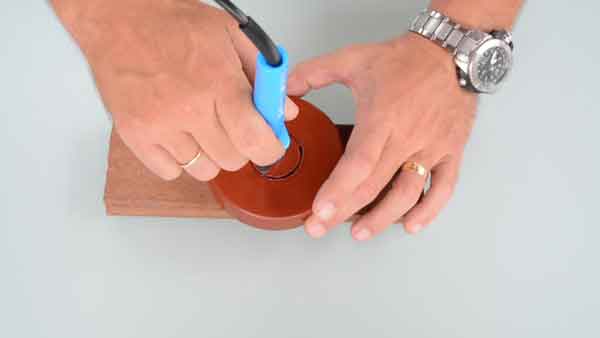
For cutting, the best thing to use is a fret saw. However, I am going to use a pyro-engraver, which I have closer at hand.
If necessary, go over the cut with a chisel to remove burrs.
Eye! With cutting tools, always be very careful.
Once this is done, we go over it with medium grain sandpaper.
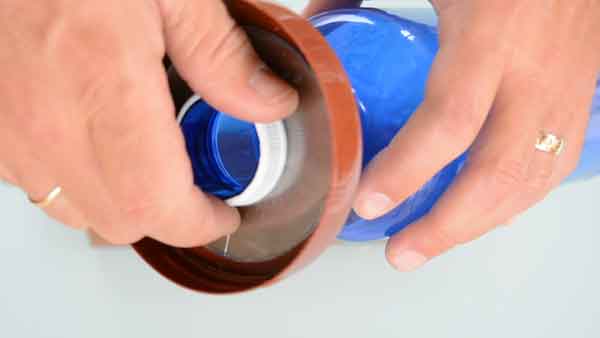
Step 2: Now we remove the cap, insert the lid and put the cap back on.
The gap between the plug and the lid, we have to fit it so that it does not move. For this, we will use CDs.
To make this measurement easier for us, we are going to turn the lid over and measure it with a caliper. If you don’t have one, I tell you the same thing as before, you can also do it with a ruler or meter.
It gives us a margin of 3.8mm.
We stack a number of CDs, the total thickness of which is approximately 3.8mm. So we have to take 3.
Step 3: To make it possible for all the light to come out upwards, we are going to remove the aluminum layer that the CDs have on one of their faces.
If you want to see how to do it quickly and easily, click on this link how to peel cd.
Once you have the transparent CDs, first we will make a template by tracing a 38.5mm circle on paper with a compass. Just like we did with the lid.
We put the CD centered on top of the template and trace the circle with a permanent marker.
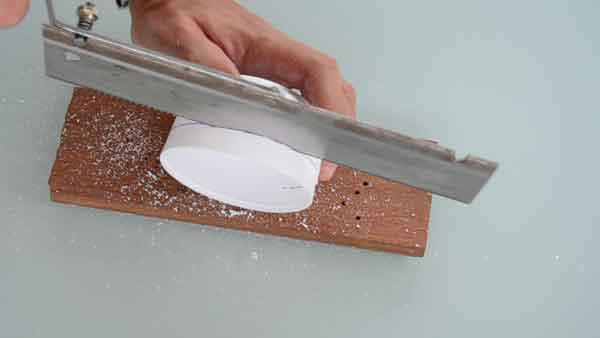
Then with the pyro-engraver, or the marquetry saw, we will empty the circle. Put a piece of wood under the CD. This way you will avoid damaging the table.
We will review the cut with the chisel, and with sandpaper. Exactly the same as we did with the lid.
We will proceed in the same way with the 3 CDs.
Now, we test how it is, inserting the CDs in the neck of the bottle.
If it were necessary to review them because they do not fit, we review them and that’s it.
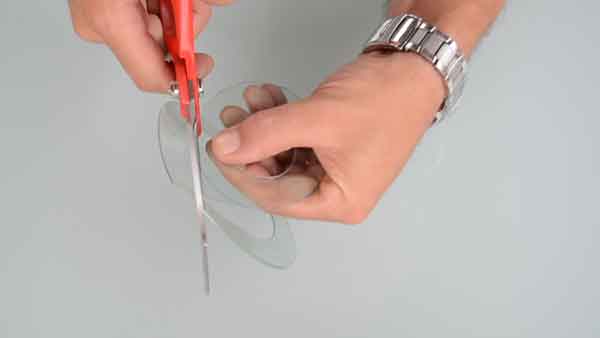
Step 4: Now we have to cut the outer area of the CDs so that they fit inside the smaller pot and, thus, make possible the necessary game to turn the button on and off with the button. decorative lamp of plastic.
We measure the inner diameter of this, which is 84.7mm.
We make a new template on paper, drawing an 80mm circle, leaving a small margin on each side.
We transport the circle to the CDs and cut them. This time we will cut them with scissors. Use sturdy, well-sharpened scissors.
And we do a new test on the bottle.
Step 5: Now we cut the inside of the tampon, leaving it as a nut.
In this way, all the light will pass towards the lampshade, making it possible for our decorative lamp project spectacular light effects.
As the cap is made of a not very hard plastic, we can cut it well with the cutter.
Once emptied, we review it.
We reassemble everything, to see if we go well.
Only in this way, we will always be in time to make the necessary corrections.
Step 6: We introduce the led button inside the jar and make the appropriate measurements to cut both the jar and the pot that will be the moving part of the lamp.
Here go slowly and take the measurements as many times as necessary. It is about combining several measures, and we have to go slowly so as not to make mistakes.
Once we have the measurements clear, we transport them with a permanent marker on the pot and the jar. And we proceed to cut them.
The boat, which is less strong, will be cut with the cutter.
The jar, which is harder, with the rib saw. And once cut, we will go over the latter with sandpaper.
You can use any another type of sawbut take care that the blade has small teeth.
Once cut, we reassemble everything and test it.
If it works correctly, we move on. Otherwise, we retouch the measurements and cuts.
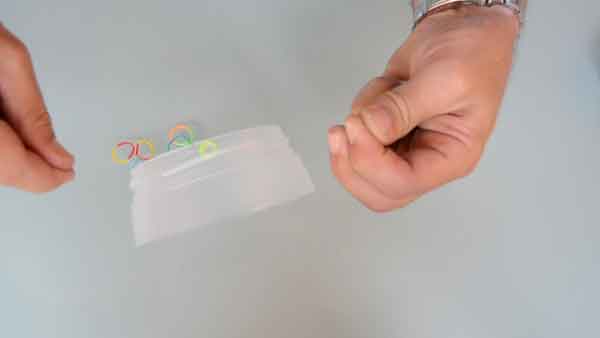
Step 7: Now we are going to join the fixed part with the mobile part. For this we will use wire and elastic bands. You will see how it is:
We measure the circumference of the jar, and mark the 3 points where the hooks will go, which will have to have the same distance from each other. And we make 3 small holes in its upper part.
If you had made them too high or too low, as it happened to me, don’t worry since this part will not be seen later, make them again in the right place.
With wire, we make some small hooks, and we anchor them to these 3 holes.
See how I do it in the video.
Step 8: Now we take the pot of cola-cao, we remove the lid and we make the same distribution as before, only in this case we will make 3 pairs of holes.
This time we will use fishing line, so that it does not get in the way when threading the lid.
We point and drill.
We introduce the line with a rubber band, we give it two turns, and we knot well.
We assemble everything, and test that the rubber exerts enough pressure to keep the pieces as if they were one, while allowing the necessary movement to connect and disconnect the button.
If necessary, we would shorten the hooks, or extend the length of the rubber bands.
Step 9: Once it works correctly, it only remains to do a little magic.
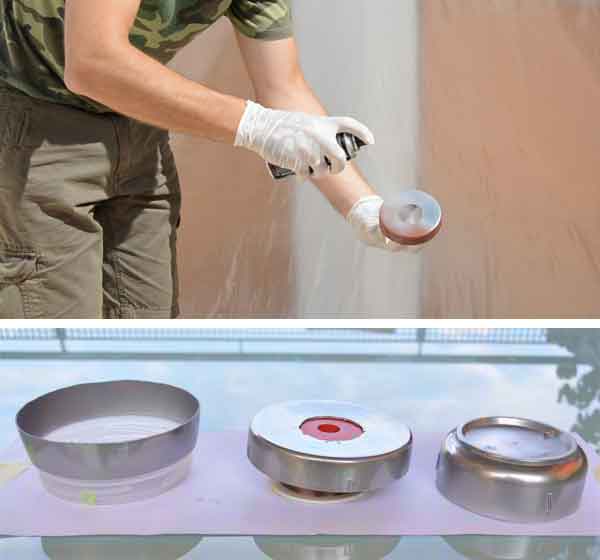
We are going to make the base of the lamp, which is made of plastic, look metallic. To do this, we will give a chrome finish by applying chrome-colored spray paint.
We will paint the three pieces separately. But first of all, we will protect the area where we are going to paint so as not to stain anything, covering it with painter’s plastic.
We also protect our hands with latex gloves.
Now we can paint. First we paint the jar, only the lower part of its outer part, which is what you could see something. Then the cover, only its exterior. And finally, the outside of the boat. On this occasion, we will protect the area of the thread with bodybuilder’s tape; which we will remove immediately after having painted it.
Now let it dry for the time indicated by the manufacturer.
Step 10: All that remains is to assemble all the pieces that make up our decorative lamp.
Secure the wire hook to the neck of the bottle with pliers.
We cut the excess line that we had left.
We test that the base has the necessary mobility to turn it on and off.
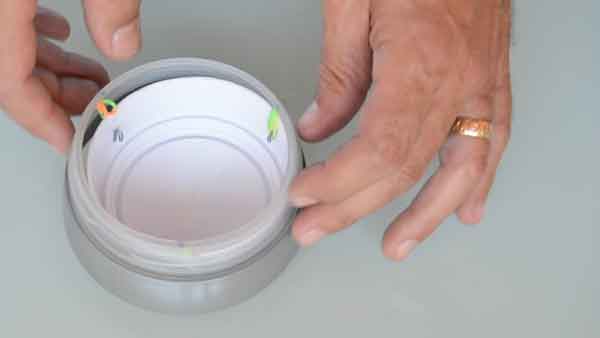
We introduce the led button in the base.
And we assemble the two parts of the decorative lampthreading them.
When making lamps with heat-sensitive materials, such as plastic, cardboard, paper, etc., NEVER use incandescent bulbs.
The reason is very easy. This type of bulbs lose around 95% of the energy in the form of heat. With which they pose a serious risk of fire if we combine them with combustible materials.
However, one of the advantages of LED lighting is that they transform 99% of the electrical energy into light, losing only 1%, compared to 95% of incandescents.
In this link you can see all the advantages of LED lighting.
voila. We already have our super-original decorative lamp desktop push, made almost entirely with recycled materials.

Now you can surprise your visitors with a decorative, original, functional, and unique element.
DIYBlog channel


