A few days ago, we presented our “mega article” dedicated to the soundproofing of a commercial premises, which will be made up of twenty parts. Well, today we will share with you the second chapter, in which we will deal with the layout of the premises, the making of a plan and the sound measurement to check the current soundproofing.
Therefore, before getting down to business, we have to make a previous step, very important, especially when the project that we are going to face is of magnitude as it is the case.
taking measurements
As we say, it is about, first of all, taking measurements of the surface to be soundproofed, the construction elements that will intervene in some way and, in our case, the obstacles that we can find, such as pipes.
Layout and plan of the premises for sound measurement.
Making a plan
Second, we need to graphically represent all the measurements we have taken. We will do this through a plan, in which we will also capture what we want to do and how we want to do it exactly. The more detailed and thorough the plan, the better.
And finally, in this second chapter, we will carry out a first sound measurement so that, at the end of the project, we will be able to carry out a new test and check the level of insulation achieved and, therefore, the improvement achieved.
I insist that, as in most DIY jobs, before starting, it is highly recommended, I would even say necessary, to spend the necessary time to make a plan. No time should be spared on this step. Only in this way, we will avoid improvisations and not give rise to many failures and inconveniences.
We have made this plan to scale that includes, in addition to the dimensions of the premises, all the construction elements, such as: pillars, beams, load-bearing walls, joists, pipes, and the layout of the structure that we are going to install.
First sound measurement test, prior to the soundproofing of the premises.
sound measurement
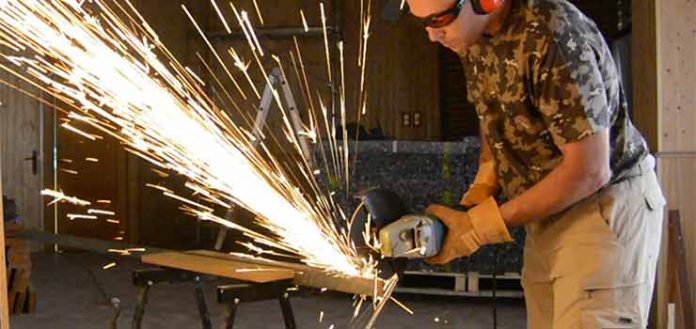
Before continuing, we are going to carry out a first sound measurement. We’ll take a sample from the adjoining room. To do this, we will use a sound meter, as well as a radial or grinder, since this tool emits a high frequency.
Once the meter is mounted on its tripod and oriented towards the focus of the sound, we begin the test.
We return to the workshop and, first of all, we put on all the necessary protections. Remember, safety first.
And, now yes, we begin with the test, which will consist of measuring the sound produced by a radial when cutting a steel plate.
Below you can see the results. We have obtained an average of around 63 dB, with the highest peak located at 68.5 dB.
Once we have completely finished all the soundproofing, we will make a new measurement to check what the sound reduction we have achieved has been.
Results of the first sound measurement. Average level and maximum sound peak obtained.
Clarification
I want to clarify that the sound meter that we have used has a measurement range that goes from 30 dB to 130 dB.
This means that the maximum graphic representation that we can demonstrate will be 30 dB, although the soundproofing level may actually be below.
However, even if it were only 30 dB, the result would be quite good, since we would have achieved a reduction of more than half of the sound level.
In the next chapter, we will see how to Measure, Mark, and Drill the beams to subsequently anchor the plates.
Then I leave you the directory of the entire project, so you can navigate through it in the order you prefer.
Video of the work done in this article
Programming the soundproofing of a room
1st Part – Preparation of the structure.
1st Chapter – Introduction and work programming.
2nd Chapter – Layout, plan and measurement of the current soundproofing.
3rd Chapter – Measurement, marking and drilling of the beams.
4th Chapter – Drilling and machining of metal parts.
5th Chapter – Welding and protection of anchor plates.
6th Chapter – Placing the plates on the left side.
7th Chapter – Measurement of the angle of facing plates, welding and protection of these.
8th Chapter – Placement of plates in the first right lateral half.
9th Chapter – Installation of the first half of joists.
10th Chapter – Measurement of the angle of the rest of the plates, welding, protection and placement.
11th Chapter – Placement of the rest of the joists and completion of the first part.
2nd Part – Soundproofing of the ceiling.
12th Chapter – Acoustic materials and installation procedure.
13th Chapter – Step prior to soundproofing.
14th Chapter – Cutting and preparation of acoustic plates.
15th Chapter – Preparation of acoustic plates.
16th Chapter – Installation of soundproofing on the ceiling.
3rd Part – Vertical soundproofing.
17th Chapter – soundproofing of the walls.
18th Chapter – Soundproofing of shutter drums.
19th Chapter – Door soundproofing.
20th Chapter – New measurement of the final soundproofing and review of the work.
.
If you don’t want to miss any of our publications, SUBSCRIBE…
to the Blog => I WANT TO SUBSCRIBE
to our YouTube channel => I WANT TO SUBSCRIBE
Once you have subscribed to our YouTube channel, don’t forget to do click on Tinker Bell. This way you will receive a notice every time we upload content.
How to subscribe to our YouTube channel.
.
.


