Having an organized workspace is essential to save time when performing any task. In this practical guide you will find 7 tips to organize your DIY workshop that will provide you with practical solutions based on my own experience.
A DIY workshop is not just a space to work with tools. In order for it to be functional and practical, it must also meet a series of requirements organization, distribution and comfort that will help develop your DIY projects efficiently.
For this reason, I have recently renovated my workshop to optimize its layout and create a personalized workspace. In the following video you can see the whole process:
Delete and repair
The first step in organizing your workshop will consist of remove or get rid of everything you don’t use and repair what is a problem. For example, in my case the furniture was not practical since:
- The doors of the modules were too heavy and sagged
- The drawers did not open properly
- Interior shelves were missing to better organize the space
- The modules accumulated dust and sawdust between them that was difficult to clean
- The upper part of the bench was wasted
- The screen was uncomfortable to move because the floor is not level

Also, I had a leak problem that he had to solve before taking any action and avoid damaging the new furniture. To waterproof the roof from the inside, I used Brik Cen R-38 from Quiadsa, which is an ideal insulating membrane for waterproofing cracks in roofs, decks, exterior and interior joints, basement walls, etc.
The application is very simple and cross-links at room temperature with humidity. It is available in white, grey, terracotta and black so that it goes unnoticed, although in this case a false ceiling will be installed and this repair will be hidden.

custom furniture
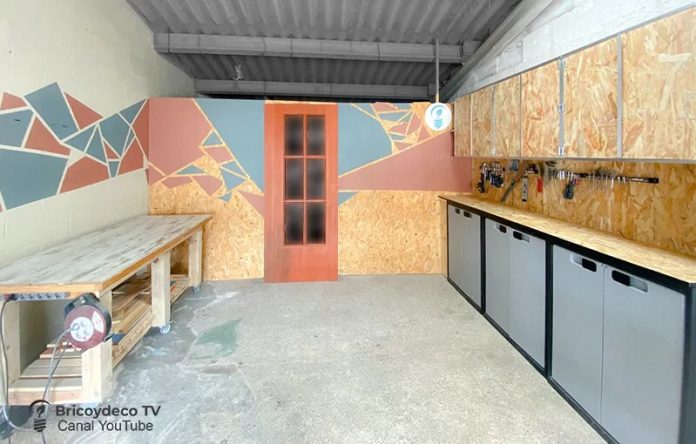
When organizing a workshop we must take into account our needs and priorities. In my specific case, being a workshop where carpentry projects are usually carried out, I needed cabinets with doors that would prevent the tools and materials from filling up with dust and sawdust as much as possible. They also needed to be easily cleaned with a pressure washer, which is why I chose resin cabinets and water-repellent OSB boards to build custom cabinets.
Custom furniture optimizes the space to the maximum since every corner can be used. The Wolfcraft metal dowel master for wood is ideal for assembly, as it achieves the exact positioning of the holes to subsequently insert the dowels or dowels.
The kit consists of a drill guide, jaws, an 8mm wood drill bit with a depth stop and 40 wood dowels.
To make angle joints, one of the boards will be fixed to the guide and to the auxiliary piece. Next, the second board will be placed in a vertical position and fixed with the clamps.
Then, the stop will be attached to the drill and the holes will be made by inserting the drill in one of three sizes: 6, 8 or 10 mm.

Expand the useful work area
One way to expand your work area is to place a worktop or board between the high and low cabinets or on brackets screwed to the wall. In it you can prepare the tools that you are going to use during the execution of your project to use them quickly when you need them.
In this case, to fix the countertop on the lower cabinets and panel the front with OSB, Quiadsa’s Fixed + Turbo adhesive has been used, which is super fast and joins practically any material.

always at hand
When you look for a tool, do others appear that you didn’t remember you had? Without a doubt, this is another example of poor organization and to solve it, the best thing to do is to define a place for each tool and try to keep the frequently used ones in view.
For this, a magnetic tool bar like the one from Wolfcraft is ideal, which supports 13 kg of weight and has 8 powerful magnets that guarantee the fastening of screwdrivers, hammers, pliers, bits, etc.
Its assembly is very simple and includes 2 supports that allow you to place them one after the other.

Every corner is useful
As small as it may seem, every corner is useful and customized solutions can be created to take advantage of it. For example, after placing the upper cabinets, there was a gap about 15 cm wide in which some shelves have been placed to leave the drills. In the lower part, a cabinet or rack with wheels for the sergeants has been built.
These types of solutions help ensure that everything has its place, is easily located and saves you time when carrying out your DIY projects.

personalized decoration
Your workshop can be a space to develop a hobby or also your workplace. In both cases it is important that it is not only practical, but also that you feel identified with it and reflect your personality.
Personally, I wanted to give it a touch of color with a geometric wall decoration. For this, I have used Jotun’s Majestic Resist, specifically the colors Lively Red, Humble Yellow and Serene Blue.
This wall and ceiling paint is characterized by being odourless, super washable, stain repellent and scuff resistant, making it ideal for high traffic areas such as kitchens, children’s rooms, hallways or a DIY workshop.
Applying a couple of layers the surface will be completely covered. Although it must be taken into account that between both layers it is necessary to allow 6 hours to elapse.

You can always improve
My last piece of advice is never to consider the organization of your workshop as the final one, as your needs may change over time. For this reason, you must open your mind to changes and adapt what no longer works or has ceased to be useful to you.

In short, your DIY workshop is a living space that is constantly evolving, so I hope that this guide will help you organize it and turn it into a functional and comfortable place for you. You can find more guides and tricks on DIY and decoration at
Project carried out in collaboration with Mi Hogar Mejor


