


How many times have you seen abandoned furniture next to a container? On many occasions, they are furniture that can still be given a second chance. If you want to know How to restore old furnitureDon’t miss this step by step tutorial.
As soon as I saw this chest of drawers piled up next to other demolition furniture, I thought that there was still enough to be used for it. Although two of the three drawers were missing, it was possible give this old piece of furniture a second chance and use it to store bedding, or as a side table for the television.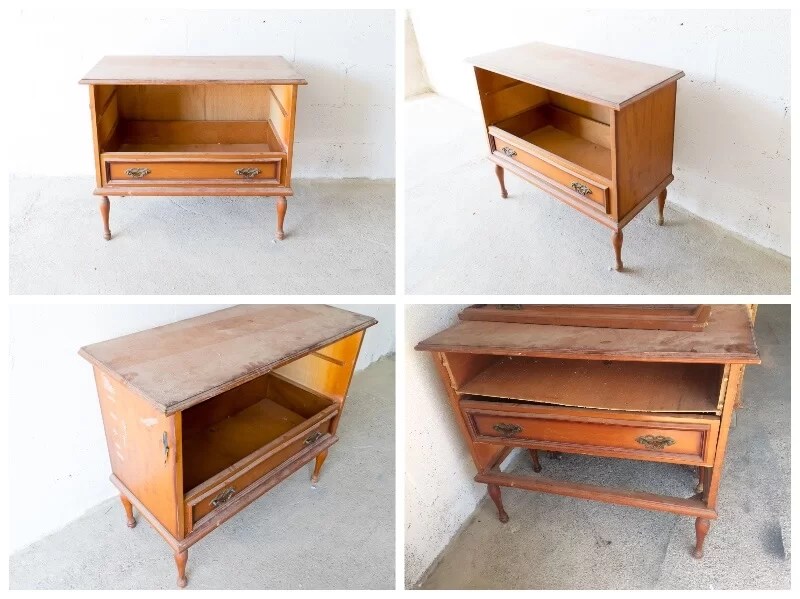
Materials and tools
The materials and tools that I have used have been the following:
- Fabric with personalized print to upholster the interior. In this article you will see the entire process to create a personalized upholstery fabric.
- Leather pulls.
- Universal spray primer. It will improve adhesion and prevent you from spending more paint than necessary.
- Saphire Blue spray paint. This navy blue tone is not only trendy, but it is also very elegant and really pretty.
- Spray adhesive to fix the fabric to the furniture.
- Spatula
- Sander, sandpaper sheets or abrasive sponge.
- Vaporette or burning alcohol.

Restore old furniture step by step
Before restoring or tuning any piece of furniture, you must identify what material it is made of. In this way, we will know what type of products or treatments we should apply. In this case, the base and legs of the dresser were made of wood and the rest of MDF and shiny melamine.
You will also have to see the parts that are badly deteriorated and replace them with new ones. Specifically, the back of the chest of drawers was in very poor condition and also several drawers were missing. For this reason, I chose to place a shelf above the last drawer and create an open storage area.

Step 1: clean the furniture
The cabinet not only had several layers of dust, but also had traces of stickers and electrical tape on one side. To make a deep cleaning steamer can be used. In this way, the stickers and embedded dirt are more easily removed.
An alternative solution to steaming is to use methylated spirits.

Step 2 – Sand the Surface
After removing the layers of dust and dirt I discovered that the envelope was quite damaged. In addition to scratches, ridges and stains could be seen.

To remove them and smooth the surface, I sanded the top with a multi-sander. For the moldings and legs it is more convenient to use a medium grain abrasive sponge, since it adapts better to embossed or turned surfaces.

Step 3 – Apply Primer
The next step was apply primer. Although with sanding you get a surface that is porous enough for the paint to have a good grip, with the primer you get:
- Seal the surface and prevent bleeding or tannin problems on wooden furniture.
- Spend less paint.
- A base of uniform color that will highlight the final color.
On the other hand, it must be taken into account that the drying times between the primer and the paint must be respected, especially when they have different bases (water and solvent). Otherwise, a cracked effect may occur.

Step 4: paint
After the drying time of the primer, the paint will be applied. For the chest of drawers I used spray paint sapphire tone and gloss finish. This color adds elegance to a piece of furniture with a classic line like this one, but at the same time gives it a more up-to-date look.
Only the exterior part was painted since the interior was going to be upholstered.

Step 5: upholster
The last step was to upholster the interior part of the furniture that is visible. To do this, a custom print by printing on fabric. The design consists of a small motif in shades of blue, tan and gray that give the piece of furniture the look of a suitcase or trunk interior.
To upholster I followed the following steps:
- I cut several pieces of fabric to size to line the inside sides of the cabinet, as well as the top of the shelf, the front of the drawer, and the new back. Keep in mind that you must leave a minimum of 1 cm of margin.
- Next, I sprayed the back of the fabric with spray adhesive. The advantage of this type of adhesive is that it does not moisten the fabric and also allows it to be rectified. In this way, you have a margin of time to stick and take off until you adjust the piece to the furniture.
- With the spatula, smooth the surface to fix the fabric well and eliminate any bubbles.

Finally, a varnish can be applied to the entire piece of furniture to protect it from bumps and scratches, as well as the upholstery from stains.
Before and after of an old piece of furniture
After following all the previous steps, it has been possible to transform a demolished piece of furniture into an elegant auxiliary piece of furniture.
The leather handles give it a modern touch while reinforcing that suitcase interior look you were looking for.

There is no doubt that the change is surprising to say the least. Who would say that it is the same piece of furniture? I think that if the person who abandoned it were to see it again, they would want to take it home again.

What did you think of the transformation after restoring an old piece of furniture? Not only has it been given a second chance, but also with the customization of the fabric an exclusive piece of furniture is achieved.
If you liked this article, you can find many more practical guides and DIY projects at .


