

In this article we will talk about wooden gazebos, also called pergolas. A pergola can be a real oasis in the middle of your garden or terrace, but it can also become fun and a real adventure while you build it.
For DIY enthusiasts, the garden is a real “sanctuary”, where they can let your creativity run wild, materialize many ideas and thoughts, as well as relax and enjoy carrying out DIY projects and tasks such as maintaining garden furniture.
As I was saying at the beginning of this article, today we will focus on an ambitious project. We will see how to make a wooden pergola for our garden.
Pergolas and gazebos for the garden
Definitively, wooden gazebos for gardens provide indisputable added value to any garden, and even to certain terraces. They highlight the beauty of your garden in a very natural way, while they can mask to a certain extent the less beautiful or more cluttered areas and, of course, provide shade and a zone of maximum comfort outdoors.
Wooden gazebos are not only wooden structures or places, but multipurpose environments that awaken diverse and disparate sensations, all of them pleasant and positive. I am referring to the fact that they are ideal for holding meals and gatherings with family or friends and enjoying this space in company. But they also invite meditation, recollection and relaxation, making it possible to enjoy it alone as well.
These types of environments offer endless possibilities, aesthetically speaking. To the classic pergolas, other types of rustic gazebos are also added, whose beauty is totally comparable to that of those. So that you can decide which style is the one that best suits you, here is a gallery on Pinterest of photos of rustic wooden gazebos.

Some time ago we published an article on how build a terraced pergola to the main building. Today we are going to publish this other article that shows how to design and build an independent pergola isolated from any other construction.
Materials for the pergola
Regarding the dimensions, it is never advisable to build a pergola that measures less than 80 centimeters from the ground to the bottom of the rafters. The minimum height should be approximately that of an interior door. However, very tall pergolas in relation to their length and width are not advisable either.
There are no predetermined dimensions for the construction of pergolas. Although this type of structure does not support weight, it is necessary to take into account avoiding too wide spans without intermediate posts, in order to prevent the beams from sagging and the deflection from being high.
In this case, two 3 meter long double main beams have been used, connected to each other and to the post with double galvanized through bolts.
For lights greater than 4 meters, angles would need to be added to each side of it.
Eleven simple joists have been installed on the main beams.
The section of the beams used is 4 x 25 cm.
pergola design
You will only need four wooden posts, some boards, and little else. But you do have to take into account a few important aspects, such as the pergola must be plumb, level and well squared.
The choice of the type of wood in this type of work is an important step and one that must be stopped to make the right choice, since it will withstand the effects of water in winter, the harmful effects of the sun in summer , as well as the action of insects that can affect its integrity. On this occasion, a visually beautiful wood was chosen as well as resistant to rot. Western red cedar was chosen.
However, for the use of wood outdoors, it is highly recommended that the wood comes already treated in an autoclave (vacuum/vacuum, or vacuum/pressure). Regardless of the latter, we must periodically (once a year, for example) give a surface treatment with a wood protection product. With this we will ensure a long life of the wood.
For this project, a frame was built into the ground to mark the locations of the four posts, prior to digging. This can be used for pergolas that will go over grass. On the other hand, it will be mounted on a stone floor, the structure should not be anchored directly to the ground. Instead, some stones must be removed, the foundation dug up, and the pieces reinstalled around the posts.
To anchor posts to a concrete slab, it is highly recommended to use anchors such as Simpson Strong-Tie from ABA66, or similar. In this way the wood of the post is never in contact with the humidity of the ground.
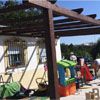
construction of the pergola
The first thing is to calculate approximately the time, materials and tools that we will need.
With regard to time, it was estimated that two days would be necessary for setting out, leveling and preparing the ground. One day for the excavation of the foundations of the posts, and their placement. And finally, a day for the assembly of the beams and joists.
However, depending on the means available and the level of skill and knowledge of each one, the time required may vary.
Renting an excavator saves time and effort, and also ensures that the shaft of the holes are straight and flat bottomed.
A 4 foot level has been used here to make sure the posts are plumb in both directions.
Once the posts are in place, they must be supported with provisional angles while the concrete sets. These temporary fastenings will only be removed when the beams and joists have been fixed in place.
The various parts are drilled and machined on the ground. This makes installation easier and greatly increases accuracy.
Steps for building a pergola
1st step
With a machine we drill the holes for the foundation. A 40 cm drill has been used, and 1 meter deep for the footings, or the depth necessary to hit solid ground.
This work can be done by hand but, obviously, if we use a machine, we will do it more quickly and restfully.
For drainage, pour 10 cm of gravel into the holes before installing the posts.

2nd step
Build a frame of 4 x 20 cm. Its inner corners mark the four posts.
We dig a small trench where the frame will be embedded, level the frame, and remove it to dig the holes.
Next, we put the frame back in its place of destination, adjust the posts and fasten them to the sides of the frame, leaving them plumb.

3rd step
After fixing the posts to the frame, we installed 4 x 10 cm brackets to the posts. These will hold the posts in proper position while pre-installation work is being done to raise the joists and block the posts instead of backfilling. Once the beams are installed, they will be removed.

4th step
As the length of the posts can vary, depending on the unevenness of the ground, in this case, once the posts have been installed, measurements have been taken from the frame upwards, and they have been cut. You can do this cut with a manual saw, but it is best to do it with a portable circular saw.
Now install a small strip about 16 cm down from the top of the post, which will serve to support the beams while we fix them.

5th step
We place the main beams in their location and fix them to the post with the through screws. We let the beam protrude up from the post a couple of centimeters. In this way we manage to eliminate the accumulation of moisture in such a delicate area, such as the heads, and on the other hand, to be able to install a wire system through which some type of vine or vegetation grows.

6th Step
Cut the joist tails on the floor to the proper length, and then mark their 18-inch overhangs.
Then we put them in place and fix them to the main beams with two screws about 7 cm long.
7th Step
Finally, to give greater stability to the whole, we will tie the joists together. To do this, we will use battens that we will screw onto the beams. The slats have been installed with a separation between each other of about 60 cm centimeters.

Source photos: PopularMechanics
Completed work. Now we only have to enjoy our pergola in good company.
Did you like this article? If the answer is yes, then share it with your friends.
You may be interested in seeing these other outdoor DIY items:

Installation of misting system |
Special wooden platform for exteriors |
Attached wooden pergola |
.


