Windows are one of the main sources of heat and cold losses in a home. Good insulation will increase the energy efficiency of your home and reduce your electricity and gas bills. To know how to insulate a window thermally and acousticallyas well as regulate the intensity of the light that enters through it, you just have to watch this step-by-step video tutorial.
Good insulation in your windows can reduce your annual energy consumption by between 25% and 50%. Having a double window or double glazing system helps to reduce this cost, but there are also a series of tips that will help you save:
- Check if the window closes hermetically and, if not, install a weatherstrip or adhesive rubber.
- Regulating the entry of sunlight is one of the simplest ways to keep the heat or cold in our home. The blind and a blind night and day will help you filter the rays as you see fit.
- The shutter box is another point of heat or cold leakage. To avoid this, seal the joints and place an internal drawer or gallery.
The following video tutorial will show you how to put these tips into practice in just a few hours:
Insulate windows with weather stripping
The most economical way to improve the insulation of a window is with the weather stripping installation, which are self-adhesive strips of foam, rubber or silicone that are glued around the window frame. In this case, I have installed tesamoll® PREMIUM FLEXIBLE Silicone on a sliding window, which has the following characteristics:
- It closes gaps between 1 and 7 mm, which can lead to energy savings of up to 40% thanks to thermal insulation
- Installs easily, cleanly and in just a few minutes
- It resists temperatures between -50º and 60º, as well as UV rays, which guarantees a duration of up to 15 years.
For its installation, just follow the following steps:
- Clean the window frame of dust and dirt to improve the adherence of the weatherstrip, as well as lower the blind for safety reasons.
- Stick a strip between the two sliding windows, right next to the windbreak brush. This brush tends to lose thickness over time and stops fulfilling its function, placing the weatherstrip will correct the mismatch.
- Fix the weatherstrip to the side slots of the frame. As it is usually a fairly narrow space, we can help ourselves with a spatula or wooden stick to introduce it.
- Cut the excess part with scissors.
Finally, it should be noted that as the chosen weatherstrip is transparent, the final result is practically invisible, but no less effective for that. In addition, this particular window overlooks an interior patio, so the placement of the weatherstrip also helps reduce noise from neighbors thanks to the sound insulation it provides.

Install a Night and Day blind
In order to benefit to the maximum from the effects of the sun we must regulate its intensity with the help of blinds, curtains or blinds. Too much sun in the summer will increase the temperature of the room, but it will also help warm it up in the winter. For this reason, the installation of a blind can be very advantageous when insulating our windows.
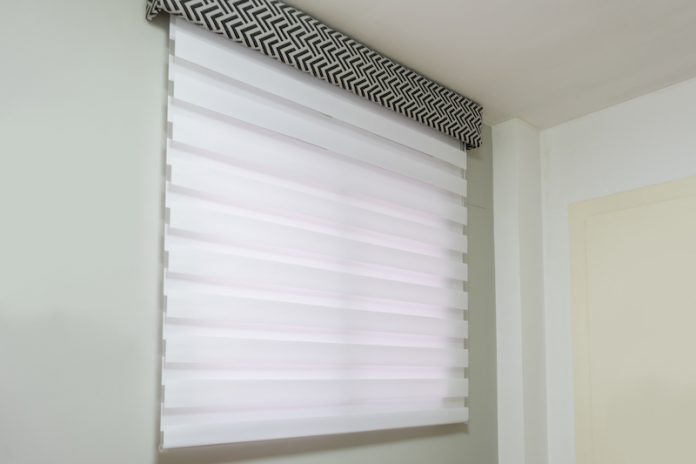
Personally, I have chosen the Night and Day Duolux roller blind from Stor Planet because it is a very decorative and practical blind. It is made up of horizontal bands that are translucent and others that are opaque. Both can be interspersed by activating the chain to control both the passage of light and our privacy. In addition, its installation is very simple since an instruction manual and the necessary elements for its fixing are attached. The steps to follow are the following:
- Mark the place where the brackets will be fixed, to drill and then screw them. The fixings can be screwed to the ceiling or to the wall, I chose the latter because my ceiling is made of concrete and it is more complicated to drill.
- Insert the top rail of the blind into the brackets. A “click” will be heard when it is properly attached.
- Screw the chain to the wall so that it is stretched, but not too tight. It is a child safety system, since by fixing the chain we prevent children from getting entangled with it and thus prevent possible accidents.

Make a gallery to cover the drawer of the blind
The shutter box is one of the places where more energy is lost and more noise enters. for a Hermetic closure Ideally, place polystyrene panels or sheets inside the drawer. On the other hand, an interior gallery or drawer will also help reduce the entry of drafts, in addition to decoratively hiding the mechanisms of the blind or the curtain rod. To build a custom-made gallery you must follow the following steps:
- Cut a piece of wood that loosely covers the height and width of the drawer. In my case I have used an OSB board 150 cm long and 20 cm wide, as well as two 20 x 7 cm pieces for the sides.
- Attach foam or cushion padding with a hot glue gun such as the Salki 60W Advance that is part of your new system Comfort System and that includes guns and tails. In this way, all the guns in the range have an anti-burn nozzle, are ergonomic and stable, and the glues have a self-dispenser, XL sticks and are of high quality (Manufactured in Spain). These features make it ideal for multiple DIY projects.
- Wrap the board with the fabric and adhere it from the back with the silicone gun. Line the sides of the gallery in the same way.
- Screw the sides to the front with metal brackets and place some hooks to hang it.
- Drill holes in the wall on each side of the shutter box to insert some hooks and hang the canvas gallery from them.

After all these steps, the insulation of the window will have been improved and it will present a much more decorative appearance.

What did you think of this tutorial for insulate a window and install a blind with a canvas gallery? I hope you can put it into practice to improve the energy efficiency of your home. Do not forget that you will find many more guides and tricks on DIY and decoration at
Project carried out in collaboration with Mi Hogar Mejor


