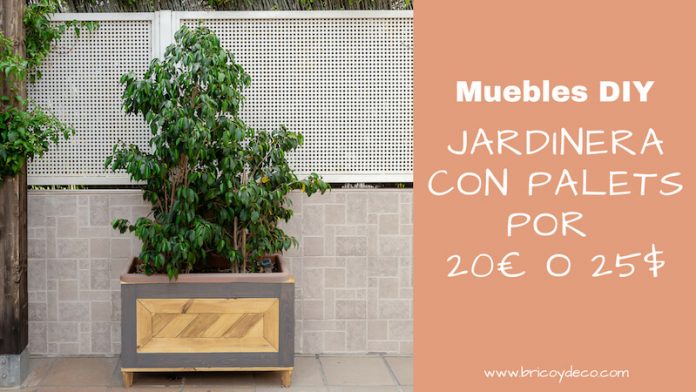
Do you need a planter for your terrace or garden? Would you like it to be original, but within your budget? If so don’t miss this step by step tutorial to make a planter with pallets. It will stand out wherever you place it and it will cost you much less money than you imagine.
When they commissioned me to make this planter, they made it clear to me that they wanted it to have the warmth of wood, but at a reasonable price. For my part, I wanted it to stand out for its original design and to be different from the classic terrace or garden planters. The keys to achieve this were:
- Use pallet tables to lower the cost
- Make a geometric design with miter joints
- Protect and decorate the wood by combining different shades of lasur so that it does not lose its natural charm
Next, you will be able to verify that it is not necessary to be an expert handyman to be able to make a planter with pallets. If you try it you will save yourself a lot of money.

Materials to make a planter

Planter with pallets step by step
The following video tutorial shows you the whole process explained step by step to make the planter:
In summary and so you don’t miss any details:
- Disassemble the pallet. You can do this with a crowbar, but it’s much faster with a saber saw.
- Condition the boards. To get a good finish I recommend brushing the pallet slats. In this way it is possible to smooth the surface and eliminate imperfections, humidity, etc. Another option if you don’t have a brush is to sand them.
- Cut the slats to assemble the frame of the planter with the miter saw or with a handsaw. Taking into account that the pallet boards are 7 cm wide, I have cut 8 boards of 40 cm in length for the corners, 4 of 66 cm for the front and back and 4 of 25 cm for the sides.
- Assemble the structure. For this I have used a template to drill and screw diagonally, but you can also use fixing brackets. In this link you will find a guide on the Kreg Jig R3 jig.
- Screw the plywood to the inside of the structure.
- Cut the boards of the central part at a 45º angle. Next, fix them with carpenter’s glue and a nailer.
- Make the legs by cutting a 10 cm long board with the ends at a 15º angle and then tapering diagonally.
- Assemble a rectangle with pallet boards to fix the legs to the lower part and another with 2 cm wide strips to finish off the upper part.
- Drill several holes inside to be able to adjust the height of the base and adjust it according to the size of the pots. I have used a guide to drill, but it can also be done by marking the holes with a pencil.
- Place the base. To save costs I have used the leftovers of some parquet boards.
- Protect and decorate the wood with lasur.

How to protect and decorate the planter with lasur
As I mentioned at the beginning, one of the keys to this DIY project has been protect and decorate wood with lasur. Lasur is an open-pore wood protector made of acrylic resins. This feature makes it possible to waterproof the wood and protect it from the elements, but in such a way that it can regulate its interior humidity. In this way, it is prevented from cracking as it happens with some varnishes.
If you want to know more about this wood protector, you just have to consult this guide on lasur.

On the other hand, from the decorative point of view, the lasur highlights the beauty of the wood since it does not completely cover the grain. It also has a wide variety of colors. In fact, in this specific case, three different shades of lasur Cedria have been combined:
- Pacific Lasur Pacific Gray. This semi-matt lasur gives a tone to the wood similar to that of woods exposed to typical Pacific weather. It is only necessary to apply a single layer to protect the wood, but I have applied three to intensify the effect and create a greater contrast with the interior of the planter.
- Dekor Lasur oak color. It is recommended to apply two coats so that the wood is perfectly protected, however I have applied a single coat on the internal decoration of the planter. Next, I applied a second coat only on a few pieces to intensify the tone and create a sense of depth.
- Sol Lasur colorless, which contains sunscreens to increase the resistance of outdoor wood. In this way, I have ensured that the planter was perfectly protected to be outdoors, but without losing its naturalness.
I would also like to point out that all three products are water-based and do not have any type of odour. In addition, Cedria Dekor Lasur has achieved the Carbon Footprint certification. This fact means that it is an ideal product for those who want to reduce their ecological footprint and reduce the consequences of climate change.

Lasur tips and tricks
When applying the lasur and obtaining a good result, I recommend following these tips and tricks:
- Lasur should always be applied to untreated wood. If it has been previously painted or varnished, it will have to be stripped or sanded.
- Do not shake the lasur but stir it with a stick before application to prevent bubbles from forming.
- Although lasur can be applied by brush, roller or spray, it is preferable to apply it by brush on untreated wood. You will achieve greater impregnability and protection in this way.
- Extend the lasur always following the direction of the wood grain.
- Work quickly and in small areas as it dries very quickly. This way you will avoid leaving fences or brush marks.
- Avoid applying it in hours of maximum solar radiation so as not to harm the hardening of the resins.
- Respect the recommended repainting time to ensure a good finish.
- It combines colored and colorless lasur to provide different shades and finishes to the wood, but with the proper protection.
- When you have to reapply lasur due to degradation due to time, clean the surface with pressurized water and the next day sand the wood to open the pore.

did you like this planter with pallets? Have you ever made a planter for your terrace or garden? In any case, I hope that this DIY project has inspired you and has been useful. You can find many more DIY guides and tutorials at


