


Don’t you know what to do anymore? remove mold from silicone gaskets? Do you clean it but it comes back after a few weeks? Here you will find the keys to keeping your bathroom free of mold and damp for a long time.
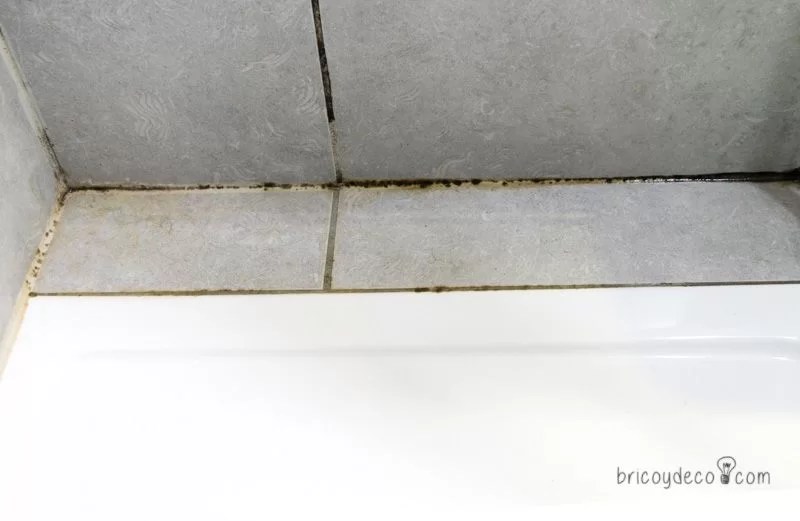
The bathroom is often a breeding ground for mold. The main reason is humidity due to water condensation that is generated daily. This fact encourages mold to end up settling on shower curtains, mats, tile joints and silicone joints. Precisely, mold grows very easily on silicone gaskets because it is a flexible material that retains moisture.
What is mold and why does it like to live in my bathroom so much?
To attack the root problem and prevent it from reappearing after a few weeks, it is essential to know that mold is a fungus that grows mostly in humid and dark environments.
Having mold in the bathroom is not only an aesthetic problem, but it can also affect our health. On many occasions, he is the main person responsible for allergies, respiratory problems, irritations, etc.
There are several reasons that favor the appearance of mold in the bathroom:
- They are usually small spaces with little natural lighting.
- On many occasions they lack windows and ventilation is limited to a small grille.
- It is easy for moisture and water vapor to concentrate.
- The products that are usually used for our hygiene (gels, oils, etc.) also serve as food for mold.
How to solve the mold problem?
Sometimes it will be enough to remove the mold from the silicone joints, but in others it will be necessary to renew them to eradicate it.
Remove mold from the bathroom step by step
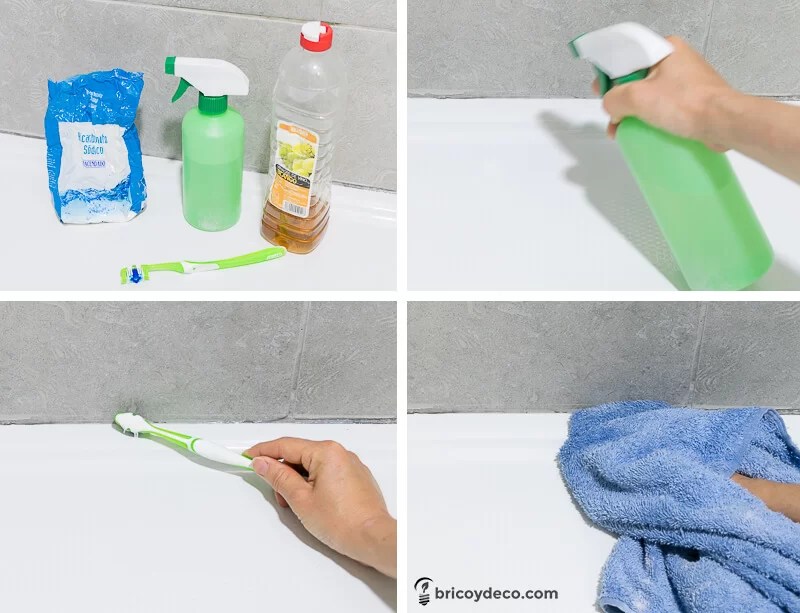
To get rid of mold on silicone joints, it is not enough to clean it, but we will also need a product that kills it. There are many fungicides on the market such as chlorine and ammonia, but others can also be used equally effective natural remedies. In these cases, vinegar and bicarbonate are your great allies (do not miss more uses of bicarbonate in this link).
- Fill 2/3 of a spray bottle with white vinegar and add a couple of tablespoons of baking soda.
- Wait for the reaction that occurs when mixing both ingredients to finish and close the container.
- Spray on the silicone in the shower or any other affected area and leave it to act for about 30 minutes.
- Then rub the area with a toothbrush and rinse with hot water.
- Do not forget to dry everything with a cloth or towel since it is very important to avoid accumulations of water.
Change the silicone of the bathroom step by step
However, it is not always possible to clean mold from the joints of the shower and bathtub, especially when it has been installed in it for a long time and the sealant is not adequate. In these cases, the only possible solution is to renew the gasket with a mold resistant silicone.
In my case, I have used Penosil Mold-Free silicone, since it is specially formulated for humid spaces. Among its features are:
- It contains an additive that protects and keeps the sealing of the joints free of mould.
- It can get wet within half an hour of placement.
- It resists cleaning products and detergents, maintaining its color even if you use hair dye in the shower.
- It incorporates “as standard” a practical spatula that greatly facilitates the placement of the silicone, since it allows a perfect finish even if you have little experience in this type of task (as is my case).
In the following video you will see step by step how I renewed the silicone gasket of the shower:
[Actualización] How to renew silicone easily and simply
Penosil has recently added a new accessory to its silicone renovator kit that makes the process even easier. this accessory allows to remove the previous silicone easily and quickly as you can see in the following video:
How to keep silicone gaskets mold free
No matter how good the silicone used is, it is advisable to carry out a little maintenance so that the mold problem does not recur:
- Dry the shower after using it, you can help yourself with an old towel that you have at home.
- Once a week, spray the walls of the shower and bathtub with the mixture of vinegar and baking soda that you have used to clean the joints in depth.
- Ventilate the bathroom frequently and use dehumidifiers if you don’t have windows.

Summarizing…
For replace the silicone gasket of the shower or bathtub and achieve a perfect finish Even if you have never done it before, you just have to follow these steps:
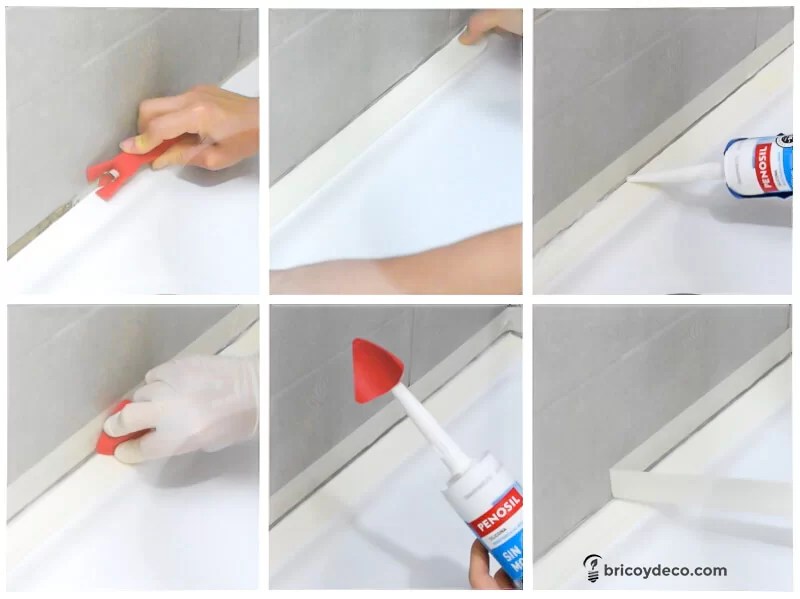
- The area must be clean and dry. It is convenient that about 12 hours have passed since the last time you used the shower or bathtub.
- Eliminate moldy joint. The accessory included in the Penosil silicone renewal kit will make your task much easier.
- protect the area. Next, place masking tape on the surface to delimit the width of the joint.
- Apply the new mold resistant sealant. Use a gun to place the silicone tube and apply it on the joint.
- pass the spatula. Then pass the spatula over it to remove the excess silicone. To do this, place the central relief between your index and middle fingers and support it by touching the wall and floor. You don’t have to press too hard, it’s enough to give a single pass to drag the excess silicone cleanly and without staining your fingers!!!
- Use the spatula as a stopper. In this way you will prevent the excess silicone from drying out and it is always ready for a new use.
- Finally, remove the masking tape to obtain a perfect and mold-free silicone gasket for a long time.
By following these steps and using a special anti-mold silicone sealant, you will get remove mold from silicone gaskets and the rest of your bathroom once and for all, saving time and money. Finally, remember that mold is not only an aesthetic problem but also an unhygienic one that can affect your family’s health in the short term.
If you liked this post, you can see many more DIY guides and tricks for your home at .
[elfsight_youtube_gallery id=»1″]


