

Personalize your notebooks with this article dedicated to crafts by combining them in part with the creative recyclingwhich we like so much, following the trend of “diy” Or what is the same, “DO IT YOURSELF”.
If you have been following us for a long time, you will have noticed that we love to share with you easy crafts step by step, well, with this video tutorial we are going to teach you, step by step, how you can tune up your notebooks, notebooks and folders, personalizing them in a very original and unique way. Your folders They will draw attention wherever you go.
In addition, every time your jeans break and there is no possible solution, you can give it a second life recycling it either reusing it in such a way creative.

You can use the part of the pants that you like the most. Such as seams, front pockets, only the small pocket in the case of small notebooks, back pockets, etc, etc.
In our case, we have used a back pocket for the cover. And for the back, a part of the leg, taking the seam along the entire length.
The pocket, in addition to being very original, is very useful for carrying pencils, pens, markers, notes,… even the mobile.
Video to personalize your notebooks
Is there any part of the video that is not entirely clear to you?
Below we collect both the necessary materials and the steps to follow.
Materials
To perform the craft proposal we will need the following materials:
- The notebook that we are going to tune.
- Jeans. Without they are to recycle, better.
- Vinilic glue.
- Brush.
- Pliers.
- Pyrographer.
- Scissors.
- Pinking shears (optional).

Procedure to personalize your notebooks
Come on !! Let’s go to the mess!!
First step
The first thing is to disassemble the notebook. With the help of the pliers we remove, carefully and without damaging, the wire spiral.

Second step
We choose the part of the pants that we are going to use. As we have said before, we have chosen a back pocket and a part of the leg.
We calculate the amount that we will need. And we cut so that it is left over.

Third step
Now we will clean the fabric to be used. So let’s undo the stitching that we don’t need and, in this case, we remove the trevillas so that they don’t get in the way later.
We have to proceed in the same way with both pasta.

Fourth step
With the help of a brush, apply the vinyl glue all over the outer surface of the paste.
So that it does not warp, it is important that the pasta is made of strong cardboard. Keep this in mind when buying the notebook.
Next, we glue the fabric. Stretch well, so that there are no wrinkles or bags.

Fifth step
Next, we finish trimming the fabric leaving about 2 fingers on each side.
Using pinking shears will prevent any cuts you make from fraying prematurely.
If you don’t have any, use normal scissors, don’t worry as we will later protect these areas with cardboard.
We will cut the corners of these flaps at 45º, in this way when folding them on the inside of the lid, they will not be mounted one on top of the other.

step six
Now we apply glue on the flaps and stick on the inside of the lid.
You don’t have to work too hard. Then we will cover a large part of the inner face with a cardboard.
Now, before it dries, we remove the excess glue with kitchen paper or toilet paper.

Well… It’s already taking shape.
Seventh step
Now we are going to proceed in the same way with the other pasta.
This time it is going to be somewhat more uncomfortable to work with since, to take one of the back pockets, we are going to have to include the waistband, which is double, with its corresponding stitching.
In fact, to cut this part we will have to use normal scissors, since the serrated ones cannot handle this thickness of fabric. But there is no problem. You will see.
Eighth step
Now we stick a white cardboard inside the pasta.
With this we will achieve two things:
On the side, hide the flaws and irregularities of the fabric.
And on the other and more important, to avoid that when drying the glue it causes the pasta to curve. By applying glue on both sides, the tension that occurs when drying is counteracted.

This is a detail of the union.

Nineth step
Now we are going to put the paste on some object that removes it from the work table, leaving the part that we are going to drill in the air. In this way we will avoid burning the table with the pyrobrader.
To guide us, we put in its position a sheet belonging to the notebook, and hold it with some kind of adhesive tape. We have used two pieces of duct tape, which has a very good grip.
Now, we just have to go drilling all the holes with the pyrographer.

We proceed exactly the same with the other pasta.
As you can see in the video, it is now more difficult to drill. This is because we are not doing it on the side that was already stamped, but on the other. So, in addition to the fabric we are drilling the paperboard.
To avoid this, when gluing the fabric it is good to mark the correct side in some way.
tenth step
Now we only have to reassemble the notebook. But don’t be fooled by appearances, it may be one of the most complicated parts.
Why? Well, because when lining the two pastes, we have made the notebook thicker, therefore the diameter of the wire spiral, now it is more forced than before.

We are going to line up the holes in the paste and the paper, and we are going to hold the whole together with 2 or 3 wires.

eleventh step
Now we start to introduce the spiral.
If necessary, help yourself with precision pliers.
It is very possible that it will cost you more work than you expected. Do not give up! Arm yourself with patience and look for the best way to achieve it.

Remember: whatever you do, there is always a way to get it.
You also have websites, such as Wunderlabel, that make your DIY task easier by providing you with products related to this activity.
Well, we are coming to the end.
Twelfth step
We hold the tail end, leaving it in its original state.
We finish introducing the spiral, and fold the other end in the same way.

It took a lot of work, but it was worth it, don’t you think?


You sign up? We suggest you customize your liveries and send us a photo of the result. We will share it on our social networks.
If you liked it, share it with your family and friends.
You may be interested in seeing these other related articles:
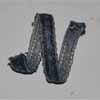
Make bracelets by recycling jeans |
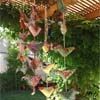
Recycling decorative birds |
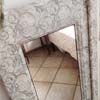
Transformation of an old shutter |
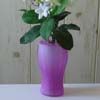
Make original vases with some simple balloons |
rope ceiling lamp |
bricoblog


