

Today to update the bathroom it is not necessary to have a large budget. With a little skill and inspiration, great results can be achieved. With this practical guide on how to reform the bathroom without worksyou will see that with a small investment you can make it more functional and contemporary.
Although they are necessary, doing works at home is usually a nuisance. In addition to dust and noise, in the case of the bathroom, we must add the fact that it may not be able to be used for a few days. For this reason, it is something to think about and plan carefully.
In 2013, the first renovation of the bathroom was carried out in which the shower tray was replaced by a larger one, the coating of that area was renewed and a new floor was installed. In addition, the tiles were painted, the bidet was removed and the toilet and sink cabinet were replaced. In this post you can see the whole process.
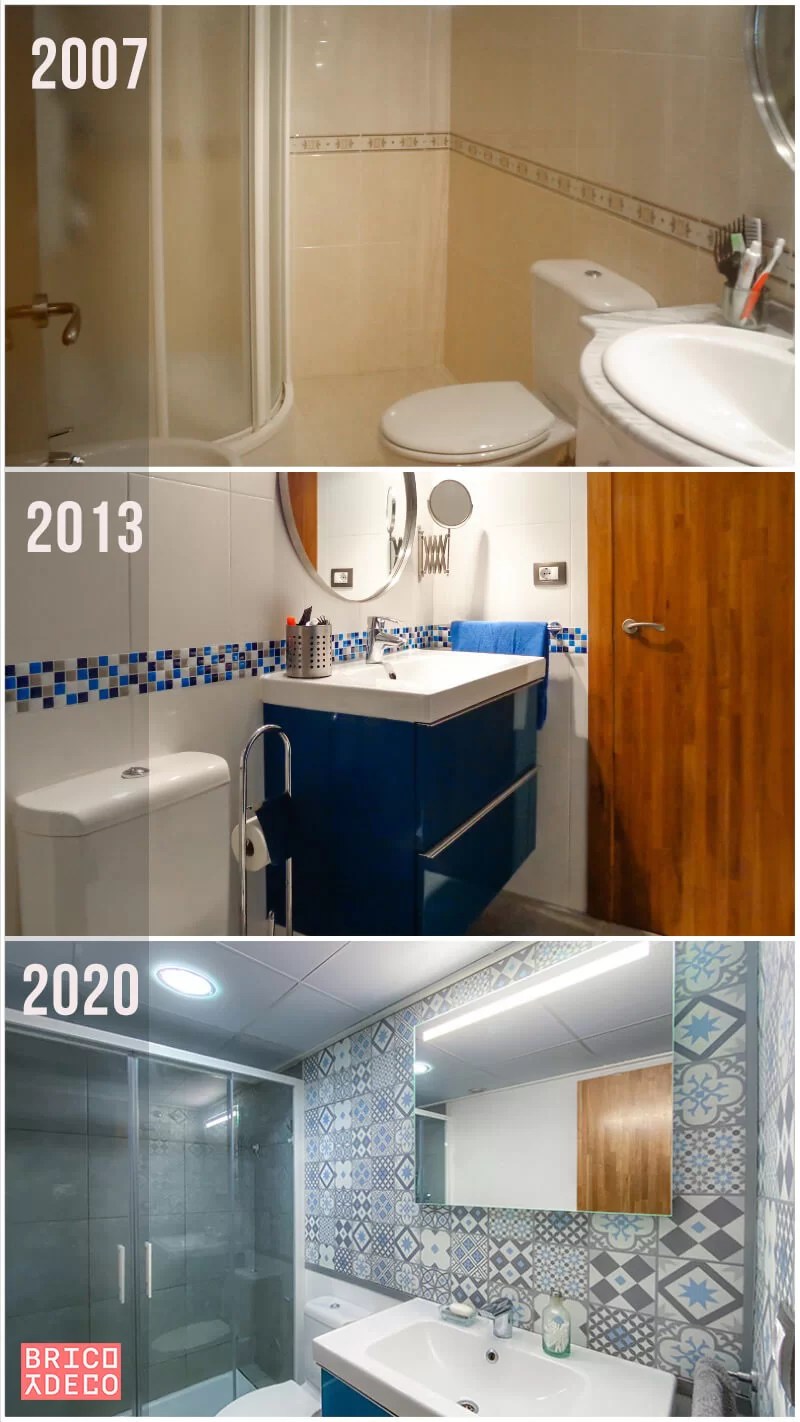
With this first reform, the change was radical, but time and daily use do not forgive and 7 years later the bathroom needed a new update. For this reason, I decided to reform the bathroom again, but this time without carrying out works. The result and all the steps I followed can be seen in detail in the following video tutorial:
Keys to a low-cost bathroom renovation
So that the budget does not skyrocket when it comes to renovating the bathroom without works, a series of aspects that are detailed below must be taken into account.
It is better to maintain than to have to change
Carrying out proper maintenance prevents deterioration in the structural elements of the bathroom and, in addition, can rejuvenate it. In this sense, it will be necessary to check and eliminate rusty elements, mold and embedded dirt.
In this particular case, some of the metal guides in the false ceiling had slightly rusted. In addition to being an aesthetic problem, oxidation causes metal corrosion and deterioration.
To stop it and avoid having to replace the guides with the expense that this entails, Owatrol Oil has been used. This versatile oil seals the metal and protects it from corrosion. Its application is very simple, you just have to follow the following steps:
- Sand to remove any peeling paint or partially detached metal parts.
- Clean with cleaning alcohol or a non-greasy solvent.
- Apply Owatrol Oil impregnating the area well with a brush.
- Allow 24 hours to elapse before painting the profiles.
In this way, the roof will look like new without having changed it, but the most important thing is that we will prevent corrosion from causing irreparable damage.

Control spending on materials
When it comes to renovating the bathroom cladding, there are different more or less economical solutions such as vinyl tiles or tile paint. Tile only the wet areas instead of the entire bathroom, can lead to great savings. For this reason I chose to put vinyl tiles only on the top of the wall where the sink and toilet are and paint the rest of the walls.
To fix them I have used the Quiadsa Brik-cen MS-Transparent sealant, which is a colorless multimaterial sealant, without any type of odor and special for wet surfaces, so it is ideal for the bathroom. It can be applied both on the tile and directly on the wall, although in any case the pieces will have to be held for a few minutes to prevent them from sliding due to their weight.

Low cost functionality
Renovating the bathroom goes beyond an aesthetic improvement, it must also increase its functionality. In this sense, a hygienic shower kit has been installed connected to the toilet to be able to use it as a bidet and the existing mirror has been replaced by one with integrated LED light.
Arco’s Twin valve and hygienic shower kit adds an additional service with the same water intake, since it allows 4 positions so that the water flow can be turned on and off as we see fit. For example, connecting the hygienic shower to the toilet tank can act as a bidet. For its installation, the following steps must be followed:
- Close the water stopcock and empty the cistern.
- Unscrew the existing valve and place a towel under it because there is always a little water left in the circuit.
- Wrap Teflon thread around the valve and screw on.
- Connect the toilet outlet to one of the pipes by screwing it in and tightening it with a wrench.
- Place an adapter in the other conduit and tighten with an allen key.
- Connect the hose to the faucet and screw on the bracket.

On the other hand, a mirror with integrated LED lighting It will facilitate our daily cleaning tasks, since the LED light provides a series of added advantages:
- Front light and without shadows because the lighting is more homogeneous.
- They give the space a clean and relaxing atmosphere.
- They are low consumption and favor energy saving.
To install a mirror with integrated LED light, you only have to connect it to the light point on the wall and make the necessary holes to hang it.

Tips for having a magazine bathroom
With these extra tips you will ensure that the result of your bathroom renovation looks like the one you can see in any decoration magazine:
- Use wood for the furniture, as it will give it a more welcoming air.
- A bathroom with style implies taking risks in its decoration, for this it opts for bright colors in accessories, towels and furniture.
- Choose neutral or cold lighting (equal to or greater than 4000k), which offer good color rendering and low heat emission.
- Place some plants to provide life and a natural touch to your bathroom.
- Keep everything organized with accessories and internal dividers in the drawers to always have your personal hygiene products at hand.
I hope this practical guide on how to reform the bathroom with little budget inspire you and help make yours update a success. Do not forget that you will find many more guides and tricks on DIY and decoration at
Project carried out in collaboration with Mi Hogar Mejor


