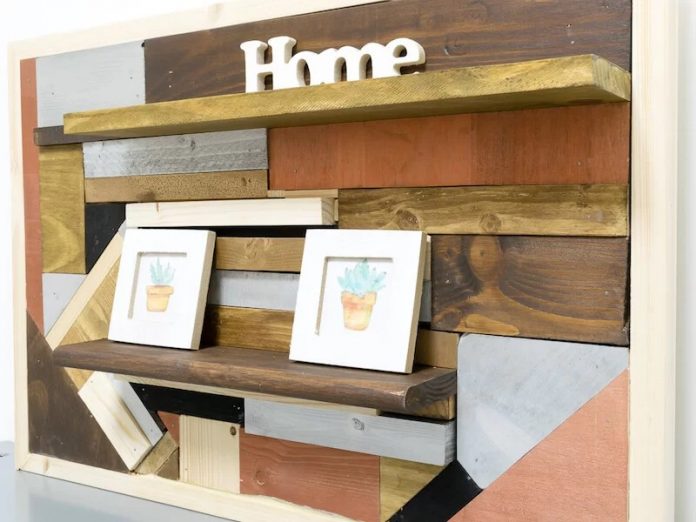
Do you have leftover pieces of wood and do not know what to do with them? This video tutorial shows you how to take advantage of leftover battens and boards to make a shelf with reclaimed wood. A decorative and practical DIY project that cannot be missing in your home.
When you do a DIY project with wooden slats or boards, it’s common to have leftovers. Since you never know what they can be used for, what I usually do is accumulate them in a drawer that I have in the workshop. They can always be useful to complement other jobs, to test paints, varnishes, etc.
The truth is that I had wanted to create a decorative shelf with them for a long time, but I never found room to do it. For this reason, when Ginés from the YouTube channel Ginessot asked me to participate in the challenge #RecyclingChallengeI didn’t hesitate for a minute.
This challenge was launched a few weeks ago on different DIY YouTube channels and consists of making a DIY project with recycled materials, so… what better opportunity to finally make my shelf?
Materials
The materials that I have used for this DIY project have been:
- Recycled wood from scraps of slats, boards and pallets
- melamine board
- Spray paint
- tint varnish
- mounting adhesive
- nailer
- miter saw

How to make a shelf with recycled wood step by step
The following video tutorial shows you the whole process:
https://www.youtube.com/watch?v=KaOuPPdc4n4
In summary, these are the steps you have to follow:
- Try to square all the pieces on the melamine board. To do this, you can arrange them both horizontally, vertically or diagonally.
- Use the miter saw to square the pieces and make them all fit together.
- Once you have your puzzle ready, you have to paint the pieces one by one. For this project I have left some pieces of wood untreated and I have combined them with others painted with spray paint in metallic tones (gold, silver and copper) and varnish-stain in oak and wenge colors.
- As the pieces dry, use mounting adhesive and a nail gun to attach them to the melamine board.
- Lastly, make an outer frame with untreated wood slats to hide the edges of the melamine board.
It’s a DIY project that takes time, but it’s worth it when you see the end result.

recommendations
Finally, here are a series of recommendations to get a good job.
- The greater the difference in size, shape and thickness between some pieces and others, the more decorative the shelf will be.
- Contrast colors for greater visual impact.
- Once you have assembled the puzzle, I recommend that you remove a piece, paint it, wait for it to dry and put it back. If you remove them all at the same time to paint them, it may happen that they do not fit you again. In addition, this way you will better visualize how to combine the different colors.
- The use of the nailer is not essential, only with the mounting adhesive the wood will be fixed. However, it speeds up the work a lot, since the adhesive reaches its maximum hardness after 24 hours.
what did you think of this idea to make a shelf with recycled wood? I hope it has inspired you to take advantage of leftover wood from your DIY projects. You can find more upcycling ideas and many more DIY projects at


