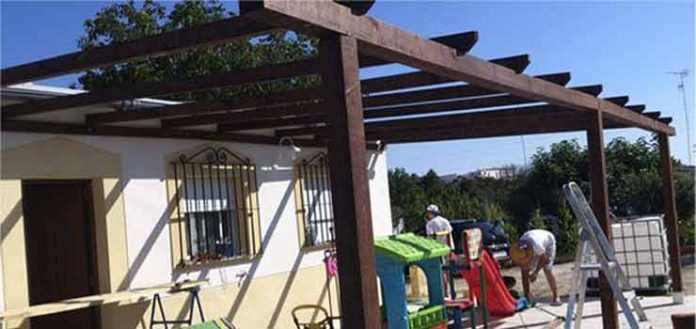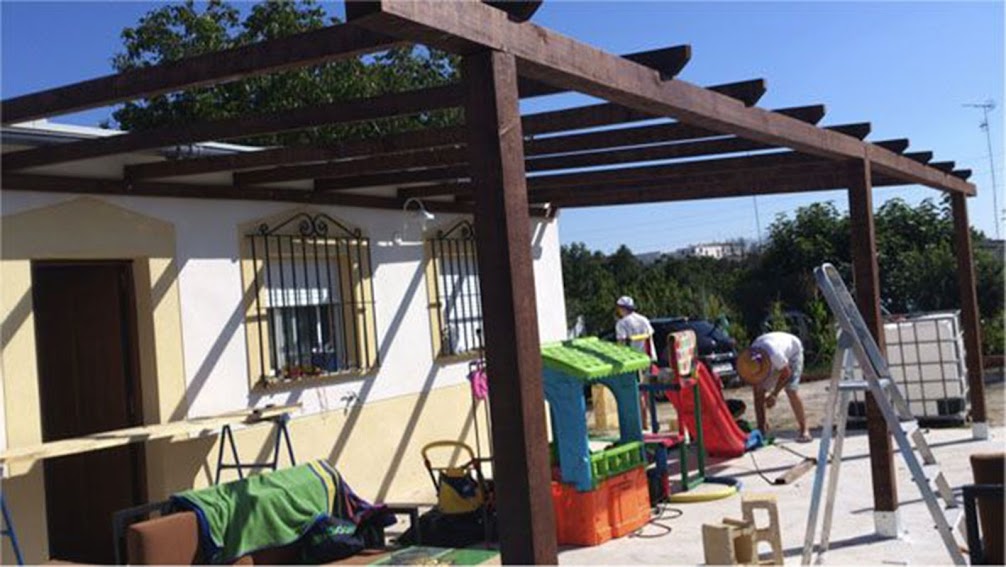
A wooden pergola together with an awning are the ideal complements or even one of the fundamental elements for a garden or terrace. In addition to providing some protection from the sun in summer, and from rain in winter, they can also provide great beauty, thus being an added value to outdoor decoration.
In this article we share the excellent work that our friend Kiko Calvillo has done.
It shows us, step by step, how to build a wooden pergola. It also indicates the price of the different materials, to serve as a guide.
The end result is flawless and impressive.

However, before getting into the matter, if you do not feel capable or simply do not feel like doing it yourself, you always have the option of having the help of a professional to build and install your pergola.
I personally am in love with wood, since I see a warmth and beauty in it that few materials have, at least in my opinion.
For this reason and continuing with the pergolas, I have located the PergoMadera company, which works with a wide variety of wooden structures and installations, among which are, of course, wooden pergolas. Below I show you some of the pergola work they have done.
Wooden pergola in walnut color.
Lasur pine wood pergola.
White wooden pergola.
Origen de las tres fotos: PergoMadera
.
How to make a wooden pergola
Well, continuing with the construction of a cheap pergola, let’s see the work done by Kiko Calvillo.
Necessary materials
- 5 wooden beams of 11 x 11 x 450 cm. Three will be the posts and two for the front beam on which the rafters will rest. (In the end I have 1 and a half left over that I will use to expand where the pool is).
- 11 wooden beams of 5 x 10 x 450 cm.
- Two will be the beam that goes on the wall on which the rafters will rest on the wall.
- 3 Bases 12×12 for pergola posts. (11×11 would have been better as the beams but I haven’t found them).
- 8 16-inch plugs for a chemical plug to attach the two beams to the wall and 8 10-inch rods with a washer and nut to attach it.
- 12 Barraqueros screws of 10 to take the bases to the concrete floor.
- 10 and 16 bit for concrete.
- Chemical wad pot.
- 8 small squares to give strength to the beam structure with its screws.
- 4 8×200 screws to join the beam with the front.
- 18 screws 8×160 to join rafters to structure.
- 12 4.5 cm screws to fix the posts to the floor fittings.
- 60 and 220 sandpaper.
- Two rollers to paint.
- Protective paint for wood.
The wood that we are going to use is Vizcaya pine which, for me, who does not understand wood, was one of the cheapest. The cubic meter of wood cost €350 + VAT, so the wood has cost us a total of €215, to build a pergola 8 meters long by 4.3 m wide, taking into account the fall. (As I have left over, I am going to extend the facade to 12 meters, and I will need to buy 4 more rafters).
The rest of the materials cost us another €140, a total of €355 for a piece of pergola, more than five times less than what they charged me for making it. I suppose that the wood would be of a different type and would adapt better, but we were looking for a cheap pergola to have shade in the summer.
preparing the wood
The first thing we have done is sand all the wood with 60 grit sandpaper to remove imperfections.
Afterwards, we have cut the rafters to give it a little final shape. For this we have made a template with cardboard so that they all had the same shape.
We have cut the columns to 2.25 meters and we have painted all the wood with protective exterior paint.
Construction of the wooden pergola
The first thing we have done has been to prepare the strips that will go to the wall and hold the rafters.
To do this we have made 4 holes with a 12 mm drill bit for wood and we will fix them to the wall with 16 mm plugs and 10 mm threaded rods with a washer and nut, all fixed with a chemical plug so that they hold the weight well.
Then we prepare the supports of the pillars. To do this, we drilled the concrete with a 10-gauge drill bit and fastened them with 10-gauge “barraquero” screws (or whatever they are called, they open when tightened) and they are fixed to the ground.
Now we begin to put the pillars trying to make them as vertical as possible, although when we put the front horizontal beam and the rafters it is when we must leave them well.
To fix them to the support we use 4 4.5 cm wood screws with washer.
Now we have to mount the front beam and fasten it to the verticals with 8×20 screws (one screw per beam and in the central one we join two, one to each). They were a bit special screws. We put the photos. To help them fit in we drilled holes in the front beam with a 5mm drill bit.
Then we start with the rafters that will overlap the beams that we have fixed to the wall and the front beam that we have just placed on the posts. We used similar 8×16 screws and drilled these out as well to help out a bit.
And we began to distribute the rafters. We distance them about 95 cm from each other approximately.
And we finish the job. An 8 x 4.5 meter pergola, for approximately €360.
It remains to cut the front to shape the finish, we did not want to cut it before to see how it would look, sand everything again with fine sandpaper and give another coat of paint to protect the wood well.
When the summer is over and the pool is disassembled, we will finish the missing part.
Total time spent cutting, sanding and painting has been around 6-7 hours and assembly another 4-5 hours, so in a day or two anyone can build themselves a pergola with the help of a few friends, fresh beer to endure the heat and barbecue to regain strength.
Thanks to Manolo, who burned himself without a shirt, to Ismael who was cute with his hat and to Antonio who ended up with his neck screaming for snow, for setting up the pergola, because I didn’t give a damn with the photos at the end.
Video
Here is a video of the whole process:
Origin: kreakawa
If you want to know more about building a wooden pergola, you can see this other article building a pergola.
.


